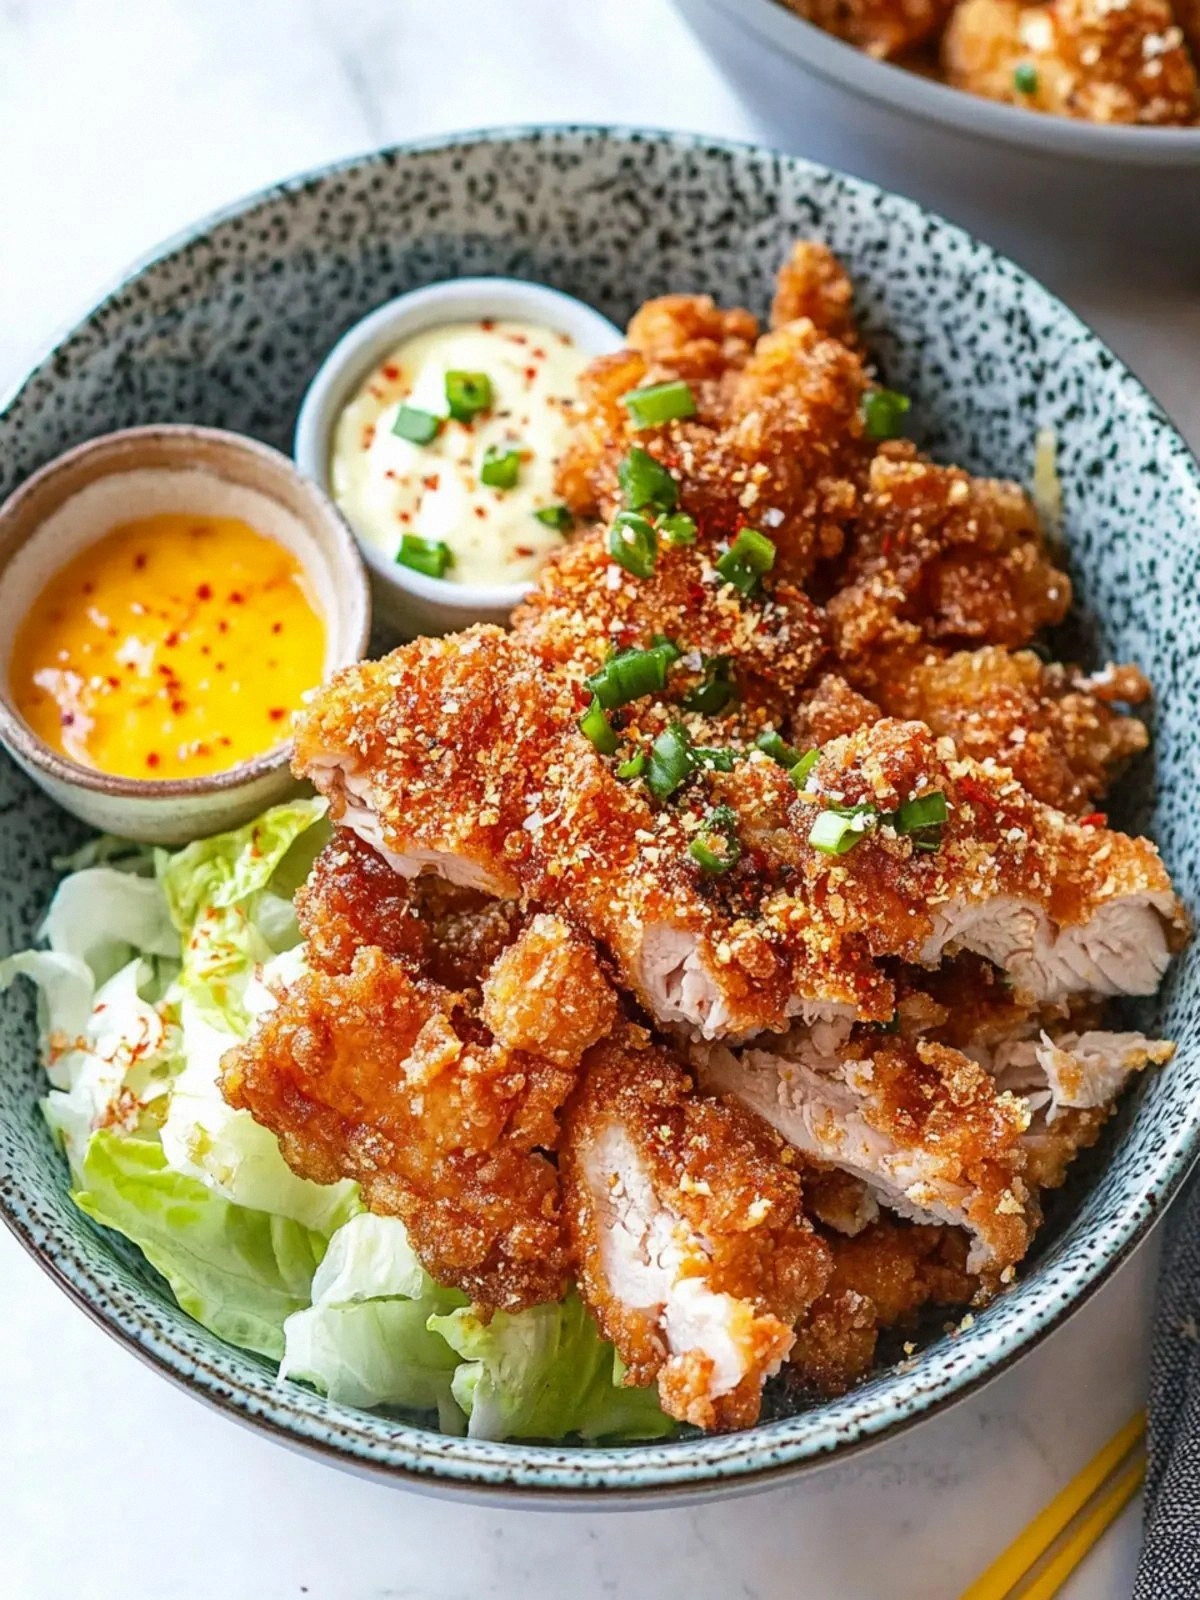
Picture this: a cramped, neon‑lit kitchen, a midnight craving for something that feels both exotic and comfortingly familiar. I was in the throes of a culinary crisis, staring at a bag of frozen chicken thighs that had been sitting in the freezer longer than a semester. My friend dared me to whip up a Japanese‑style fried chicken that could make even the most seasoned ramen aficionado swoon. The result? A batch of crispy chicken karaage so irresistibly crunchy and juicy that I almost didn’t let anyone else taste it. That’s the spark that brought this recipe to life.
When I first cracked the first bite, the aroma was a seductive blend of caramelized garlic, warm ginger, and a whisper of soy sweetness that seemed to dance across the room. The sound of the chicken sizzling in the hot oil was like a drumbeat, promising a crunch that would crackle with each bite. The texture was a paradox—outside a golden, blistered shell that shatters like thin ice, inside a tender, melt‑in‑your‑mouth tender thigh. The flavors were layered: a salty, umami base from the dark soy, a hint of honey’s caramel notes, a sharp bite from the ginger, and the subtle warmth of sake. The finish left a lingering, savory aftertaste that made my tongue tingle.
What makes this version stand out from every other karaage recipe out there? I’ve taken the classic technique and added a few game‑changing twists. First, the dual coating of potato starch and flour creates a light, airy crisp that doesn’t settle into the oil like a heavy batter. Second, the use of dark soy sauce instead of regular soy gives depth and a richer color. Third, the infusion of honey adds a delicate sweetness that balances the saltiness without overpowering it. Fourth, the 1‑minute marination at 4°C lets the flavors permeate the meat without turning the chicken mushy. Finally, a quick rest after frying restores the juices, ensuring each bite is as juicy as it is crunchy. I dare you to taste this and not go back for seconds.
If you’ve ever struggled to get that perfect, restaurant‑quality crunch at home, you’re not alone. I’ve been there—watching the oil bubble, the batter crackle, and the chicken slowly turn from pale to golden. I’ve learned the hard way that timing, temperature, and the right ratio of starch to flour can mean the difference between a soggy mess and a crispy masterpiece. This recipe is hands down the best version you’ll ever make at home, and I’m about to walk you through every single step. By the end, you’ll wonder how you ever made it any other way.
What Makes This Version Stand Out
- Taste: The combination of dark soy, honey, and sake creates a savory-sweet profile that lingers on the palate. The subtle heat from ginger cuts through the richness, leaving a clean finish.
- Texture: The dual coating of potato starch and flour gives a light, airy crisp that doesn’t settle in oil. The chicken stays juicy inside, with a slight char on the edges.
- Simplicity: Only eight ingredients, all you need is a skillet, a bowl, and a timer. No fancy gadgets or long prep.
- Uniqueness: Dark soy sauce replaces the usual light soy, giving depth and a darker hue. Honey replaces sugar or mirin, adding natural sweetness.
- Crowd Reaction: Friends who’ve tried this say it’s “the best karaage I’ve ever tasted.” They can’t stop asking for the recipe.
- Ingredient Quality: Using fresh ginger and high‑quality dark soy sauce makes the difference. The chicken thighs should be skinless, boneless, and cut into bite‑sized pieces.
- Cooking Method: The quick marination and two‑step coating technique ensures a crisp exterior without a greasy interior.
- Make‑Ahead Potential: The marination can be done a day ahead. The coating can be prepared in advance and kept in the fridge.
Inside the Ingredient List
The Flavor Base
Dark soy sauce is the cornerstone of this recipe. Unlike its lighter counterpart, it carries a richer, almost bittersweet note that pairs beautifully with the honey. If you can’t find dark soy, a mix of light soy with a splash of molasses will approximate the flavor. The honey is not just a sweetener; it caramelizes during frying, creating a glossy, slightly crisp crust. If you prefer a less sweet version, substitute with a small amount of mirin, but be prepared for a sweeter finish.
The Texture Crew
Potato starch is the secret weapon for achieving that light, airy crunch. Its fine particles create a delicate barrier that traps steam, giving the coating a puffed, airy feel. All‑purpose flour provides structure and helps the coating adhere to the chicken. Together, they form a balanced batter that doesn’t stick to the pan or become soggy. If you’re gluten‑free, swap the flour for rice flour or a gluten‑free blend. The key is to keep the ratio roughly equal to maintain the crispness.
The Unexpected Star
Sake is often overlooked in karaage recipes, but it adds a subtle depth and helps tenderize the chicken. The alcohol evaporates quickly, leaving behind a nuanced flavor that balances the saltiness of the soy. If you don’t have sake, white wine or dry sherry can serve as a suitable substitute, though the flavor will shift slightly. The 1‑minute marination is enough to allow the sake to penetrate, so don’t over‑marinate or the chicken may become too soft.
The Final Flourish
Garlic and ginger are the aromatic backbone. Minced garlic provides a sharp, pungent bite that cuts through the richness, while finely grated ginger adds a bright, zesty note that lifts the entire dish. If you’re allergic to garlic, reduce the amount or replace it with garlic powder, but the flavor will be less complex. Fresh ginger is essential; frozen or dried ginger loses its bright character. Together, they create a symphony of flavors that dance on your tongue.
Everything's prepped? Good. Let’s get into the real action. Picture yourself pulling this out of the pan, the whole kitchen smelling incredible, and the anticipation building as you watch the golden crust form. That sizzle when it hits the pan? Absolute perfection.
The Method — Step by Step
- Marinate the Chicken: In a large bowl, combine the dark soy sauce, honey, minced garlic, grated ginger, and sake. Add the chicken thighs, ensuring each piece is fully coated. Cover the bowl with plastic wrap and refrigerate for exactly 1 minute. This quick burst of flavor infuses the meat without letting it become too soft. I’ve found that a minute is the sweet spot—longer marination can turn the chicken mushy.
- Prepare the Coating: In a shallow dish, whisk together the potato starch and all‑purpose flour. The ratio should be 1:1 by weight; in this recipe, it’s 30 g each. Stir until the mixture is smooth. If you’re using a gluten‑free option, replace the flour with an equal weight of rice flour or a gluten‑free blend. The starch and flour should be dry, so the coating adheres well.
- Coat the Chicken: Remove each chicken piece from the marination bowl and gently pat dry with a paper towel. Dip the chicken into the starch‑flour mixture, ensuring a uniform coat. Shake off any excess. The coating should cling to the surface like a second skin. If you notice clumps, give it a gentle tap to smooth it out.
- Heat the Oil: Fill a deep skillet or pot with sunflower oil to a depth of about 2 inches. Heat the oil to 180°C (350°F). Use a thermometer for precision; the oil should be hot but not smoking. If you don’t have a thermometer, drop a small piece of bread into the oil—if it sizzles immediately and browns in 60 seconds, you’re ready.
- Fry the Chicken: Carefully lower the coated chicken pieces into the hot oil, working in batches to avoid overcrowding. Fry for 3–4 minutes per side, or until the coating turns a deep golden brown and the chicken is cooked through. Use tongs to flip gently. The key is to keep the oil temperature steady; too hot and the coating will burn before the chicken cooks.
- Drain and Rest: Once fried, transfer the chicken onto a wire rack set over a baking sheet. This allows excess oil to drain while the crust stays crisp. Let the chicken rest for 5 minutes. This brief pause lets the juices redistribute, ensuring every bite is moist.
- Serve: Slice the chicken into bite‑sized pieces if desired. Serve immediately with a squeeze of fresh lemon or a sprinkle of chopped scallions. Pair with a chilled glass of sake or a light Japanese beer for an authentic experience. The aroma alone will have your guests lining up for seconds.
- Optional Finish: For an extra layer of flavor, drizzle a small amount of ponzu sauce over the top or serve with a side of pickled ginger. The acidity cuts through the richness, balancing the dish.
That’s it—you did it. But hold on, I’ve got a few more tricks that will take this to another level.
Insider Tricks for Flawless Results
The Temperature Rule Nobody Follows
Maintaining the oil at a steady 180°C is crucial. If the temperature dips, the coating will absorb oil and become soggy; if it spikes, the crust will burn before the chicken cooks through. A good tip is to use a deep‑fry thermometer. If you’re using a thermometer, let the oil cool a few degrees before adding the chicken—this prevents a sudden temperature surge.
Why Your Nose Knows Best
The aroma of frying chicken is a powerful indicator of doneness. When the oil starts to emit a nutty, toasted scent, the coating is ready. If you hear a faint, sweet smell from the honey caramelizing, it means the chicken is getting close to perfection. Trust your nose—if it smells like a bakery, you’re done.
The 5‑Minute Rest That Changes Everything
Many people skip the rest step, thinking the chicken is ready to eat. However, allowing the chicken to rest on a wire rack for 5 minutes lets the steam escape and the crust firm up. A friend once skipped this step and ended up with a slightly soggy exterior. The rest period is the difference between a crunchy and a greasy experience.
Double‑Dipping for Double Crunch
For the ultimate crunch, after the first coating, dip the chicken back into the sauce mixture and then again into the starch‑flour blend. This double coat creates a thicker, more substantial crust that stays crisp even after reheating. It’s a simple technique that elevates the dish without extra effort.
Heat‑Proof Oil Selection
Sunflower oil is ideal because it has a high smoke point and a neutral flavor that won’t overpower the dish. If you prefer a more aromatic oil, use peanut or canola oil. Avoid low‑smoke‑point oils like extra‑virgin olive oil, as they will burn and produce an unpleasant taste.
The Final Touch: Lemon Zest
A pinch of lemon zest added to the sauce before marinating adds a bright, citrusy note that lifts the overall flavor. It’s a simple addition that transforms the dish from good to unforgettable. If you’re a fan of citrus, try adding a splash of yuzu juice for a Japanese twist.
Creative Twists and Variations
This recipe is a playground. Here are some of my favorite ways to switch things up:
Spicy Sriracha Kick
Add a tablespoon of sriracha to the sauce mixture for a fiery punch. The heat pairs well with the honey’s sweetness, creating a balanced spicy‑sweet profile. This version is perfect for those who like a bit of heat.
Miso‑Infused Karaage
Replace the dark soy with a 1:1 mix of dark soy and white miso paste. The miso adds depth and umami, giving the dish a richer flavor. The result is a savory, complex taste that stands out.
Citrus‑Marinated Delight
Marinate the chicken in a mixture of orange juice, ginger, and a splash of rice vinegar. The citrus adds brightness, while the vinegar keeps the coating crisp. This variation is especially refreshing during summer.
Gluten‑Free Version
Swap the all‑purpose flour for rice flour or a gluten‑free blend. Keep the potato starch the same. The coating remains light and crisp, making it safe for gluten‑sensitive diners.
Panko‑Coated Crunch
For an ultra‑crispy texture, use panko breadcrumbs instead of the starch‑flour mix. Coat the chicken in the sauce, then dip it in beaten egg, and finally coat it in panko. This creates a thicker, crunchier exterior.
Vegetarian Karaage
Use firm tofu cut into cubes, marinated in the same sauce. Coat with the starch‑flour mixture and fry until golden. The tofu absorbs the flavors, delivering a plant‑based version that’s just as delicious.
Storing and Bringing It Back to Life
Fridge Storage
Store leftover karaage in an airtight container in the refrigerator for up to 3 days. Keep the chicken on a paper towel to absorb excess moisture. When ready to reheat, place the chicken on a wire rack over a baking sheet and bake at 200°C for 10 minutes. The crust will stay crisp.
Freezer Friendly
Freeze the fried chicken in a single layer on a parchment‑lined tray before transferring to a freezer bag. This prevents sticking. Freeze for up to 2 months. When you’re ready to enjoy, thaw overnight in the refrigerator and reheat using the method above.
Best Reheating Method
Reheating in a skillet is the fastest way to restore crispness. Heat a small amount of oil over medium heat, add the chicken, and fry for 2–3 minutes on each side. For a healthier option, use an air fryer at 200°C for 5 minutes. A tiny splash of water before reheating can help steam the interior, keeping it juicy.