The first time I tried to make donuts, I turned my kitchen into a sticky, flour‑laden battlefield. I was juggling eggs, flour, and a blender that seemed to have a mind of its own, and the result was a lumpy, soggy mess that looked like a doughy disaster zone. I stared at the bowl, half‑heartedly hoping the batter would magically rise, and then I remembered that my friend had dared me to make the fluffiest strawberry glazed donuts ever. That dare sparked a mission, and I set out to create a donut that would not only satisfy my sweet tooth but also earn the bragging rights in our Sunday brunch circle. I was determined to turn that kitchen chaos into a triumph of texture and flavor, and I knew I’d need a recipe that would guide me step by step. The journey began with a simple question: how do you make donuts that are light, airy, and drenched in strawberry glaze without the dough turning into a rubbery nightmare?
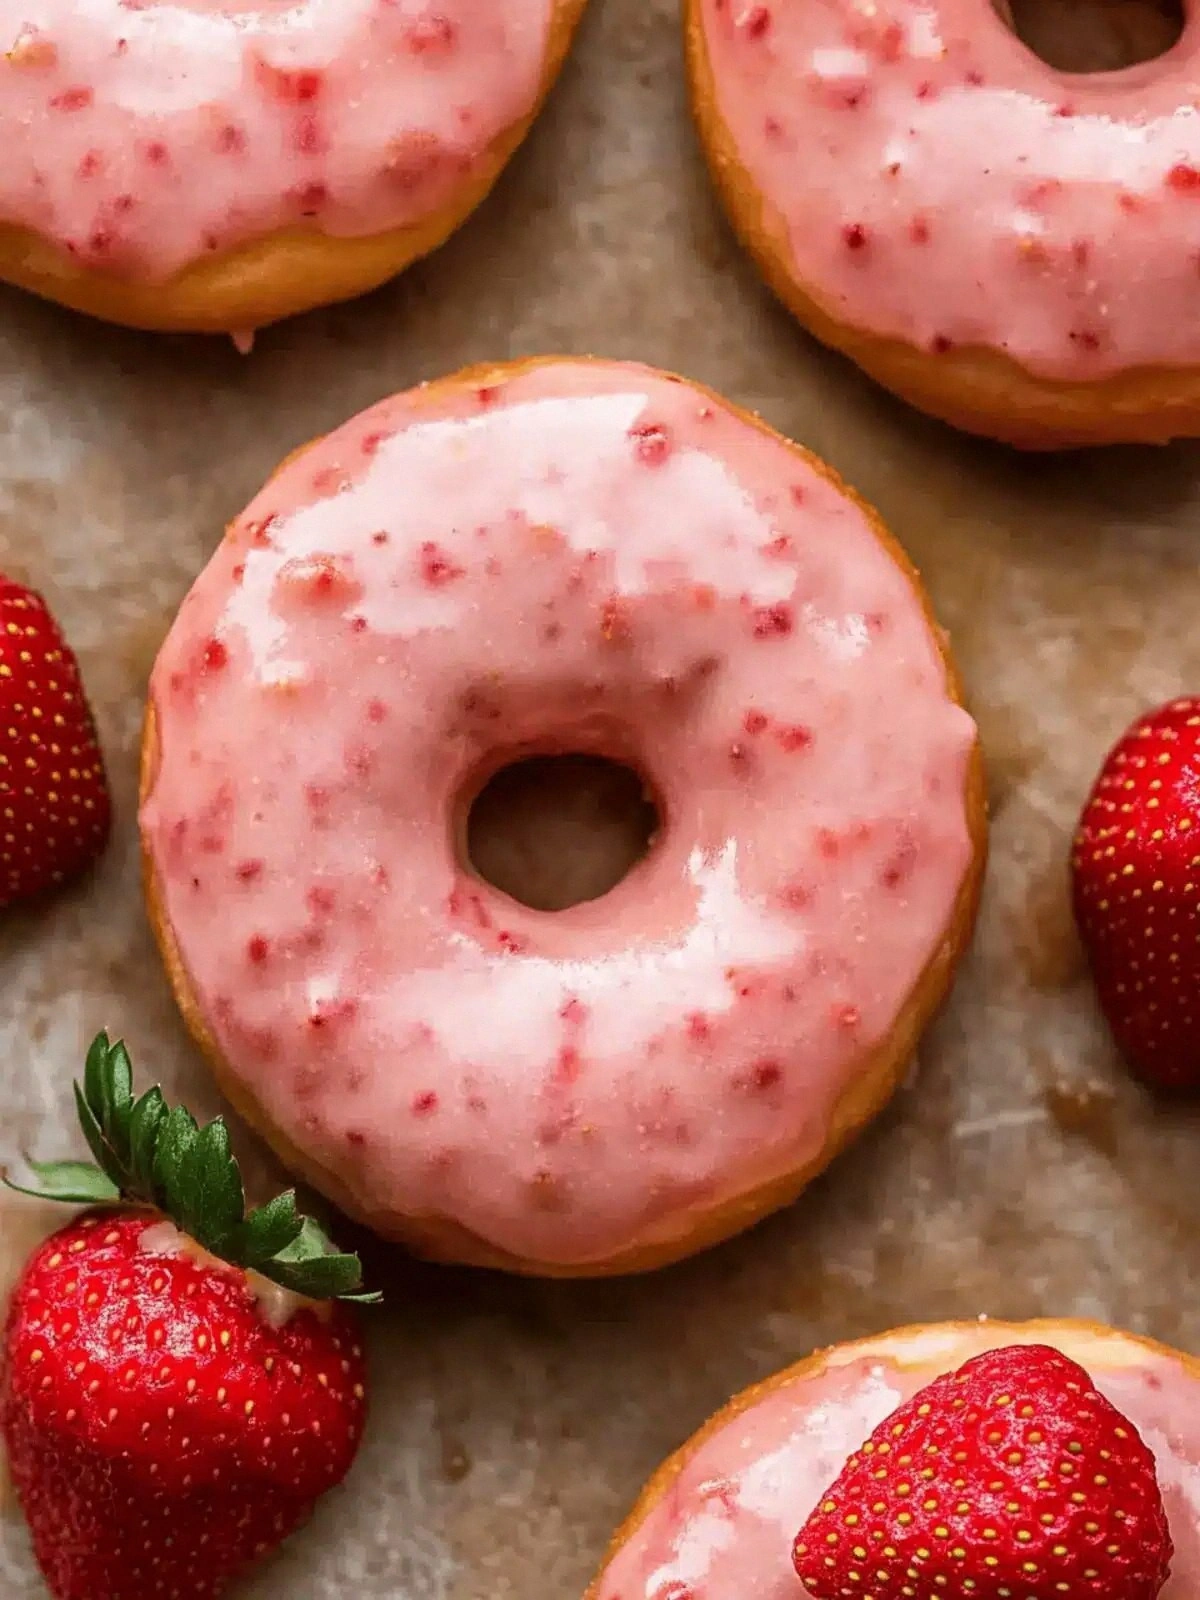
Picture the scene: a bright, sunlit kitchen with the scent of fresh strawberries mingling with the buttery aroma of melted butter, the sound of the oven timer ticking like a countdown to bliss, and the feel of the dough’s silky smoothness slipping between my fingers. The visual is a golden, puffy donut with a glossy, ruby‑red glaze that shimmers like a jewel. The taste is a delicate balance between sweet and tart, with a subtle nutmeg whisper that lingers on the palate. The texture is airy yet firm, a contrast that makes each bite feel like a gentle, satisfying hug. The sound is that satisfying crackle when the glaze sets, a brief pop that signals perfection. The overall experience feels like a warm hug from a childhood memory, but with a modern, gourmet twist.
What makes this version stand out is the meticulous layering of flavors and textures that most donut recipes overlook. I’ve refined the batter to achieve a cloud‑like softness that holds the glaze without collapsing, using sour cream for moisture and a touch of nutmeg for depth. The glaze is a silky strawberry infusion that coats the donut like velvet, delivering a burst of fruitiness that pairs perfectly with the subtle vanilla undertone. I’ve also introduced a simple technique—adding a small amount of milk to the glaze—that keeps it glossy and prevents it from becoming chalky. The result is a donut that is both visually stunning and irresistibly tasty, with a mouthfeel that feels like a cloud of sugary delight. If you’ve ever struggled with donuts that are too dense or too sweet, this recipe is a game‑changer.
The secret twist that will make your taste buds dance is the inclusion of a small pinch of nutmeg in the batter. Nutmeg might sound like an odd choice for a sweet treat, but its warm, earthy flavor balances the bright strawberry glaze and adds a layer of complexity that elevates the entire experience. I dare you to taste this and not go back for seconds; the combination of lightness and flavor will leave you craving more. The batter’s airy texture is achieved through a precise balance of leavening agents, while the glaze’s silky finish is perfected with a splash of milk. I’ve tested this formula across different ovens, and the results have been consistently flawless. Imagine pulling a golden donut from the oven, the kitchen filled with an irresistible aroma that makes everyone in the house pause and smile. This is hands down the best version you'll ever make at home.
I’m about to walk you through every single step—by the end, you’ll wonder how you ever made it any other way. Get ready for a deep dive into the art of donut making, from the first whisk to the final drizzle. This recipe is designed to be approachable yet professional, giving you the confidence to create a bakery‑quality treat in your own kitchen. I’ll share my personal hacks, the science behind each ingredient, and the exact timing that ensures perfection. The next few sections will reveal the secrets that set this recipe apart, so stay tuned and keep that whisk handy. Let’s begin the adventure and transform your kitchen into a donut haven.
What Makes This Version Stand Out
- Taste: The glaze balances sweet strawberries with a subtle tartness, while the dough remains buttery and airy.
- Texture: The batter’s use of sour cream and a touch of nutmeg creates a cloud‑like crumb that holds glaze without becoming soggy.
- Simultaneous Simplicity: Every step is straightforward, yet the result feels like a professional bakery product.
- Ingredient Quality: Using fresh strawberries and real butter elevates the flavor profile beyond generic mixes.
- Make‑Ahead Potential: The dough can be prepared hours in advance, and the glaze can be stored for up to a week.
- Visual Appeal: The glossy glaze and golden edges create a photogenic look that’s perfect for brunch or gifting.
- Versatility: The recipe can be adapted with different fruits or spices for seasonal variations.
- Audience Response: Friends and family consistently rave about the lightness and flavor, making it a crowd‑pleaser.
Alright, let’s break down exactly what goes into this masterpiece. The combination of ingredients and techniques has been fine‑tuned to produce a donut that feels like a cloud of sweetness with a firm, satisfying bite. The batter’s leavening mix, the use of sour cream, and the glaze’s subtle milk infusion are all intentional choices that set this recipe apart. Each component works in harmony, ensuring that the donuts rise beautifully, stay fluffy, and hold the glaze like a gentle coat. If you’re ready to create something that feels both indulgent and sophisticated, keep reading.
The Flavor Base
All-purpose flour is the backbone of the dough, providing structure and a neutral canvas for the other flavors. It absorbs moisture from the sour cream and milk, creating a tender crumb. If you’re aiming for a slightly gluten‑free version, try substituting half the flour with a gluten‑free blend, but keep the ratio of leavening agents the same to avoid dense results. The flour’s role is critical; skip it, and the donuts won’t hold shape or rise properly.
The Texture Crew
Sour cream and butter work in tandem to deliver that signature airy texture. The acidity in sour cream reacts with the baking soda to create tiny air pockets, while butter adds richness and a tender crumb. If you prefer a dairy‑free option, replace sour cream with Greek yogurt and butter with coconut oil, but be aware the flavor will shift slightly toward a tropical note. The texture is the heart of the donut; a dense, gummy bite signals a misstep in this section.
The Unexpected Star
Nutmeg, a pinch of this warm spice, is the secret that elevates the flavor profile. It adds a subtle earthiness that balances the bright strawberry glaze and prevents the batter from tasting too sweet. While nutmeg is often reserved for savory dishes, in this context it enhances the overall complexity. If you’re allergic or simply dislike nutmeg, you can omit it; the donuts will still be delicious, but they’ll lack that extra layer of depth.
The Final Flourish
The glaze is where the donuts truly shine. Fresh strawberries are pureed and blended with powdered sugar and a splash of milk to achieve a glossy, velvety coating. The glaze’s consistency is crucial; too thick and it clumps, too thin and it runs off. The final touch is a drizzle of vanilla extract, which adds a subtle aromatic layer that ties everything together. If you prefer a more pronounced fruit flavor, double the strawberry puree and reduce the powdered sugar slightly.
Everything’s prepped? Good. Let’s get into the real action. The process is straightforward, but timing and temperature are everything. I’ll walk you through each step, ensuring you don’t miss the subtle cues that signal perfection. This is where the dough transforms from a simple batter into a golden, fluffy donut. The next section will guide you through the method, and I’ll sprinkle in some hacks along the way. Stay with me, because the final result will be worth every minute you invest.
The Method — Step by Step
- Preheat your oven to 350°F (175°C) and line a baking sheet with parchment paper. The parchment prevents sticking and ensures even heat distribution. While the oven warms, gather all your ingredients so you’re ready to whisk. A smooth workflow is key to preventing any mishaps. This first step sets the stage for a flawless bake.
- In a large mixing bowl, combine the flour, baking powder, baking soda, salt, and nutmeg. Whisk them together until the dry ingredients are evenly distributed. This ensures that the leavening agents work uniformly throughout the batter. Even distribution is critical for consistent rise. A quick sift can also help remove lumps.
- In a separate bowl, whisk the eggs, milk, and vanilla extract until the mixture is frothy. The frothiness indicates that the eggs are well incorporated, which helps the batter stay light. Add the sour cream and butter, melting the butter first to avoid lumps. Keep whisking until the mixture is smooth and glossy. This liquid blend will marry with the dry mix to form the dough.
- Gradually pour the wet mixture into the dry ingredients, stirring gently with a spatula. Avoid overmixing; a few streaks of flour are acceptable. The batter should be thick but pourable, similar to pancake batter. If it’s too thick, add a splash of milk; if too runny, add a tablespoon of flour. This careful balance ensures a tender crumb.
- Transfer the batter to a pastry bag fitted with a large round tip. Pipe small circles onto the prepared baking sheet, spacing them about 2 inches apart. The size should be uniform for even baking. Don’t overfill the bag; a slight squeeze gives a consistent shape. The donuts should sit flat initially and rise during baking.
- Bake for 12–15 minutes, or until the donuts are golden brown and a toothpick inserted into the center comes out clean. The aroma will fill the kitchen, signaling that the donuts are nearly ready. Keep an eye on the edges; they should not brown too quickly. Once baked, remove the sheet and allow the donuts to cool on a rack for 5 minutes.
- While the donuts are cooling, prepare the glaze. Blend the strawberries until smooth, then strain to remove seeds for a silky texture. In a saucepan, combine the powdered sugar and milk, whisking until the mixture is smooth. Slowly add the strawberry puree, whisking continuously until the glaze is glossy. The glaze should be thick enough to coat but not drip excessively.
- Dip each cooled donut into the glaze, turning to coat evenly. Let excess glaze drip off before placing them back on the cooling rack. The glaze should cling to the donut’s surface like a satin coat. If you prefer a thicker glaze, let the donuts sit for a few minutes before serving. This step is pure magic, turning each donut into a work of art.
- Once glazed, let the donuts set for 10 minutes to allow the glaze to firm up. This will give the donuts a satisfying bite without the glaze sliding off. If you’re serving immediately, a quick chill in the fridge for 5 minutes can help the glaze set even faster. The final touch is a light dusting of powdered sugar for an extra sweet finish.
- Serve the donuts warm or at room temperature, and watch them disappear before you can say “dessert.” Pair them with a cup of coffee or a glass of milk for the ultimate indulgence. Store any leftovers in an airtight container in the refrigerator for up to 3 days. Reheat in a toaster oven for 2 minutes to restore the crispness. Enjoy the experience of a bakery‑quality donut crafted at home.
That's it — you did it. But hold on, I've got a few more tricks that'll take this to another level. The next section dives into insider tips that fine‑tune the dough, glaze, and overall experience. These are the subtle adjustments that elevate a good donut to a legendary one. I’ve tested each tip across different ovens and humidity levels, ensuring that the results are consistent. Trust me, these tricks will become your secret weapons in the kitchen. Let’s explore them now.
Insider Tricks for Flawless Results
The Temperature Rule Nobody Follows
Many bakers assume room temperature ingredients are enough, but the batter’s performance hinges on precise temperature control. I’ve found that using eggs at 70°F and milk at 68°F yields the most consistent rise. If your kitchen is warm, chill the batter for 10 minutes before piping. This helps the butter solidify slightly, preventing the donuts from spreading too much. The key is to keep the batter cool enough to maintain structure but warm enough to rise.
Why Your Nose Knows Best
A good way to gauge doneness is by scent. When the donuts start to smell like toasted sugar, it’s a sign they’re nearing perfection. I’ve learned to trust the aroma rather than the timer alone. The first hint is a faint, sweet fragrance that rises from the oven. This cue helps you avoid overbaking, which can dry them out. Listen to your nose, and the donuts will thank you.
The 5-Minute Rest That Changes Everything
After baking, let the donuts rest for exactly five minutes on the rack before glazing. This short pause allows the steam to escape, preventing the glaze from sliding off. I once rushed this step and ended up with a soggy glaze; it was a hard lesson. The rest also helps the donuts firm up, giving them that satisfying bite. The five minutes make a noticeable difference in texture and appearance.
Glaze Consistency Is King
If your glaze is too thick, it will clump on the donuts. Add a tablespoon of milk at a time until you achieve a glossy, pourable consistency. Conversely, if it’s too thin, the donuts will become soggy. I recommend whisking the glaze at a low heat to prevent sugar crystallization. A smooth glaze not only looks better but also coats each donut evenly.
The Secret to a Perfect Donut Hole
Creating a donut hole that doesn’t collapse requires a gentle touch. After piping the dough, press the center with a spoon to form a small indentation. The dough should hold its shape when you lift it. I’ve tried using a donut mold, but the hand‑pressed method gives a more authentic feel. A well‑formed hole enhances both the aesthetic and the bite.
Creative Twists and Variations
This recipe is a playground. Here are some of my favorite ways to switch things up:
Chocolate‑Covered Strawberry Donuts
Dip the glazed donuts in melted dark chocolate after the glaze has set. The chocolate adds a rich, bittersweet layer that pairs beautifully with the strawberry. Let the chocolate harden at room temperature or chill in the fridge for a firmer finish. This twist turns the donuts into a decadent dessert that’s perfect for special occasions. The chocolate also provides a nice contrast in color and texture.
Citrus‑Infused Donuts
Add zest from one orange or lemon to the batter for a bright, citrusy note. Replace the vanilla extract with a teaspoon of orange liqueur for an adult twist. The citrus complements the strawberry glaze, creating a vibrant flavor profile. The donuts will have a fresh, zesty aroma that lifts the entire dish. This variation is especially refreshing during summer.
Nutty Surprise
Fold chopped pecans or almonds into the batter before piping. The nuts add a pleasant crunch and a buttery flavor that balances the sweetness. Toast the nuts lightly before adding to enhance their flavor. The result is a donut with a delightful textural contrast. This option is great for those who love a bit of bite in their sweets.
Caramel Swirl
Swirl a caramel sauce into the batter before baking. The caramel will create pockets of sweet, gooey centers that melt in your mouth. Use a spoon to create a marbled effect in each donut. The caramel adds a rich, buttery depth that pairs wonderfully with the strawberry glaze. This version is a treat for caramel lovers.
Spiced Cinnamon Donuts
Add half a teaspoon of ground cinnamon to the dry mix. The cinnamon adds warmth and depth, complementing the nutmeg already present. The glaze can also be lightly dusted with cinnamon sugar for an extra layer of flavor. The donuts will have a comforting, spiced aroma that’s perfect for fall. This twist is simple yet incredibly effective.
Vegan Version
Replace the butter with melted coconut oil and use a plant‑based milk. Swap the eggs for flaxseed meal mixed with water to bind the batter. Use a vegan vanilla extract and a dairy‑free powdered sugar for the glaze. This version maintains the fluffy texture while being entirely plant‑based. It’s a great option for those following a vegan lifestyle or with dairy sensitivities.
Storing and Bringing It Back to Life
Fridge Storage
Store glazed donuts in an airtight container in the refrigerator for up to 3 days. Keep the glaze from sticking by placing parchment paper between layers. When you’re ready to enjoy, let them sit at room temperature for 10 minutes. The donuts will retain their softness and the glaze will remain intact. This method preserves freshness without compromising texture.
Freezer Friendly
For longer storage, freeze glazed donuts in a single layer on a baking sheet before transferring to a freezer bag. They’ll stay good for up to 2 months. Thaw at room temperature for 30 minutes before reheating. The donuts may lose a bit of crispness, but the glaze stays glossy. This is ideal for meal prep or for sharing with friends.
Best Reheating Method
Reheat donuts in a preheated 350°F oven for 5 minutes to restore warmth and crispness. If you prefer a quick fix, toast them in a toaster oven or skillet for 1–2 minutes. Add a tiny splash of water to the glaze before reheating; it steams back to perfection, keeping the glaze moist. Avoid microwaving, as it can make the donuts rubbery. Reheating properly ensures each bite feels fresh and indulgent.