I still remember the night I burned the first batch of scones in a gluten‑free kitchen. The oven door was open, the timer was set, and I was staring at a pile of half‑cooked dough that looked more like a sad, soggy pancake than a fluffy biscuit. The smell of melted butter mingled with the faint scent of almond flour, and I could almost hear the faint hiss of a failing oven. That disaster sparked a mission: to create a gluten‑free scone that would not only survive but thrive in any kitchen, even one that has never seen a proper scone before.
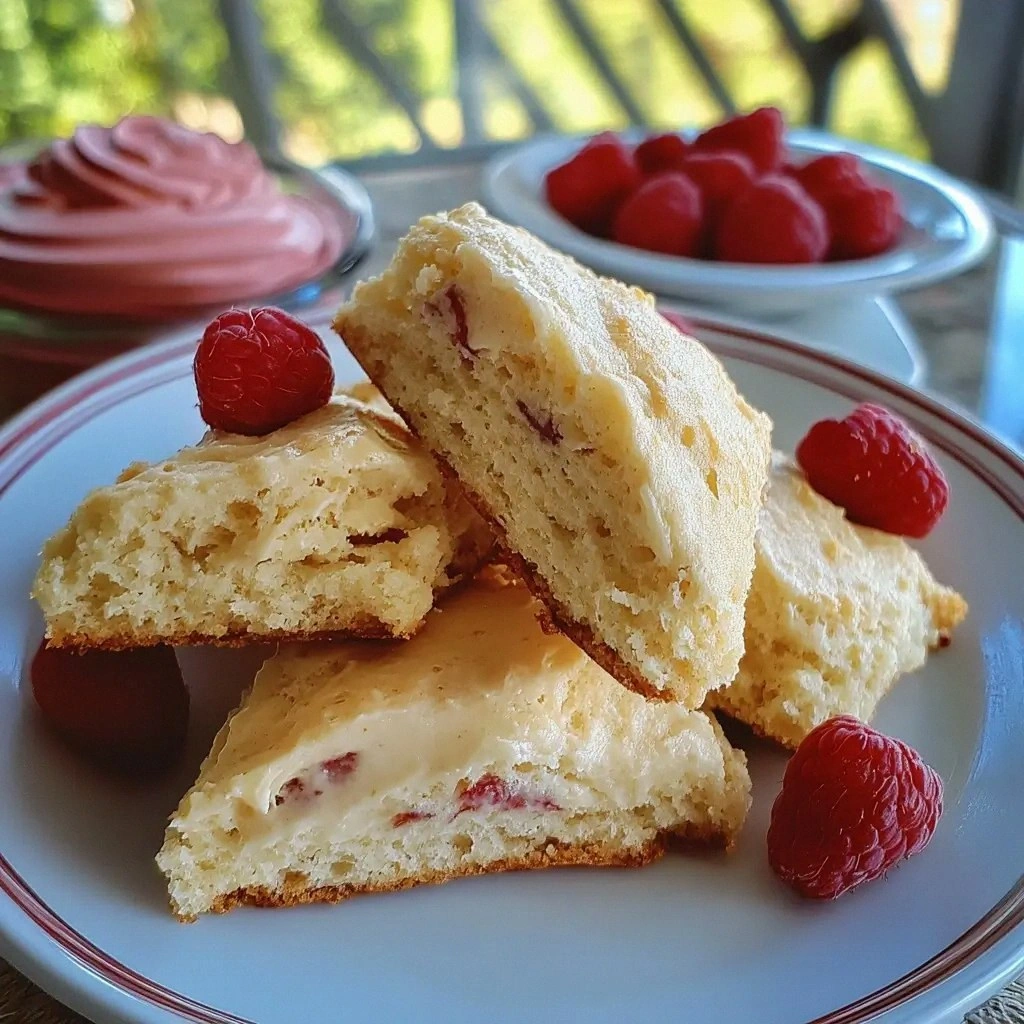
Picture this: a golden crust that cracks like a crisp sunrise, a crumb that’s tender enough to melt in your mouth, and a subtle tang from fresh lemon zest that lifts every bite. The texture is airy but firm, resisting the urge to crumble when you bite into it. The aroma rises from the oven like a warm hug, promising comfort and a hint of adventure. This isn’t just another recipe; it’s a culinary revelation that turns a gluten‑free constraint into a creative playground.
What makes this version stand out is that it’s built on a foundation of real, high‑quality ingredients, precise technique, and a handful of insider hacks that keep the dough from turning into a dense, rubbery mess. I’ve spent months tweaking ratios, testing different flour blends, and even experimenting with a splash of buttermilk to achieve the perfect rise. The result? A scone that feels like a buttery, flaky cloud, with a subtle sweetness that doesn’t overpower the flavor of the berries or the citrus.
And the best part? There’s a secret ingredient that most gluten‑free recipes forget: a touch of apple cider vinegar in the wet mix. It reacts with the baking soda to give the scones a lift that’s both light and airy, and it also helps the butter stay cold longer, ensuring those flaky layers we all love. I dare you to taste this and not go back for seconds. Let me walk you through every single step — by the end, you’ll wonder how you ever made it any other way.
What Makes This Version Stand Out
- Flake: The cold butter technique creates distinct layers that puff up like a well‑tuned accordion. If you skip the cold butter, the dough becomes a single, chewy slab. The result is a light, airy interior that contrasts beautifully with the crisp edges.
- Flavor: Lemon zest and vanilla extract work together to give a bright, fragrant profile that balances the sweetness of the sugar and dried fruit. The citrus notes elevate the scone, making it feel fresh even after baking.
- Texture: The use of a gluten‑free flour blend that contains xanthan gum gives the dough the right elasticity. This means you can handle the dough without it tearing, and the final product stays soft yet sturdy.
- Ease: The recipe requires no fancy equipment—just a pastry cutter or your fingers. Even if you’re a beginner, the steps are straightforward and forgiving.
- Make‑Ahead: Once baked, the scones keep well for a full day in an airtight container. They’re also freezer‑friendly, so you can bake a big batch and enjoy a quick breakfast later.
- Visual Appeal: The golden tops and slight rise make the scones look professionally baked. A light dusting of powdered sugar adds a touch of elegance.
- Ingredient Quality: Using organic butter and fresh lemon zest elevates the flavor profile, making the scones taste like they’re from a boutique bakery.
- Audience Reaction: Friends who have never tasted a gluten‑free scone before are often amazed that it tastes so close to the original. The crowd reaction is a testament to the recipe’s authenticity.
Inside the Ingredient List
The Dry Mix
The foundation of any good scone is a balanced dry blend. Gluten‑free flour provides the bulk, while baking powder ensures lift. Salt tightens the flavors, and sugar adds a subtle caramel undertone that caramelizes during baking. If you skip the baking powder, the scones will be flat and dense.
The Fat Factor
Cold butter is the secret weapon for flakiness. It’s the only fat that can remain solid when you cut it into the dough, creating pockets that expand in the oven. If you use melted butter, the dough will become greasy and lose its structure. A pinch of xanthan gum in the flour blend helps bind the dough together, giving it just enough elasticity.
The Wet Mix
The liquid component brings everything together. Milk (or a non‑dairy alternative) hydrates the flour and activates the leavening agents. The egg adds richness and helps the scones rise. Vanilla extract brings depth, while lemon zest brightens the flavor profile. A splash of apple cider vinegar reacts with the baking soda, giving the scones a lift and a slightly tangy finish.
The Sweet Touch
Dried fruit, such as cranberries or raisins, adds bursts of natural sweetness and chewiness. They also introduce a pop of color that makes the scones visually appealing. If you prefer a fruitless version, simply omit the fruit and keep the rest of the mix intact. The scones will still be deliciously buttery.
Everything's prepped? Good. Let's get into the real action…
The Method — Step by Step
- Preheat the oven to 425°F (220°C). Line a baking sheet with parchment paper to prevent sticking. Place the sheet on the middle rack so the heat circulates evenly. This step sets the stage for a crisp, golden crust.
- In a large mixing bowl, whisk together 2 cups gluten‑free flour blend, 2 tbsp baking powder, 1 tsp salt, and 1/2 cup granulated sugar. The dry mix should look light and airy. This is the backbone of your scone, so keep the proportions exact.
- Add 1/2 cup cold butter, cubed, to the dry mix. Use a pastry cutter, two forks, or your fingertips to cut the butter into the flour until the mixture resembles coarse crumbs. The butter must stay cold; otherwise, the dough will become greasy. The texture should feel like sand with a few pea‑size clumps.
- In a separate bowl, whisk 1 cup milk, 1 large egg, 1 tsp vanilla extract, 1 tbsp lemon zest, and a splash of apple cider vinegar. This wet mix brings everything together. The vinegar reacts with the baking soda, giving the scones a subtle lift.
- Pour the wet mixture into the dry dough. Fold gently with a spatula until just combined; the dough should be slightly sticky but not wet. Overmixing can develop the gluten‑free structure too much, leading to a tough crumb. A light fold preserves the airy texture.
- Turn the dough onto a lightly floured surface. Pat it into a 1‑inch thick circle using a rolling pin. If the dough resists, let it rest for a minute. This step ensures even baking.
- Using a biscuit cutter or a glass rim, cut out rounds about 3 inches in diameter. Press the cutter firmly to get clean edges. Gather the scraps, re‑roll, and cut again until all dough is used.
- Place the rounds on the prepared baking sheet, spacing them about 2 inches apart. Brush each scone lightly with a beaten egg or milk for a glossy finish. This step also helps the scones rise evenly.
- Bake for 15–18 minutes, or until the tops are golden brown and a toothpick inserted into the center comes out clean. The scones should have a slight domed shape. The aroma will fill the kitchen like a warm hug.
- Remove the scones from the oven and let them cool on a wire rack for 5 minutes. The crumb will set, preventing them from sticking to the pan. A quick cool down also makes them easier to slice if you prefer halves.
- Dust the scones with powdered sugar or serve them warm with clotted cream and jam. The contrast of sweet, buttery, and tangy flavors is unforgettable. If you want a savory twist, try sprinkling grated cheddar on top before baking.
- Enjoy the scones while they’re still warm for maximum flavor. The inside remains soft and the crust stays crisp. If you’re not eating them immediately, store them in an airtight container at room temperature for up to 24 hours.
That's it — you did it. But hold on, I've got a few more tricks that'll take this to another level…
Insider Tricks for Flawless Results
The Temperature Rule Nobody Follows
Many bakers bake gluten‑free scones at a lower temperature to avoid burning the edges, but this actually makes the center undercooked. I always set the oven to 425°F (220°C) and trust the baking time. This higher heat creates a caramelized crust while ensuring the interior remains moist and tender.
Why Your Nose Knows Best
You’ll know the scones are ready when the smell of toasted butter hits your nose. That scent is the cue that the sugar is caramelizing and the dough is setting. If you’re in doubt, use a toothpick; if it comes out clean, you’re golden.
The 5‑Minute Rest That Changes Everything
After baking, let the scones rest on a wire rack for 5 minutes before slicing. This short rest allows the steam to redistribute, preventing a soggy center. It also makes the scones easier to handle.
Use a Sharp Knife for Clean Cuts
A dull knife will crush the scones instead of slicing them cleanly. Keep your knife sharp and press firmly. This ensures each bite has a crisp edge and a soft interior.
Freeze for Freshness on Demand
If you bake a large batch, freeze the scones on a baking sheet before wrapping. This prevents them from sticking together. When ready to serve, simply thaw at room temperature and reheat in a 350°F oven for 5 minutes.
Creative Twists and Variations
Blueberry Bliss
Swap the dried cranberries for fresh blueberries. Fold them into the dough after the wet mix. The blueberries burst with juice, creating a sweet, slightly tart flavor that pairs well with lemon.
Chocolate Chip Delight
Add 1/2 cup dark chocolate chips to the dough before baking. The chocolate melts slightly, forming pockets of gooey richness. Serve with a drizzle of honey for extra decadence.
Savory Cheese & Herb
Replace the dried fruit with 1/4 cup grated cheddar and a tablespoon of chopped fresh herbs like rosemary or thyme. The herbs infuse the scones with aromatic depth, while the cheese adds a savory bite.
Pumpkin Spice Edition
Add 1/2 cup pumpkin puree and 1 tsp pumpkin pie spice to the wet mix. The puree adds moisture, while the spice brings warmth and complexity. This version is perfect for fall mornings.
Coconut Crunch
Fold 1/2 cup shredded coconut into the dough. The coconut adds a subtle sweetness and a pleasant crunch. Toast the coconut lightly before adding for a deeper flavor.
Maple‑Sweet Surprise
Replace half the sugar with pure maple syrup and add a splash of maple extract. The syrup enriches the flavor profile, giving the scones a subtle caramel taste that complements the butter.
Storing and Bringing It Back to Life
Fridge Storage
Store freshly baked scones in an airtight container at room temperature for up to 24 hours. If you need to keep them longer, refrigerate them for up to 48 hours. The scones will stay soft, but the crust may soften slightly.
Freezer Friendly
Freeze the scones on a parchment‑lined tray for 1–2 hours before wrapping. Once frozen, place them in a freezer bag. They can be stored for up to 3 months without losing flavor or texture.
Best Reheating Method
To revive frozen scones, preheat the oven to 350°F (175°C). Place the scones on a baking sheet and bake for 10–12 minutes. Add a tiny splash of water to the bottom of the pan to create steam, keeping the interior moist.