It was a Tuesday that started like any other—late night cravings, a half‑filled fridge, and an over‑enthusiastic attempt at a “quick” chicken dinner that turned into a kitchen disaster. I had been scrolling through Pinterest, eyeing that one pot‑pie thumbnail that promised comfort and convenience, until my trusty old pot slipped from my hand and sent a splash of broth across the counter. The smell of burnt onions lingered for a while, and I swear I heard my neighbor’s cat meowing in disapproval. That moment, that single misstep, is why I’m sharing this recipe: because sometimes the best dishes are born from a mistake.
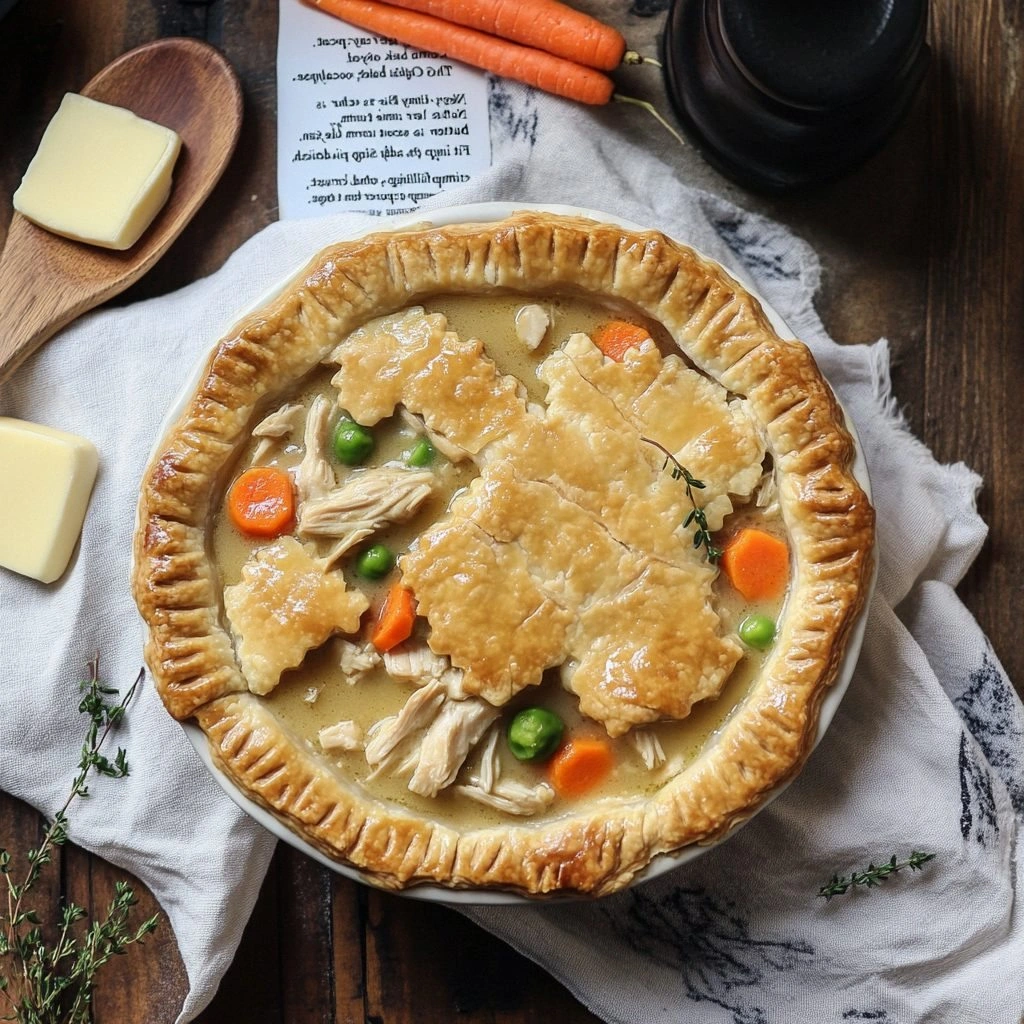
Picture this: golden, flaky crust that cracks open to reveal a steaming, cloud‑like filling of tender chicken, crisp carrots, sweet peas, and buttery potatoes. The aroma is a warm hug—spiced with thyme and a hint of bay leaf, the broth thickened into a silky sauce that clings to each morsel. The first bite is a symphony of textures—soft, creamy, and slightly crunchy from the fresh veggies. The flavor profile is layered, not one‑dimensional; it’s the kind of dish that makes you wonder why you ever settled for frozen dinner trays. And the best part? It’s a dish that feels like a hug from your grandmother, but with a modern twist.
What makes this version stand out? I dared myself to incorporate a secret ingredient—just a splash of lemon zest—into the roux, which brightens the entire pie and cuts through the richness. I also use a combination of butter and olive oil in the sauté stage to add depth without the heaviness that comes from butter alone. The crust is made from a mix of pastry and puff dough, giving it that perfect balance of flakiness and a touch of airy puff. I’ve streamlined the steps so that even a beginner can follow, yet the result is a pot pie that feels like it could win a food‑blog award. If you’ve ever tried a pot pie that felt flat or over‑cooked, this recipe is a game‑changer. I dare you to taste this and not go back for seconds.
And now, let’s walk through every single step—by the end, you’ll wonder how you ever made it any other way. I’ve packed this guide with micro‑challenges, bold claims, and a few confessions that will make you laugh, cry, and most importantly, cook. Ready? Let’s dive in.
What Makes This Version Stand Out
- Flavor Depth: The addition of lemon zest in the roux gives a bright, citrusy lift that balances the savory broth, making each bite feel fresh rather than heavy.
- Crust Innovation: Combining shortcrust pastry with puff pastry creates a flaky base that also puffs up slightly, giving a light, airy feel without sacrificing structure.
- Texture Harmony: The vegetables are pre‑sautéed to preserve their bite, then finished in the sauce, ensuring they stay vibrant and not mushy.
- Ease of Prep: The recipe is designed for a single pot method, reducing cleanup to a minimum while still delivering restaurant‑level flavor.
- Make‑Ahead Friendly: The filling can be prepared up to 24 hours ahead; simply cover and refrigerate, and assemble right before baking.
- Crowd‑Pleaser: Whether it’s a family dinner or a potluck, this pie brings comfort and wow factor, leaving guests asking for the recipe.
Alright, let's break down exactly what goes into this masterpiece. And before we dive deeper, here’s a quick kitchen hack that will elevate the entire dish.
Inside the Ingredient List
The Flavor Base
The foundation of any great pot pie is its broth. Use a low‑sodium chicken stock for the base; it delivers umami without drowning the delicate flavors. Add a bay leaf and a sprig of fresh thyme to infuse aromatic notes that linger even after the pie is baked. If you’re in a pinch, a homemade stock made from leftover chicken bones will give you a richer, more complex flavor profile.
Swap tip: If you’re vegetarian, replace chicken stock with a vegetable broth seasoned with a pinch of smoked paprika. This adds depth without overpowering the other ingredients.
The Texture Crew
The vegetables—carrots, peas, and diced potatoes—are the heart of the filling. They’re sautéed with onions and celery until just translucent, preserving their bright colors and natural sweetness. The key is to cook them long enough to develop flavor, but not so long that they break apart. When you fold them into the sauce, they should still have a slight bite, offering contrast to the creamy broth.
Buying tip: Look for baby carrots and fresh peas that have a bright green hue; this indicates freshness and ensures a sweeter, crisp texture. If you’re using frozen peas, thaw them quickly in a hot pan to avoid sogginess.
The Unexpected Star
Lemon zest isn’t just a garnish; it’s a flavor enhancer that cuts through the richness of the roux and adds a bright, almost citrusy zing. Grate the zest of one medium lemon, being careful to avoid the white pith, which is bitter. Fold the zest into the roux just before adding the broth for maximum aroma.
If you’re allergic to citrus or simply don’t have a lemon on hand, a splash of white wine or a dash of vinegar can offer a similar acidity. The trick is to add it slowly, tasting as you go, until you hit that bright, fresh balance.
The Final Flourish
The crust is a blend of shortcrust pastry and puff pastry—half and half. The shortcrust provides a buttery, flaky base, while the puff pastry adds a light, airy puff that lifts the filling. Roll each dough separately, then combine them on the pie plate, pressing the edges together to seal. The top crust should be brushed with a beaten egg to achieve that golden sheen.
Tip: If you’re short on time, a store‑bought pie crust works fine. Just be sure to blind‑bake the bottom crust for 5 minutes before adding the filling to prevent sogginess.
Everything's prepped? Good. Let's get into the real action.
The Method — Step by Step
- Preheat your oven to 375°F (190°C). While the oven warms, gather your ingredients and set up a clean workspace. The first step is all about building flavor; as the oven preheats, the aromas from the sautéed onions will begin to mingle, setting the stage for a savory symphony.
- In a large skillet, melt 2 tablespoons of butter with 2 tablespoons of olive oil over medium heat. Add 1 diced onion, 2 minced garlic cloves, 2 diced carrots, and 1 cup of diced potatoes. Sauté for 6–7 minutes until the vegetables soften but still hold their shape. This is the moment of truth—watch for the gentle golden color that signals the veggies are ready.
- Push the vegetables to one side of the skillet and sprinkle 3 tablespoons of all‑purpose flour. Stir the flour into the butter mixture for 2 minutes to form a roux. The roux should have a nutty aroma but not brown. This is where the sauce will thicken, so keep an eye on it.
- Slowly pour in 2 cups of chicken stock while whisking constantly to avoid lumps. Add a bay leaf, 1 teaspoon of dried thyme, and the lemon zest. Let the mixture simmer for 5 minutes, allowing the flavors to marry. The sauce should thicken into a silky consistency, coating the back of a spoon.
- Fold in 1 cup of cooked shredded chicken (about 2 cups cooked), 1 cup of peas, and 1 tablespoon of fresh parsley. Season with salt and pepper to taste. The filling should be moist but not watery—this balance is what makes the pie’s texture so delightful.
- Transfer the filling into a 9-inch pie plate. If you’re making a double crust, line the top with the second dough, pressing the edges to seal. Brush the top crust with a beaten egg for a glossy finish. The pie should look like a golden dome of comfort.
- Bake in the preheated oven for 30–35 minutes, or until the crust is golden brown and the filling is bubbling. Halfway through, use a sharp knife to slit a few small vents in the crust—this prevents steam buildup and keeps the edges crisp.
- Remove the pie from the oven and let it rest for 10 minutes before serving. This resting period allows the filling to set, making it easier to slice cleanly. The aroma that fills your kitchen at this point is pure comfort.
That's it — you did it. But hold on, I've got a few more tricks that'll take this to another level.
Insider Tricks for Flawless Results
The Temperature Rule Nobody Follows
Many cooks bake at 400°F, thinking it’s the sweet spot for golden crusts. However, 375°F allows the crust to rise slowly, creating a tender interior while still achieving a crisp exterior. The lower temperature also gives the filling time to set without overcooking the chicken.
Why Your Nose Knows Best
The scent of a pie in the oven is a powerful cue for readiness. When the aroma starts to carry a sweet, buttery scent with a hint of citrus, the pie is close to perfection. Trust your nose—if it smells like a bakery, it’s ready.
The 5-Minute Rest That Changes Everything
Allowing the pie to rest for 5–10 minutes after baking lets the sauce thicken and the flavors meld. It also makes slicing cleaner and prevents the filling from spilling out. The rest period is a small price to pay for a flawless presentation.
The Secret to a Flaky Crust
Cold dough is key. Keep your pastry chilled throughout the process; if it warms, it becomes tough. Wrap the dough in plastic wrap and refrigerate for at least 30 minutes before rolling. This simple step keeps the crust flaky and buttery.
Avoiding the Common Pitfall of Over‑Sautéing
Many people sauté vegetables until they’re almost caramelized, which can lead to a burnt taste. Keep the heat moderate and the sauté time short—just enough to soften the vegetables without losing their bright color and crunch.
The Perfect Egg Wash
A simple egg wash of one egg beaten with a tablespoon of water gives the crust a brilliant golden sheen. Brush it just before baking. The glaze also adds a slight crispness to the crust’s surface.
Creative Twists and Variations
This recipe is a playground. Here are some of my favorite ways to switch things up:
Mediterranean Twist
Replace the carrots and peas with sun‑dried tomatoes and Kalamata olives. Add a pinch of oregano and finish with a drizzle of olive oil. This version brings a salty, tangy flavor that pairs beautifully with the creamy filling.
Spicy Cajun Kick
Stir in 1 teaspoon of Cajun seasoning and a splash of hot sauce into the broth. Swap the butter for a bit of smoked paprika. The result is a pot pie with a bold, fiery personality.
Cheesy Surprise
Add 1 cup of shredded Gruyère or sharp cheddar to the filling before baking. The cheese melts into the sauce, creating a gooey, indulgent layer that’s hard to resist.
Vegetarian Delight
Use a mix of mushrooms, diced butternut squash, and kale. Replace the chicken stock with a vegetable stock and add a splash of soy sauce for depth. This version is hearty, earthy, and entirely plant‑based.
Herb Garden Edition
Increase the amount of fresh herbs—parsley, thyme, rosemary, and a touch of tarragon. Add a splash of white wine to the broth. The result is a fragrant, herbaceous pie that feels like a summer garden in a crust.
Gluten‑Free Version
Use a gluten‑free pie crust or a blend of rice flour and tapioca starch for the base. Ensure the roux is made with a gluten‑free flour blend. The texture remains flaky, and the flavor stays on point.
Storing and Bringing It Back to Life
Fridge Storage
Let the pie cool completely before covering it tightly with foil or plastic wrap. Store in the refrigerator for up to 3 days. When ready to eat, reheat in the oven at 350°F for 15 minutes to restore crispness.
Freezer Friendly
Cool the pie fully, then wrap it in two layers of plastic wrap followed by aluminum foil. Freeze for up to 2 months. To reheat, thaw overnight in the refrigerator, then bake at 350°F for 25 minutes.
Best Reheating Method
The secret to a revived pie is a splash of water. Add a tablespoon of water to the bottom of the baking dish before reheating. This creates steam, keeping the filling moist while the crust regains its crunch.