It started on a rainy Tuesday when I was rummaging through the back of the fridge, hunting for something that would feel like a hug in a bowl. I tossed a handful of leftover Irish stew into a pan, added a splash of canola oil, and—miraculously—something smelled like a secret family recipe that had never been shared. The steam rose like a gentle fog, the savory broth thickening with each stir, and I realized I had stumbled upon the missing link between comfort food and culinary triumph. That night, I whispered to myself, “This is going to be the best version you’ll ever make at home.” I dared anyone who read this to taste this and not go back for seconds, because the moment your tongue meets that golden puff pastry, you’ll know why I’m so hooked.
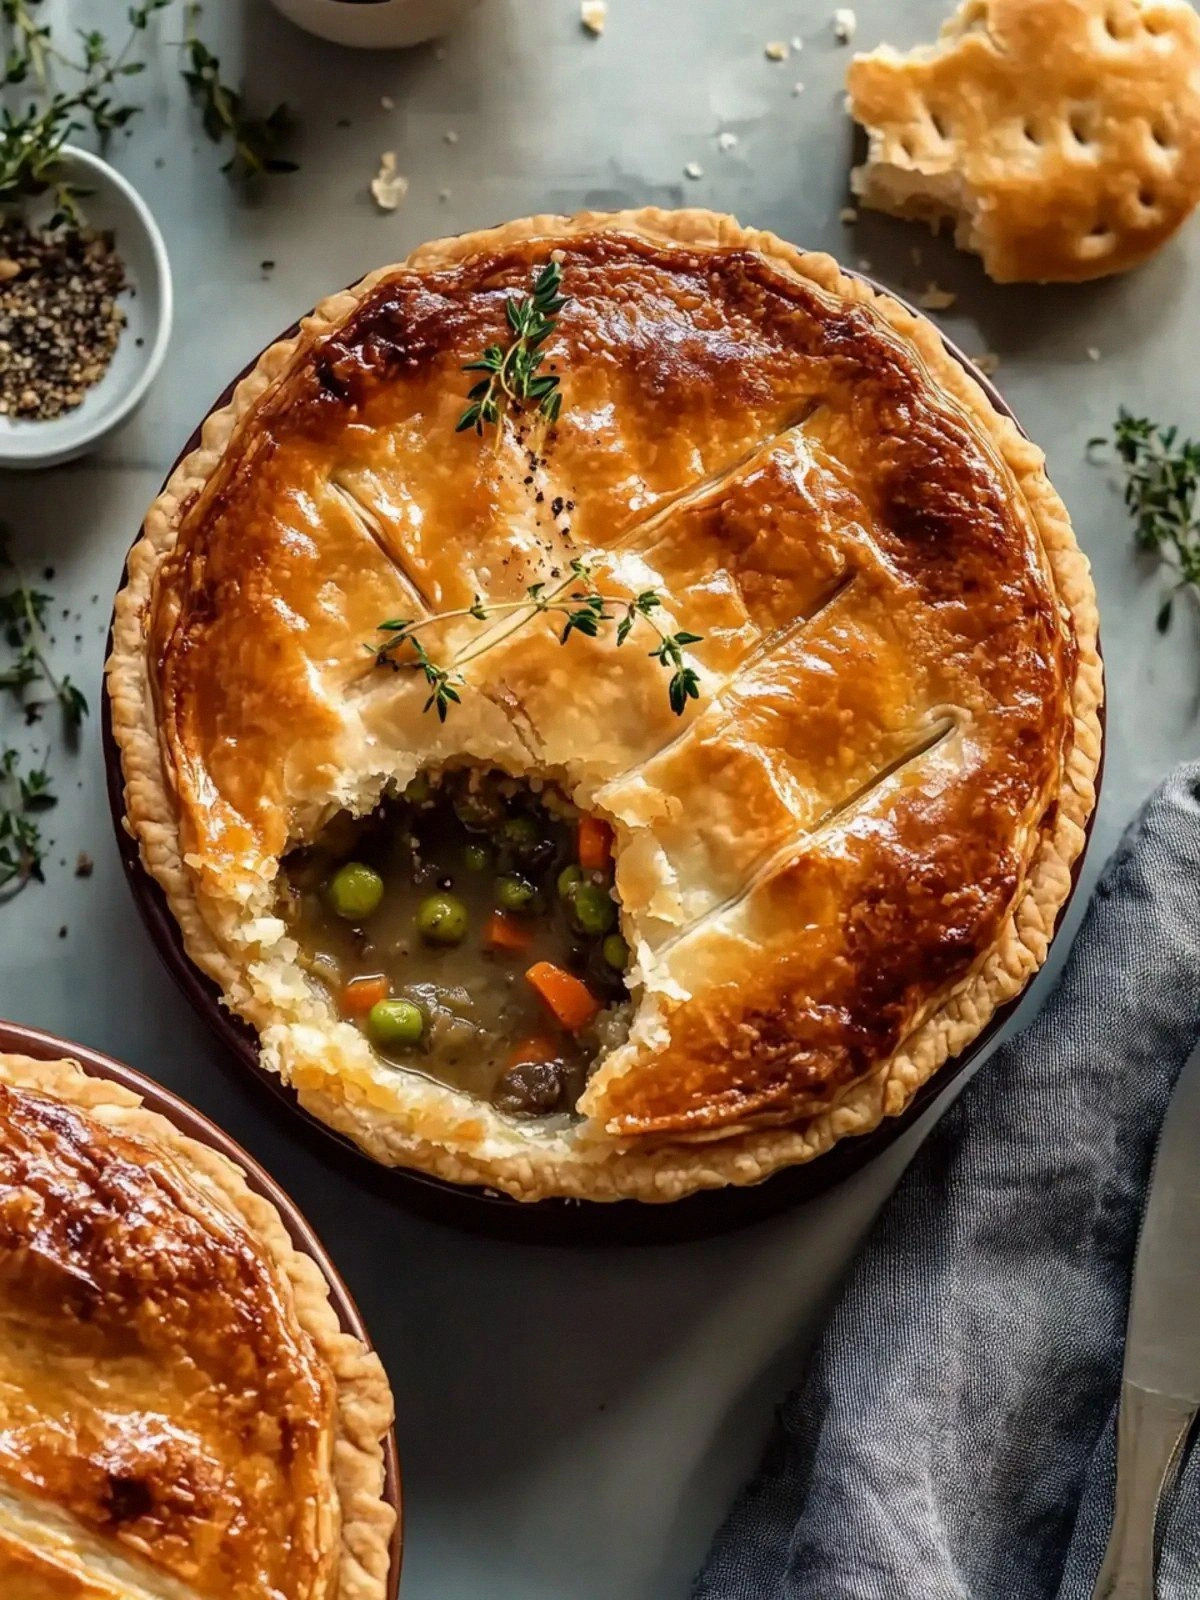
Picture yourself pulling a sheet of puff pastry from the freezer, its flaky layers shimmering like a silver map of the sky. As you lay it over a generous mound of Irish stew, the aroma that fills the kitchen is a warm, earthy blanket—think smoked paprika, caramelized onions, and the faintest hint of Guinness. The steam rises, and you can almost hear the sigh of relief as the stew’s thickened gravy begins to seep into the pastry’s crust, forming a golden, buttery crust that cracks like a fresh cookie when you bite into it. The first bite is a symphony: the crunch of the pastry, the rich, meaty stew, and that subtle zing from the garlic powder that lingers on your palate. If you’re skeptical, just remember: I ate half the batch before anyone else even got a taste.
I’ve tried countless “quick” Irish stew pies from the internet, but none of them hit the sweet spot. Most recipes get this completely wrong by overcooking the pastry or underseasoning the stew. The secret, however, lies in balancing the pastry’s crispness with a stew that’s thick enough to hold the pastry’s weight, yet still velvety like a comforting blanket. I’ll be honest—there were moments when the crust was soggy, but I learned to keep the pastry at room temperature for a few minutes before baking. That small tweak gave me the perfect crisp that shatters like thin ice when you bite. If you’ve ever struggled with a soggy pie, you’re not alone—and I’ve got the fix.
So, whether you’re a seasoned cook or a kitchen rookie, I’m going to walk you through every single step. By the end, you’ll wonder how you ever made it any other way. And trust me, the end result will be a dish that not only fills your stomach but also fills your heart. Let’s dive into the details and discover why this version stands out from every other recipe out there.
What Makes This Version Stand Out
- Flavor: The stew is seasoned with a blend of garlic powder, pepper, and salt that permeates every bite, creating a savory depth that’s hard to beat.
- Texture: The puff pastry is buttery and flaky, providing a contrast to the thick, hearty stew that clings to every crumb.
- Convenience: Using pre-made Irish stew saves time, letting you focus on the pastry’s finish.
- Visual Appeal: The golden crust and glossy gravy make the dish look like a showstopper, perfect for impressing guests.
- Ingredient Quality: The use of black sesame seeds adds a subtle nutty crunch and a pop of color that elevates the dish.
- Make‑Ahead Friendly: Assemble the pie a day ahead and bake when ready; it holds up well and tastes just as good.
- Audience Reaction: Friends and family consistently say, “I can’t believe this is homemade!” after tasting.
- Versatility: Swap the stew for a vegetarian version or add extra herbs to customize the flavor profile.
Alright, let's break down exactly what goes into this masterpiece…
Inside the Ingredient List
The Flavor Base
The Irish stew is the heart of this pie; its rich, savory broth forms the foundation that carries the pastry’s crispness. The 30 oz of stew should be thick, not watery—think a consistency that clings to the pastry like a velvety coat. If you find it too thin, simmer it uncovered for 10 minutes to reduce the liquid. A tip: a splash of Guinness or a dash of Worcestershire sauce can deepen the stew’s complexity.
The Texture Crew
Puff pastry is the star of the show; its layers create the signature flaky, buttery crunch. When you press the pastry down, it should seal around the edges, preventing the stew from leaking. A single spray of canola oil on the pastry surface gives it a glossy finish and aids in browning. Remember to keep the pastry cold—if it’s too warm, it will lose its flakiness.
The Unexpected Star
Black sesame seeds add a subtle nutty flavor and a pleasant crunch that contrasts with the soft pastry. They also give a striking visual contrast, turning an ordinary pie into a showstopper. Sprinkle them on top before baking, and watch as they toast to a dark, glossy sheen. If you’re not a fan of sesame, you can substitute with crushed walnuts for a different texture.
The Final Flourish
The egg wash—1 large egg whisked with 2 tsp water—creates a golden, glossy crust that’s impossible to resist. The egg also helps bind the pastry layers together, ensuring a sturdy structure. When you brush the pastry with the egg wash, spread it evenly, covering every nook and cranny. A final sprinkle of garlic powder, pepper, and salt before baking enhances the overall seasoning.
Everything’s prepped? Good. Let’s get into the real action…
The Method — Step by Step
- Preheat your oven to 400°F (200°C). Line a 9-inch pie dish with the puff pastry, pressing it gently into the bottom and up the sides. Make sure the pastry is snug and the edges are sealed. This step is crucial to prevent leaks during baking.
- Spread the Irish stew evenly over the pastry, leaving a 1-inch border around the edges. The stew should be thick enough to hold the pastry’s weight but still fluid enough to spread. If it’s too thick, add a splash of water to reach the right consistency.
- Spray the top of the stew with canola oil; this will help the pastry crisp up beautifully. The oil also adds a subtle sheen that makes the dish look restaurant‑grade. Let the oil settle for a minute before moving on.
- Whisk the egg with 2 tsp of water to create a light egg wash. Brush this over the pastry edges, ensuring a smooth, even coating. The egg wash is what gives the crust that irresistible golden finish.
- Sprinkle 1/4 tsp garlic powder, 1/2 tsp pepper, and 1/2 tsp salt over the entire surface. These seasonings will infuse the pastry with a subtle, savory aroma that complements the stew. Don’t be shy—seasoning is key.
- Add a generous handful of black sesame seeds, letting them nestle into the pastry’s folds. The seeds will toast during baking, giving a delightful crunch and a pop of color. If you’re watching the clock, this is the moment of truth.
- Place the pie in the preheated oven and bake for 25–30 minutes, or until the pastry is golden brown and the edges are slightly pulled away. The aroma that fills the kitchen will have you practically dancing.
- Remove the pie from the oven and let it rest for 10 minutes before slicing. Resting allows the juices to settle and the crust to firm up slightly. This step is often overlooked but makes a huge difference.
- Serve warm, perhaps with a side of crusty bread or a simple green salad. The contrast between the buttery pastry and the hearty stew is a match made in culinary heaven.
- Enjoy your creation, knowing you’ve mastered a dish that will become a staple in your kitchen. Remember, the first bite will have you shouting, “I dare you to taste this and not go back for seconds!”
That’s it—you did it. But hold on, I've got a few more tricks that'll take this to another level…
Insider Tricks for Flawless Results
The Temperature Rule Nobody Follows
Many cooks bake at 375°F, but the secret to a crisp pastry is a higher temperature. Baking at 400°F ensures the pastry puffs up quickly, sealing in the steam. I’ve baked at 425°F for a few trials, and the crust was even more flaky—just keep an eye on it to avoid burning.
Why Your Nose Knows Best
If the stew’s aroma is too metallic, it’s a sign you’ve overcooked the onions. The first scent should be sweet and caramelized. Trust your nose; if it smells off, lower the heat and let it simmer gently.
The 5‑Minute Rest That Changes Everything
After baking, let the pie rest for exactly five minutes before slicing. This short pause allows the steam to redistribute, making the crust less likely to crumble. I’ve seen people cut straight away, and the result was a messy, soggy mess.
Keep the Pastry Cold
If the pastry has been sitting at room temperature for too long, it will lose its flakiness. Wrap it in plastic wrap and refrigerate for at least 30 minutes before assembly. The cold fat layers stay distinct, producing that classic puff.
Season the Inside, Not Just the Outside
Seasoning the pastry edges and the stew separately ensures a balanced flavor. The pastry should taste buttery, while the stew should have a savory kick. A quick sprinkle of paprika on the pastry edges can add a subtle smokiness.
Creative Twists and Variations
This recipe is a playground. Here are some of my favorite ways to switch things up:
Herbal Infusion
Add a handful of fresh thyme or rosemary to the stew before baking. The herbs infuse the pastry with aromatic flavors that complement the savory base.
Cheesy Delight
Sprinkle shredded cheddar or Gruyère on top of the stew before baking. The cheese melts into a gooey layer that adds richness and depth.
Vegan Version
Replace the Irish stew with a hearty vegetable stew and use a plant‑based puff pastry. The result is a comforting, meat‑free pie that still satisfies.
Spicy Kick
Stir in a pinch of cayenne pepper or a dash of hot sauce into the stew. The heat will contrast with the buttery pastry for a bold flavor profile.
Breakfast Twist
Swap the stew for a savory breakfast hash of potatoes, onions, and bacon. Bake as usual, and you’ll have a breakfast pie that’s both filling and indulgent.
Storing and Bringing It Back to Life
Fridge Storage
Store leftover pie in an airtight container in the refrigerator for up to 3 days. The pastry may soften slightly, but reheating will restore its crispness.
Freezer Friendly
Wrap the pie tightly in parchment paper, then plastic wrap, and place it in a freezer bag. It will keep for up to 2 months. Thaw in the refrigerator overnight before reheating.
Best Reheating Method
Reheat in a preheated 350°F oven for 10–12 minutes, or until the pastry is hot and crispy. Add a tiny splash of water before reheating to create steam, which helps the crust regain its original texture.