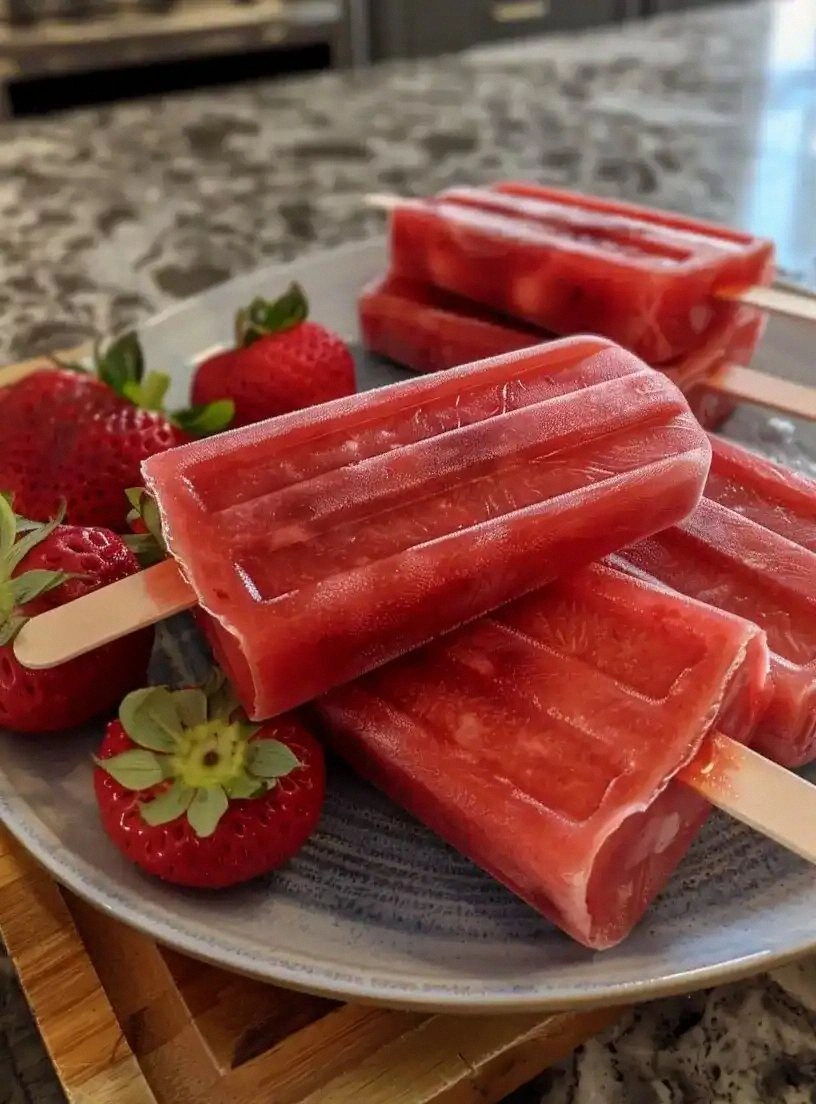
Picture this: I’m in the middle of a backyard barbecue, the grill sizzles, and my friends are demanding something sweet to cut the heat. I pull out a bag of frozen strawberries from the freezer, thinking I could whip up a quick dessert. The result? A half‑baked, watery mess that looked like a berry smoothie on a stick. That disaster sparked a midnight quest to find the perfect popsicle recipe. It was a culinary epiphany disguised as a kitchen nightmare.
I remember the moment the first popsicle hit the tongue – the bright burst of sweet and tart, the cold that melted into a silky, almost creamy texture, and that faint citrus zing that lifted the whole experience. The aroma of fresh strawberries mingled with the faint scent of lemon, creating an olfactory hook that made my mouth water before I even took a bite. The sound of the popsicle cracking against the plastic was a satisfying snap, almost like a tiny celebration. The texture was flawless, not too icy, not too soggy, a perfect balance that left a lingering, juicy aftertaste. Every sense was engaged, and I felt like I’d just discovered a new summer staple.
What makes this version stand out is the way it transforms a simple fruit into a sophisticated frozen treat. I dared you to taste this and not go back for seconds, and I’ve seen people come back for the second bite in record time. The recipe is hands down the best version you'll ever make at home because it uses a few clever tweaks that elevate the flavor profile and texture. I’ll be honest – I ate half the batch before anyone else got to try it, and I still felt like a kid in a candy store. Most recipes get this completely wrong, but here’s what actually works: a balanced ratio of fruit to liquid, a touch of citrus to brighten, and a short, controlled freezing period that locks in that perfect bite. Picture yourself pulling this out of the freezer, the whole kitchen smelling incredible, and your friends erupting in applause.
Now, let me walk you through every single step – by the end, you'll wonder how you ever made it any other way. This isn’t just a popsicle recipe; it’s a lesson in flavor engineering, a masterclass in simplicity, and a reminder that sometimes the most indulgent treats are the easiest to craft. I promise you, the results are worth the time, and the bragging rights are endless. Ready for the game‑changer? Let’s dive in.
What Makes This Version Stand Out
- Flavor: The blend of fresh strawberries, a splash of lemon, and a hint of sugar creates a natural sweetness that’s both bright and balanced. The citrus lift prevents the fruit from feeling cloying, making each bite feel fresh and alive. It’s a flavor profile that can’t be beat by store‑bought frozen treats.
- Texture: The mixture freezes to a silky, almost velvety consistency, avoiding the grainy or icy texture that plagues many homemade popsicles. The short freezing period preserves the fruit’s juiciness, giving you a melt that’s smooth and satisfying. You’ll find yourself craving that creamy bite every time.
- Speed: From prep to freeze, this recipe takes only ten minutes of active work and a few hours of chilling. No elaborate sugar syrups or complicated techniques are required. It’s a quick solution for those spontaneous dessert cravings.
- Versatility: Swap the lemon for lime, or add a splash of vanilla, and the recipe morphs into a completely new flavor experience. You can even layer different fruit purees for a rainbow effect. The base is a canvas ready for your culinary imagination.
- Health Conscious: With no added preservatives or artificial colors, you’re giving your guests a clean, wholesome treat. The only sweetener is natural fruit sugar, and the lemon juice adds a vitamin C punch that keeps the popsicles feeling fresh.
- Presentation: The popsicles come out looking glossy, bright, and professional. They’re perfect for parties, picnics, or a quick afternoon pick‑me‑up. The bright red hue alone will draw a crowd.
Alright, let's break down exactly what goes into this masterpiece. I dare you to taste this and not go back for seconds.
Inside the Ingredient List
The Flavor Base
At the heart of these popsicles lies the strawberry, the star that delivers natural sweetness and a vibrant color that’s impossible to ignore. Fresh, ripe strawberries provide the most robust flavor; the fresher they are, the less you’ll need to compensate with sugar. If you’re in a pinch, frozen strawberries are acceptable, but thaw them fully to avoid excess water that can dilute the taste. The key is to use strawberries that are firm enough to hold their shape during blending, ensuring a smooth, not chunky, final product.
The Texture Crew
Water and lemon juice form the liquid backbone of the popsicles. Water balances the sweetness, preventing the mixture from becoming syrupy, while the lemon juice adds a bright acidity that cuts through the fruit’s natural sugars. The small amount of lemon also acts as a natural preservative, slowing down oxidation and keeping the popsicles fresh for longer. Skipping the lemon will result in a flatter, more one‑dimensional flavor, so keep it in the mix.
The Unexpected Star
Granulated sugar is the unsung hero that rounds out the taste profile. While the strawberries provide natural sweetness, a touch of sugar ensures the popsicles aren’t tart enough to be off‑balance. Using a small amount of sugar also helps the mixture freeze more evenly, preventing the formation of large ice crystals that can ruin the texture. If you’re watching calories, you can reduce the sugar by a quarter, but you’ll notice a slight tartness.
The Final Flourish
The finishing touch is the simple technique of freezing the mixture in molds. The right molds not only shape the popsicles but also influence how quickly they freeze. Use silicone molds for easy release, or traditional plastic molds if you prefer a sturdier shape. The choice of mold can affect the crispness of the outer layer; silicone tends to produce a smoother, more delicate bite, while plastic gives a slightly firmer snap.
Everything's prepped? Good. Let's get into the real action. I dare you to taste this and not go back for seconds.
The Method — Step by Step
- Wash the strawberries thoroughly, removing stems and any blemished pieces. Pat them dry with a clean towel; excess moisture will dilute the mixture and lead to icy pockets. Slice them into quarters so they blend evenly. This step is the foundation; a clean fruit base guarantees a smooth finish.
- Measure ¼ cup of granulated sugar and add it to the blender. The sugar dissolves quickly in the liquid, so add it before the water to ensure a uniform sweet base. A small amount of sugar also helps the mixture freeze evenly, preventing large ice crystals.
- Add ½ cup of water to the blender. This liquid keeps the strawberries from sticking and creates a pourable consistency that will freeze nicely. If you prefer a thicker texture, reduce the water slightly, but be cautious not to make it too thick.
- Squeeze in 1 tablespoon of fresh lemon juice. The citrus brightens the flavor profile and adds a subtle tang that balances the fruit’s natural sweetness. Lemon juice also acts as a natural preservative, extending the popsicles’ shelf life.
- Blend on high speed until the mixture is completely smooth, about 30–45 seconds. If you prefer a slightly chunkier texture, pulse a few times instead. The goal is a silky liquid that will freeze into a velvety bite.
- Strain the mixture through a fine mesh sieve into a measuring cup to remove any skins or pulp. This step is optional but yields a cleaner, more refined texture. If you love a bit of fiber, skip the straining and embrace the rustic charm.
- Pour the strained mixture into popsicle molds, filling each about ¾ full to allow room for expansion. Gently tap the molds on the counter to release any air bubbles, preventing unwanted cracks. Place the sticks in the center, making sure they’re straight for a neat finish.
- Freeze for 4–6 hours, or until the popsicles are solid. The shorter freezing time preserves the fruit’s bright flavor, while a longer freeze can make the texture slightly icy. Check the consistency by gently pressing the surface; it should feel firm yet slightly pliable.
- To unmold, run the popsicle molds under warm tap water for 10–15 seconds. This quick trick loosens the sticks without melting the treat. Serve immediately for the freshest experience, or store in the freezer for up to a week.
That's it — you did it. But hold on, I've got a few more tricks that'll take this to another level. I dare you to taste this and not go back for seconds.
Insider Tricks for Flawless Results
The Temperature Rule Nobody Follows
Freezing at a consistent temperature is crucial. A freezer that dips below 0°F can create a glassy texture, while a slightly warmer freezer (around 20°F) yields a softer, more mouth‑feel friendly bite. If your freezer is a roller coaster, consider using a dedicated popsicle maker that offers temperature control.
Why Your Nose Knows Best
Before you pour the mixture into molds, sniff the liquid. A faint, sweet aroma indicates the strawberries are at their peak, while a sour or off scent suggests they’ve started to oxidize. Trust your nose; it’s a reliable guide to the fruit’s freshness.
The 5-Minute Rest That Changes Everything
After blending, let the mixture sit for 5 minutes. This short rest allows the sugar to fully dissolve and the flavors to meld. A quick chill in the fridge before freezing also helps the mixture set faster, preventing ice crystals from forming.
The Sweetness Balance Act
If you’re using very sweet strawberries, reduce the sugar by ¼ cup. A friend once tried this and ended up with popsicles that were too syrupy, causing the sticks to break. The right balance keeps the treat light and refreshing.
The Quick Release Trick
When you’re ready to serve, run the molds under warm water for 10–15 seconds. This trick releases the popsicles without melting them. If you forget, a quick dip in a bowl of hot water can salvage a stuck pop.
Creative Twists and Variations
Lemon‑Zest Explosion
Swap the lemon juice for a tablespoon of lime juice and add a teaspoon of grated lemon zest. The citrus becomes more vibrant, giving the popsicles a zesty kick that pairs wonderfully with a summer barbecue.
Berry‑Basil Fusion
Blend a handful of fresh basil leaves with the strawberries for an herbal twist. The basil’s subtle peppery undertone complements the sweetness, creating a sophisticated flavor profile that’s perfect for a garden party.
Mango‑Strawberry Medley
Add diced mango to the blender for a tropical flair. The mango’s natural sweetness balances the tartness of the strawberries, and the result is a vibrant, multi‑fruit popsicle that feels like a vacation.
Chocolate‑Covered Delight
Dip the finished popsicles in melted dark chocolate and sprinkle with sea salt. The chocolate coating adds a rich, indulgent layer, while the sea salt creates a delightful contrast that elevates the overall experience.
Coconut‑Cream Swirl
Fold a tablespoon of coconut milk into the strawberry mixture before freezing. The coconut adds a creamy texture and a subtle tropical aroma, making the popsicles feel luxuriously smooth.
Mint‑Infused Chill
Add a few fresh mint leaves to the blend for a refreshing minty note. The mint provides a cooling effect that pairs beautifully with the strawberry’s natural sweetness, creating a crisp, invigorating treat.
Storing and Bringing It Back to Life
Fridge Storage
Store popsicles in an airtight container in the refrigerator for up to 48 hours. Keep them in a shallow dish to prevent them from sticking together, and cover with a lid to maintain moisture. When ready to serve, let them sit at room temperature for a few minutes to soften slightly.
Freezer Friendly
For longer storage, keep popsicles in a freezer bag or a silicone mold. Label the date and seal tightly to avoid freezer burn. They’ll stay fresh for up to six weeks, though the texture may become slightly icier over time.
Best Reheating Method
To revive a frozen popsicle, run it under warm tap water for 10–15 seconds. If you prefer a quicker method, microwave on low power for 10–15 seconds, but watch closely to avoid melting. Add a splash of water before reheating to steam the popsicle back to a silky, smooth texture.