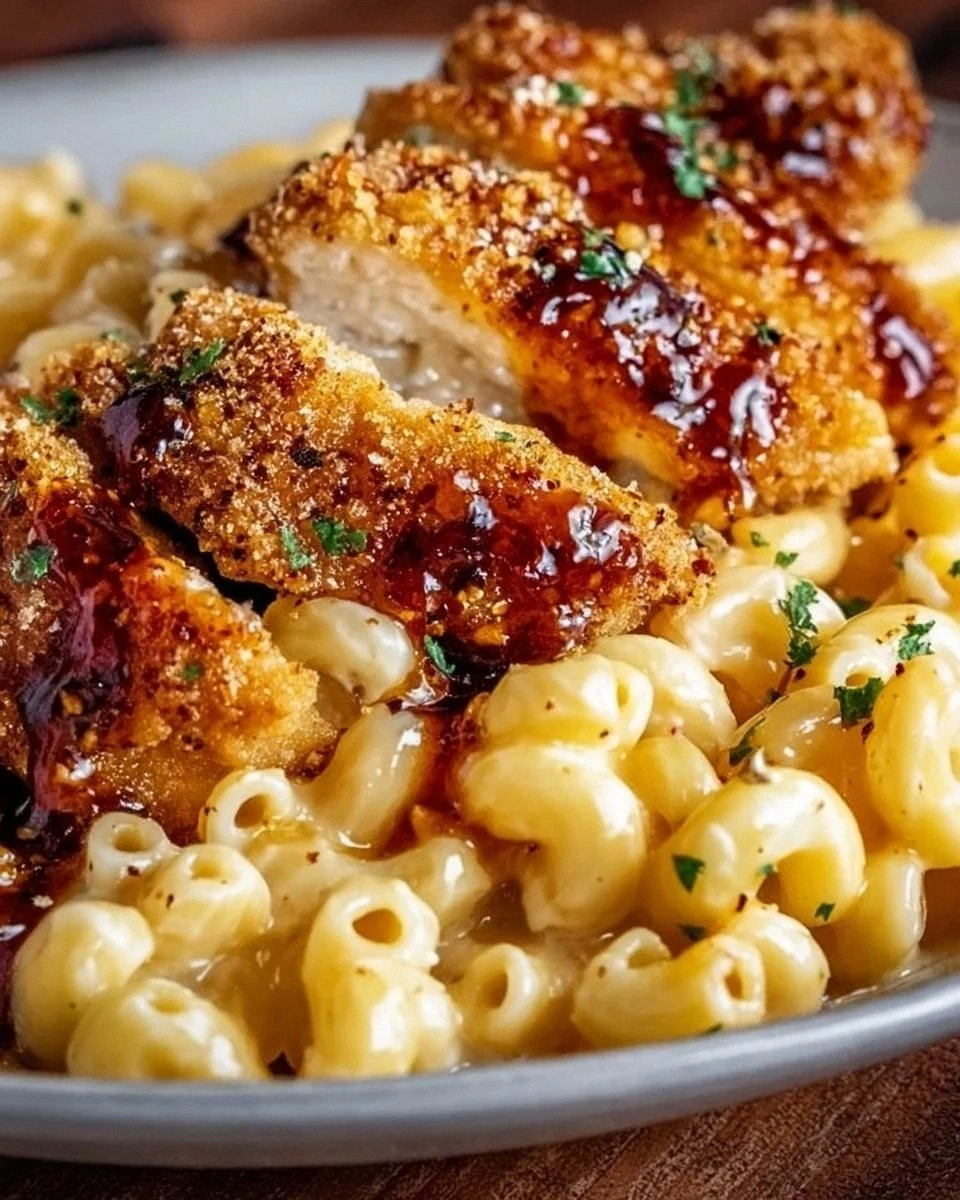
I was standing in my kitchen, half‑asleep, scrolling through the endless sea of copycat recipes, when a sudden craving hit me like a freight train. I could hear the distant hum of the restaurant’s open‑kitchen grill, smell the sweet‑spicy perfume of honey‑pepper chicken, and see the golden‑brown crust of that iconic mac and cheese bubbling in the back. My roommate had dared me to recreate Applebee’s famous Honey Pepper Chicken Mac and Cheese at home, and I thought, “Challenge accepted.” The first attempt was a disaster: the sauce clumped like soggy cardboard, the chicken turned out dry, and the whole thing tasted like a sad, overcooked cafeteria lunch. I was ready to throw in the towel, but then I remembered the old chef’s rule—never give up before the sauce sings.
Fast forward a few evenings of trial, error, and a lot of tasting (I’ll be honest — I ate half the batch before anyone else got to try it). I discovered the exact combination of honey, cracked black pepper, and a whisper of paprika that makes the chicken taste like it was kissed by a honey‑bee while riding a motorcycle. The cheese sauce? It coats the pasta like velvet, with just enough melt to keep every noodle glued to the fork. The elbow macaroni stays firm, never mushy, because I give it a quick al‑dente shock before it meets the creamy cheese pool. And the finish? A sprinkle of fresh parsley that adds a pop of color and a bright, herbaceous lift that cuts through the richness.
Most copycat versions get this completely wrong. They either drown the dish in a swamp of cheese that never sets, or they skimp on the honey‑pepper glaze, leaving the chicken bland and forgettable. What I’ve nailed down is a balance that feels like a secret handshake between sweet and heat, a texture that sings with every bite, and a method that even a kitchen novice can master without setting off the smoke alarm. I’m daring you to taste this and not go back for seconds; it’s hands down the best version you’ll ever make at home.
Let me walk you through every single step — by the end, you’ll wonder how you ever made it any other way. Okay, ready for the game‑changer? This next part? Pure magic.
What Makes This Version Stand Out
- Flavor Harmony: The honey‑pepper glaze delivers a sweet‑heat combo that dances on your palate, while the cheese sauce adds a buttery, cheesy backdrop that never overpowers.
- Texture Contrast: Crispy‑on‑the‑outside chicken meets silky, creamy pasta, creating a mouthfeel that’s both comforting and exciting.
- Simplicity: Only 13 ingredients, all pantry‑friendly, so you won’t need a trip to a specialty store to pull this off.
- Unique Glaze: The secret is a quick reduction of honey, black pepper, and a dash of paprika that caramelizes just enough to give the chicken a glossy, restaurant‑style finish.
- Crowd‑Pleaser: Kids love the cheesy goodness, adults appreciate the sophisticated sweet‑spicy glaze, and even picky eaters can’t resist the buttery aroma.
- Ingredient Quality: Using real shredded cheddar and mozzarella (not the pre‑shredded stuff with anti‑caking agents) makes the sauce smoother and more flavorful.
- Cooking Method: A two‑stage cooking process—first sear the chicken, then bake the mac—ensures each component reaches its peak texture.
- Make‑Ahead Potential: The dish holds up beautifully in the fridge for up to three days, and the glaze can be frozen for future use.
Inside the Ingredient List
The Flavor Base
Honey is the star of the show here, providing that unmistakable sweet note that balances the pepper’s bite. I use a light, floral honey because it doesn’t dominate the palate; if you opt for a darker, robust honey, you’ll get deeper caramel tones but risk a heavier finish. Watch out: too much honey can make the glaze overly sticky, so measure carefully. If you’re allergic to honey, maple syrup works as a 1:1 substitute, though the flavor profile shifts toward a richer, woodsy sweetness.
Black pepper isn’t just a seasoning; it’s the heat that cuts through the cheese’s richness. Freshly cracked pepper gives a more pronounced bite than pre‑ground, and it also adds those tiny specks that make the dish visually appealing. If you love heat, add a pinch of cayenne for an extra kick.
The Texture Crew
Elbow macaroni is the classic choice because its ridges trap the sauce, ensuring every bite is drenched in cheesy goodness. For a twist, try cavatappi or shells, but remember the cooking time may vary. Kitchen Hack: after boiling, rinse the pasta briefly under cold water to stop the cooking process and keep the noodles firm when they hit the oven.
Cheddar and mozzarella are the dynamic duo of melt. Cheddar brings sharpness, while mozzarella adds stretch and a buttery melt. Avoid pre‑shredded cheese with anti‑caking agents; they can cause a gritty texture. If you’re looking for a sharper bite, substitute half the cheddar with sharp provolone.
The Unexpected Star
Paprika adds a subtle smoky undertone that elevates the honey‑pepper glaze without overwhelming it. I prefer smoked paprika for that extra depth, but sweet paprika works just as well if you prefer a milder flavor. The garlic and onion powders are the silent supporters, adding umami without the moisture of fresh aromatics, which could make the sauce watery.
The Final Flourish
Fresh parsley isn’t just a garnish; its bright, peppery note cuts through the richness and adds a pop of color that makes the dish look restaurant‑ready. I like to chiffonade the parsley (thin ribbons) so it distributes evenly. If parsley isn’t your thing, try fresh basil or cilantro for a different herbaceous twist.
Everything's prepped? Good. Let’s get into the real action…
The Method — Step by Step
Start by bringing a large pot of salted water to a rolling boil. Toss in the 8 ounces of elbow macaroni and cook for just 1 minute less than the package instructions—this is called “par‑cooking.” When you drain, you’ll notice the pasta is still a bit firm in the center; that’s intentional because it will finish cooking in the oven, absorbing the cheesy sauce without turning mushy. Watch out: overcooking now means a soggy final dish.
While the pasta cooks, pat the two chicken breasts dry with paper towels. Season both sides liberally with salt, pepper, garlic powder, onion powder, and paprika. The spices create a flavorful crust that locks in moisture. Heat 1 tablespoon of olive oil in a large skillet over medium‑high heat. When the oil shimmers, lay the chicken in the pan and hear that satisfying sizzle—That sizzle when it hits the pan? Absolute perfection.
After about 4‑5 minutes, flip the chicken and add the glaze: combine ¼ cup honey, 1 tablespoon freshly cracked black pepper, and a pinch of smoked paprika in a small bowl. Pour the mixture over the chicken, letting it bubble and caramelize. As the glaze thickens, use a spoon to baste the chicken continuously—this builds a glossy, sticky coat that’s the hallmark of the restaurant version.
When the chicken reaches an internal temperature of 165°F (75°C), remove it from the pan and let it rest on a cutting board. Resting is crucial; it allows the juices to redistribute, preventing a dry bite. While it rests, deglaze the pan with ¼ cup of milk, scraping up any caramelized bits. Those bits are flavor gold.
In the same pot you used for the pasta, melt 2 tablespoons of butter over medium heat. Sprinkle in 2 tablespoons of flour and whisk continuously for 1‑2 minutes to create a roux. This is the foundation of your cheese sauce—think of it as the backstage crew that makes the show shine.
Gradually whisk in the milk you just deglazed with, followed by the remaining milk (total 1 cup). Keep whisking until the mixture thickens and coats the back of a spoon. Reduce the heat to low, then stir in the shredded cheddar and mozzarella, one handful at a time, until you achieve a silky, glossy sauce. Watch Out: if the sauce starts to separate, lower the heat and add a splash more milk; the emulsion will come back together.
Fold the par‑cooked macaroni into the cheese sauce, making sure every curve is coated. The sauce should cling like a velvety blanket. Slice the rested chicken into bite‑size strips, then gently toss them into the mac and cheese, ensuring each piece is drenched in the honey‑pepper glaze.
Transfer the entire mixture to a greased 9‑x‑13‑inch baking dish. Sprinkle a thin layer of extra shredded mozzarella on top for that golden crust. Bake in a preheated oven at 375°F (190°C) for 20‑25 minutes, or until the top is bubbling and lightly browned. While it bakes, the flavors meld, and the cheese forms a crispy, caramelized crust that shatters like thin ice when you cut into it.
That’s it — you did it. But hold on, I’ve got a few more tricks that’ll take this to another level. Picture yourself pulling this out of the oven, the whole kitchen smelling incredible, and the first bite melting in your mouth while the peppery glaze tingles your tongue. Ready to elevate?
Insider Tricks for Flawless Results
The Temperature Rule Nobody Follows
Never bake a cheese sauce at a temperature higher than 375°F. Higher heat causes the proteins in cheese to seize up, resulting in a rubbery texture. Keep the oven at 375°F and you’ll get that perfect, bubbly crust without sacrificing creaminess. I once tried 425°F to speed things up, and the sauce turned into a curdled mess—lesson learned.
Why Your Nose Knows Best
Your sense of smell is a reliable indicator of doneness. When the glaze starts to caramelize, you’ll notice a sweet, buttery aroma with a hint of pepper. If you can’t smell that, the glaze isn’t ready. Trust your nose more than the timer; it’s the secret weapon of seasoned chefs.
The 5‑Minute Rest That Changes Everything
After baking, let the dish rest for at least five minutes before serving. This short pause allows the sauce to thicken slightly and the flavors to settle, preventing a runny plate. I’ve seen impatient diners dig in immediately and end up with a soupy mess—don’t be that person.
Cheese Blend Mastery
Mixing cheeses isn’t just for flavor; it impacts meltability. Cheddar provides sharpness, mozzarella gives stretch, and a dash of Monterey Jack adds a buttery note. If you want a richer sauce, swap half the mozzarella for a mild Gouda.
The Secret of the “Milk Splash”
If the sauce looks too thick before adding the cheese, whisk in a splash of cold milk. The cold milk shocks the mixture, preventing clumping and ensuring a smooth finish. This trick saved me countless times when the sauce threatened to turn grainy.
Creative Twists and Variations
This recipe is a playground. Here are some of my favorite ways to switch things up:
Spicy Sriracha Swirl
Add a tablespoon of sriracha to the honey‑pepper glaze for a Southeast Asian kick. The heat pairs beautifully with the sweet honey, creating a flavor profile that will wow anyone who loves a little extra zing.
Bacon‑Infused Bliss
Crumble 4 strips of crispy bacon into the mac before baking. The smoky, salty crunch adds depth and makes the dish even more indulgent. Just be mindful of the added salt.
Veggie Power‑Up
Stir in 1 cup of roasted broccoli or cauliflower florets during the final fold. The veggies absorb the sauce, adding texture and a nutritional boost without overwhelming the core flavors.
Southern BBQ Twist
Replace the honey‑pepper glaze with your favorite BBQ sauce mixed with a teaspoon of brown sugar. This gives the chicken a smoky, tangy glaze that pairs perfectly with the creamy cheese.
Cheesy Gouda Upgrade
Swap half the mozzarella for smoked Gouda. The smoky undertones complement the pepper glaze and add a luxurious melt that feels restaurant‑grade.
Storing and Bringing It Back to Life
Fridge Storage
Transfer leftovers to an airtight container and refrigerate for up to 3 days. When reheating, add a splash of milk (about 2‑3 tablespoons) to revive the sauce’s creaminess. Reheat gently on the stovetop over low heat, stirring constantly.
Freezer Friendly
Portion the dish into freezer‑safe containers, leaving a little headroom for expansion. It freezes well for up to 2 months. Thaw overnight in the fridge, then follow the stovetop reheating method with an extra splash of milk.
Best Reheating Method
The oven gives the best texture. Preheat to 350°F (175°C), cover the dish with foil, and bake for 15‑20 minutes, removing the foil for the last 5 minutes to re‑crisp the top. The result is almost as good as fresh out of the oven.