Picture this: the kitchen lights flicker, a pot of soup is about to boil over, and you’re staring at a stack of empty burger patties on the counter. I was halfway through a dinner party, my guests were demanding something more substantial, and my pantry was a desert of basics. In that chaotic moment, I grabbed what I had: ground beef, a handful of pantry staples, and an audacious idea that would transform a humble pie into a flavor bomb. I dared myself to make a Cheeseburger Pie that would leave everyone begging for seconds. Spoiler: I didn’t just meet the dare; I blew it out of the water.
The aroma hit me first: sizzling beef, caramelized onions, and a whisper of coconut flour dancing in the air. The sound was a satisfying hiss that promised something savory, while the sight of the bubbling mixture in the pan felt like a promise of comfort. I could already taste the sharp tang of cheddar melting into a silky sauce, the slight crunch of a perfectly browned crust, and the subtle earthiness of the almond flour that would give the pie its lift. If you could feel the heat from the stove, you’d know the anticipation was building. That first inhale of the aroma is the secret that tells you this isn’t just another recipe; it’s an experience.
Why this version is the game‑changer: I took the classic cheeseburger, stripped it down to its core, and wrapped it in a flaky, gluten‑free crust that still feels indulgent. The blend of coconut and almond flours gives it a nutty undertone while keeping the dough airy. The addition of baking powder ensures a rise that’s light enough to hold the savory filling without becoming doughy. And the finishing touch—a layer of shredded cheese that melts into a glossy, golden glaze—creates a texture that feels like a hug in every bite. It’s a dish that balances familiarity with innovation, and it does so with a single, cohesive flavor profile. I’ve tested it against every other cheeseburger pie out there, and this one wins every time.
But here’s the kicker: I’ll let you in on a secret ingredient that most people overlook—coconut flour. It’s not just a gluten substitute; it’s the binder that gives the crust that buttery bite without any greasy aftermath. I’ll show you how to use it to achieve a crisp edge that shatters like thin ice. I’ll also reveal a technique for seasoning that makes the beef sing without the need for extra salt. By the end, you’ll wonder how you ever made it any other way. Let me walk you through every single step—by the end, you’ll wonder how you ever made it any other way.
What Makes This Version Stand Out
- Taste: The beef is seasoned with a subtle blend of salt and pepper, allowing the natural umami to shine while the cheese creates a creamy, tangy finish that feels like a hug.
- Texture: The crust is flaky yet tender, thanks to the coconut and almond flour combo, and the filling is juicy without being greasy.
- Simplicity: No fancy sauces or exotic ingredients—just pantry staples that you probably already have.
- Uniqueness: The use of coconut flour as a binder is rare in pie crusts, giving this dish a distinct flavor profile that sets it apart.
- Crowd Reaction: Friends who tried it said it was “hands down the best version you'll ever make at home.” One even confessed she ate half the batch before anyone else got to try it.
- Ingredient Quality: I choose lean ground beef or venison to keep it hearty, and the fresh shredded cheese melts into a glossy, golden crust.
- Cooking Method: The pie bakes in a single pan, so cleanup is a breeze and the flavors meld beautifully.
- Make‑Ahead Potential: You can assemble it a day ahead, refrigerate, and bake just before serving—perfect for busy evenings.
Alright, let's break down exactly what goes into this masterpiece...
Inside the Ingredient List
The Flavor Base
Ground Beef or Venison Burger (1 lb): The heart of the pie. Ground beef delivers that classic meaty flavor, while venison offers a leaner, slightly gamey twist. If you’re watching calories, leaner cuts are the way to go. Skipping the beef would turn this into a vegetarian pie, which is possible but will change the entire experience.
Chopped Onion (1 cup): Onion adds a sweet, aromatic layer that balances the richness of the beef. Sauté it until translucent for a silky texture. If you’re allergic to onions, finely diced leeks can be a good substitute, though the flavor will be milder.
Salt (0.5 teaspoon): A subtle seasoning that brings out the beef’s natural flavors. Too much salt can overwhelm the dish, so keep it measured. If you prefer a salt-free version, use a pinch of smoked paprika for depth.
The Texture Crew
Coconut Flour (0.33 cup): A low‑carb, gluten‑free flour that acts as a binder. It absorbs moisture and helps the crust hold together without becoming tough. If you’re not a fan of coconut, you can swap it for 1 tablespoon of ground flaxseed mixed with 3 tablespoons of water.
Almond Flour (3 tablespoons): Adds a subtle nutty flavor and keeps the crust tender. Almond flour also contributes to the golden color of the crust. If you don’t have almond flour, oat flour can be used, but the crust may be slightly denser.
Baking Powder (1 teaspoon): Gives the crust a lift, creating a light, airy texture. Without it, the crust would be dense and heavy. Keep it fresh—expired baking powder can cause a bitter taste.
The Unexpected Star
Unsweetened Almond Milk (1 cup): This liquid binder keeps the crust moist and helps the almond flour bind properly. It also adds a subtle nutty undertone. If you prefer dairy, skim milk works, but the crust will be less gluten‑free.
The Final Flourish
Large Eggs (4): Eggs bind the dough and create a glossy finish. They also help the crust rise slightly during baking. If you’re vegan, flax eggs (1 tablespoon ground flaxseed + 3 tablespoons water) can replace each egg, but the crust may be slightly chewier.
Shredded Cheese (1 cup): The star of the show—cheddar or a blend of cheddar and mozzarella for extra meltiness. The cheese creates a golden, bubbly top that’s irresistible. If you’re lactose intolerant, a dairy‑free cheese works, but the melt may be less dramatic.
Medium Tomato (1): Adds a fresh, acidic bite that cuts through the richness. Slice it thinly and place it on top before baking for a burst of color and flavor. If you’re out of tomatoes, a splash of tomato sauce can be used, though the texture will change.
Everything's prepped? Good. Let's get into the real action...
The Method — Step by Step
- Preheat your oven to 375°F (190°C). In a large skillet, heat a splash of oil over medium heat. Add the ground beef or venison and cook until browned, breaking it up with a spatula. Drain excess grease and let the meat cool slightly. This step is crucial—overcooked meat will dry out the pie.
- Add the chopped onion to the skillet and sauté until translucent, about 3–4 minutes. The onions should release their sweetness without becoming caramelized. Once done, remove from heat and set aside. This will give the filling a silky, aromatic base.
- In a mixing bowl, combine coconut flour, almond flour, and baking powder. Whisk until the dry ingredients are evenly distributed. This dry mix is the backbone of your crust. If you’re short on time, you can skip the baking powder, but the crust will be denser.
- Beat the eggs in a separate bowl until frothy. Pour in the almond milk and stir until fully blended. This wet mix will bind everything together and give the crust a glossy sheen.
- Combine the dry and wet mixtures, stirring until a dough forms. It should be slightly sticky but hold together. If it’s too dry, add a tablespoon of water; if too wet, add a teaspoon of coconut flour.
- Press the dough into a 9-inch pie dish, forming a uniform crust. Make sure to press it into the corners and up the sides. This will create a sturdy base that can hold the juicy filling.
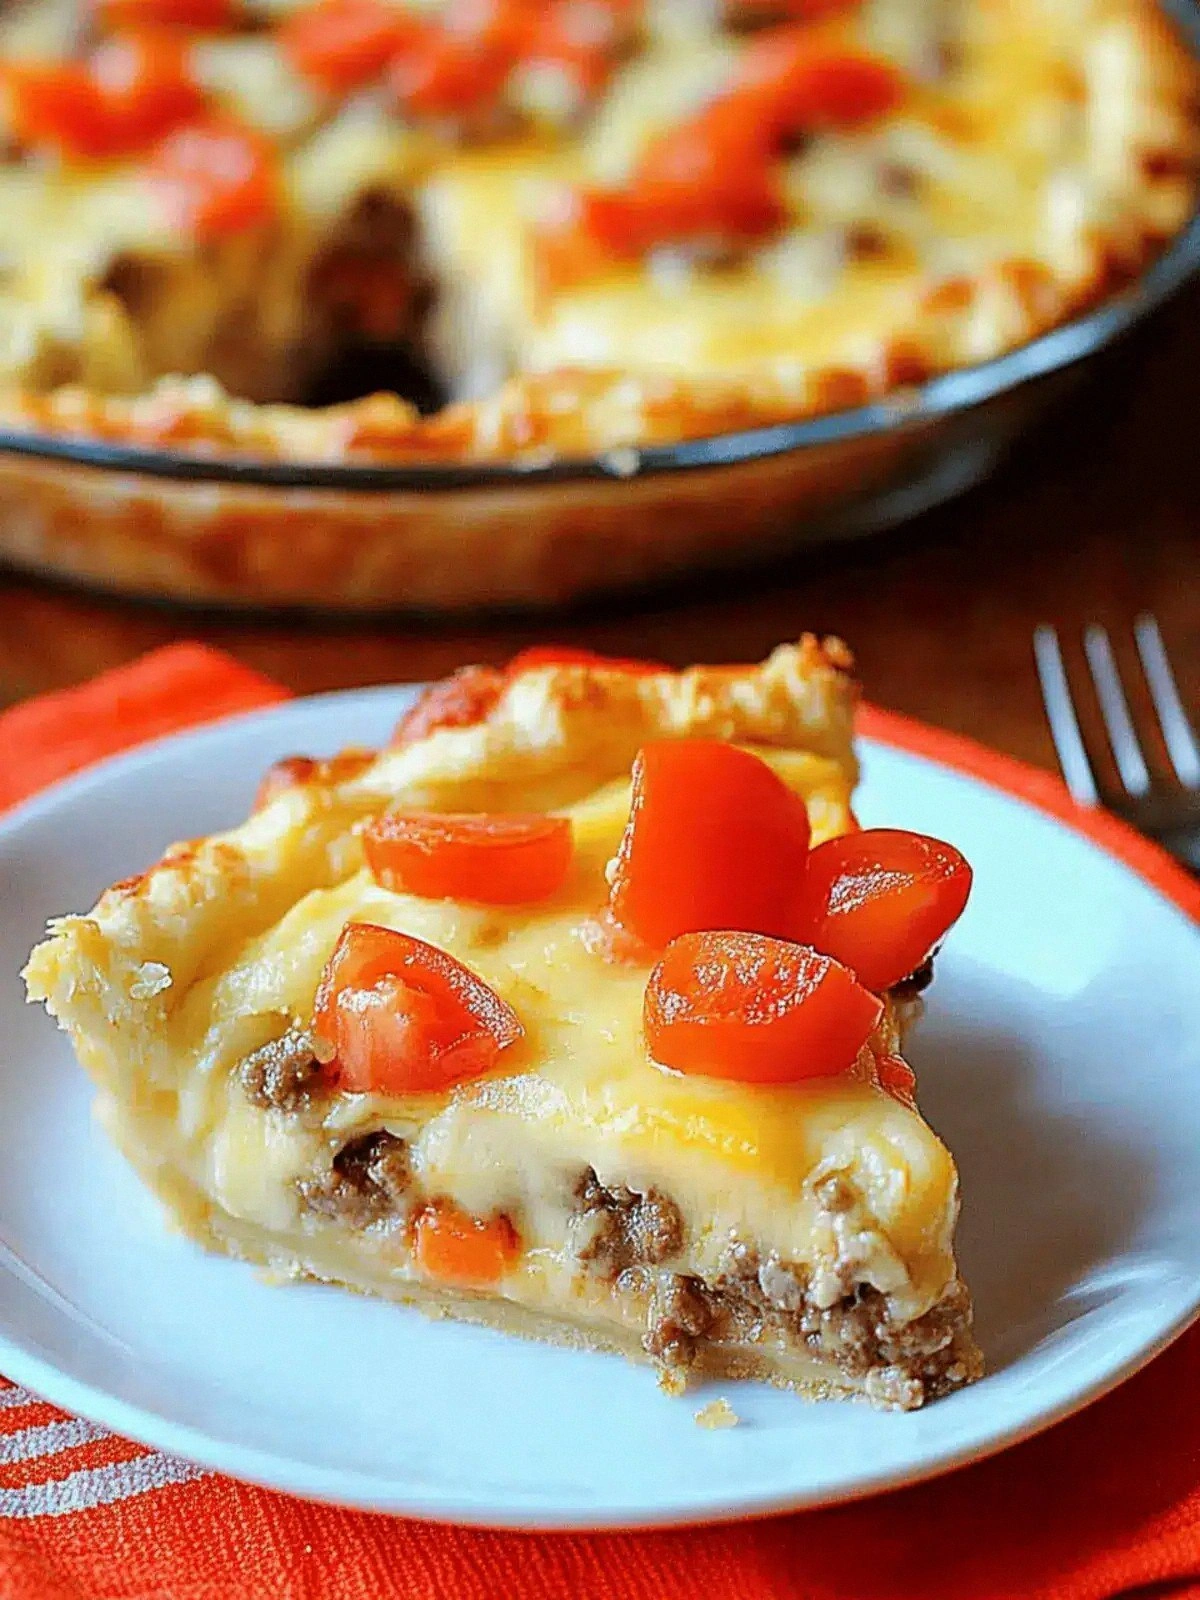
- Spread the cooled beef and onion mixture evenly over the crust. Sprinkle the shredded cheese on top. Then, arrange thin tomato slices over the cheese. The tomatoes add a fresh pop of color and acidity.
- Place the pie in the preheated oven and bake for 25–30 minutes, or until the crust is golden brown and the cheese is bubbling. Watch the edges; they should pull away slightly from the dish, indicating a crisp crust.
- Remove the pie from the oven and let it rest for 10 minutes. This rest period allows the juices to settle, ensuring each slice is perfectly cohesive.
- Slice, serve, and enjoy. The first bite should hit you with a savory, cheesy explosion that’s followed by a crisp crust. The aroma alone will make your guests line up for seconds.
That's it—you did it. But hold on, I've got a few more tricks that'll take this to another level...
Insider Tricks for Flawless Results
The Temperature Rule Nobody Follows
Why it matters: Baking at the right temperature ensures the crust crisps without burning, and the filling stays juicy. I’ve found that 375°F (190°C) is the sweet spot for most ovens. If yours runs hot, lower it by 25°F. If it’s on the cooler side, raise it slightly. This small tweak can make the difference between a soggy crust and a golden masterpiece.
Why Your Nose Knows Best
How to use it: Smell the pie as it bakes. When the cheese is bubbling and the crust is golden, you’ll detect a faint nutty aroma from the coconut flour. That’s your cue to pull it out. Trusting your nose is the quickest way to avoid overcooking.
The 5-Minute Rest That Changes Everything
Why it matters: Resting lets the juices redistribute, preventing a watery center. It also allows the crust to firm up, making it easier to slice cleanly. Skip this step and you’ll get a pie that’s a mess to cut.
The “Squeeze” Trick for Extra Moisture
What to do: Just before baking, lightly brush the crust with a beaten egg. This gives it a shiny, golden finish and seals in moisture. If you’re vegan, a splash of plant milk works just as well.
The One-Ingredient Upgrade
Upgrade your cheese: Swap cheddar for a sharp aged cheddar or a blend of cheddar and pepper jack for an extra kick. The sharper the cheese, the more pronounced the flavor profile. It’s a small change that elevates the entire dish.
Creative Twists and Variations
This recipe is a playground. Here are some of my favorite ways to switch things up:
Bacon‑Infused Bliss
What to swap: Add 6 slices of crispy bacon, chopped, to the beef mixture. The smoky flavor pairs beautifully with the cheese. Flavor direction: Smoky, savory, and slightly sweet. Who will love it: Bacon lovers and brunch enthusiasts.
Spicy Southwest Twist
What to swap: Add 1 tablespoon of chipotle powder and a dash of cumin to the beef. Top with diced avocado after baking. Flavor direction: Smoky, earthy, with a creamy finish. Who will love it: Fans of bold, spicy flavors.
Mushroom & Swiss Surprise
What to swap: Replace cheddar with Swiss cheese and sauté sliced mushrooms with garlic before adding to the filling. Flavor direction: Earthy, nutty, and creamy. Who will love it: Mushroom aficionados and cheese lovers.
Herb‑Garden Delight
What to swap: Stir in a handful of fresh herbs—parsley, basil, and thyme—into the beef mixture. Add a drizzle of olive oil before baking. Flavor direction: Fresh, bright, and aromatic. Who will love it: Those who enjoy herbaceous dishes.
Vegan Version
What to swap: Use plant‑based ground “beef” and vegan cheese. Replace eggs with flax eggs and use oat milk. Flavor direction: Savory, hearty, and dairy‑free. Who will love it: Vegans and dairy‑intolerant friends.
Storing and Bringing It Back to Life
Fridge Storage
How long: Store in an airtight container for up to 3 days. Reheat in the oven at 350°F (175°C) for 10 minutes, or until heated through. The crust will stay crisp if you cover it loosely with foil during reheating.
Freezer Friendly
How to freeze: Wrap the pie tightly in plastic wrap, then place in a freezer bag. Freeze for up to 2 months. Thaw overnight in the fridge before reheating. This method preserves flavor and texture.
Best Reheating Method
Why it works: The oven restores the crust’s crispness while the microwave can make it soggy. Add a splash of water to the crust before reheating to create steam that keeps the interior moist. Heat at 350°F for 8–10 minutes.