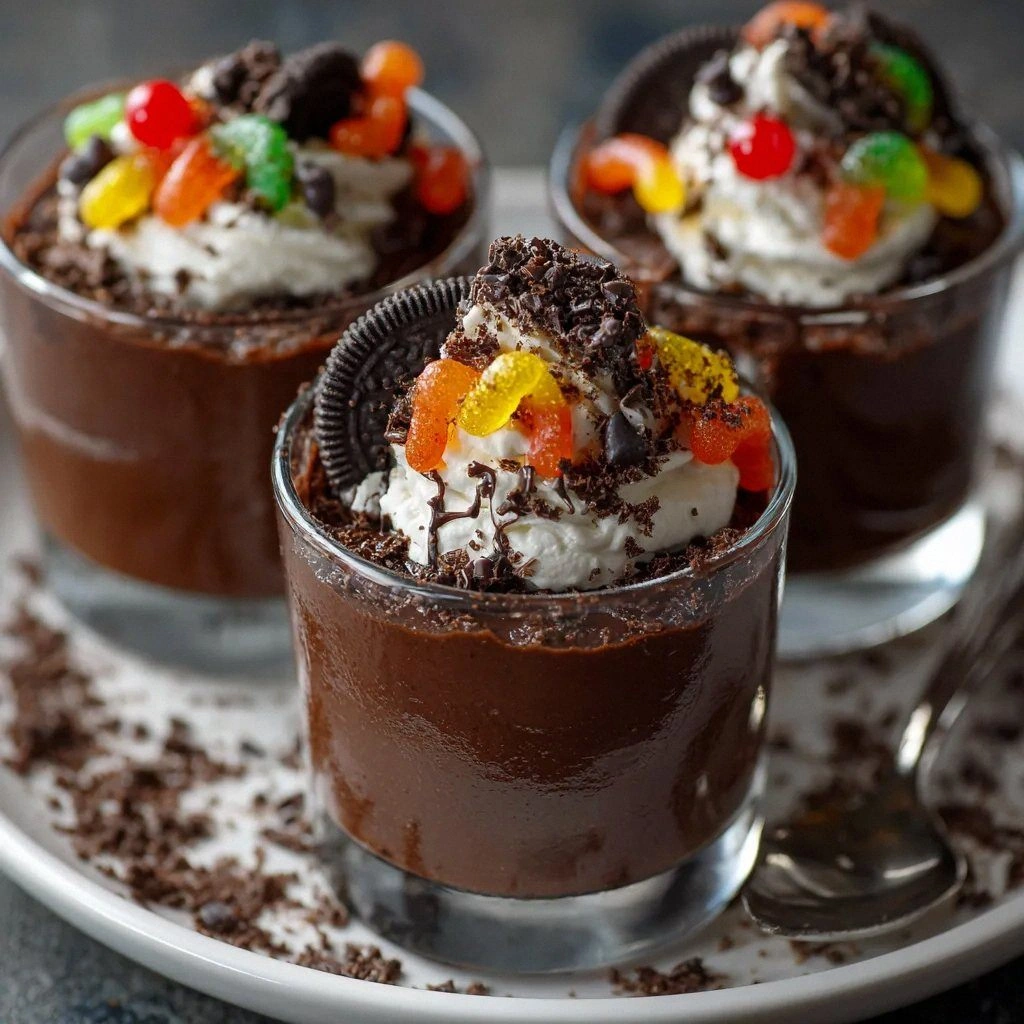
Picture this: you’re halfway through a late‑night binge‑watch of a horror anthology, the lights are low, and the kitchen smells faintly of cocoa and sugar. You’re craving something sweet, something that feels like a guilty indulgence, but you’re not ready to commit to a full cake or pie. Suddenly, the idea pops into your head: pudding cups that look like a spooky graveyard. It sounds absurd, but trust me, the combination of chocolate pudding, cookie “dirt,” whipped cream “moss,” and gummy worms “crawlers” is the ultimate treat for any night of the year. I dare you to taste this and not go back for seconds.
I’ve been experimenting with dessert hacks for years, but this one was a revelation. The moment the pudding hit the glass, the rich chocolate swirled like a midnight river, and the crushed cookies settled into the base, creating a textured layer that mimicked the look of dark, damp earth. The whipped cream floated like mist over the “graveyard,” and the gummy worms seemed to crawl right out of the scene. The whole thing smelled like a sweet, chocolatey forest after a rainstorm—sweet, comforting, and undeniably creepy.
What makes this version stand out from every other pudding cup recipe is the meticulous attention to detail and the playful twist on presentation. It’s not just a dessert; it’s an experience that engages all five senses. The crunchy cookies give a satisfying snap, the smooth pudding feels silky against the tongue, the airy whipped cream offers a light contrast, the gummy worms add a fun surprise, and the chocolate sprinkles finish with a glossy, earthy look. I’ve been told that even the most skeptical dessert skeptics can’t resist the first bite.
And there’s a secret ingredient that most people overlook: a pinch of sea salt in the pudding mixture. This subtle touch lifts the chocolate’s depth and balances the sweetness, making every cup feel more refined. If you’re curious, stick around—by the end of this guide, you’ll wonder how you ever made pudding cups any other way. Let me walk you through every single step, and I promise you’ll be ready to host the ultimate Halloween party—or any night that needs a little spooky sweetness.
What Makes This Version Stand Out
- Taste: The chocolate pudding is the heart of the dish—rich, velvety, and slightly bitter, which balances the sugary gummy worms and whipped cream. The pinch of sea salt is the secret weapon that elevates the flavor profile.
- Texture: The crushed cookies provide a crunchy base that contrasts with the smooth pudding and airy whipped cream, creating a multi‑sensory bite that feels like a chocolatey adventure.
- Presentation: The “graveyard” look is achieved with a dark, earthy base, a layer of “mossy” whipped cream, and gummy worms that seem to crawl across the surface, turning each cup into a miniature scene.
- Simplicity: All the steps are straightforward, and the ingredients are pantry staples. You can make this in under 45 minutes, and it’s perfect for both beginners and seasoned bakers.
- Make‑ahead: The pudding can be prepared a day ahead, and the assembly only takes a few minutes. This is ideal for parties where you want to minimize last‑minute prep.
- Crowd Reaction: Kids and adults alike love the playful concept. The gummy worms add a touch of fun, while the chocolate base satisfies any sweet craving.
- Ingredient Quality: Using high‑quality chocolate pudding and premium chocolate sandwich cookies makes a noticeable difference in taste and texture. The fresher the ingredients, the better the final product.
- Versatility: You can swap out gummy worms for other Halloween candies, or even create a savory version for a different twist. The recipe is a playground for creativity.
Alright, let's break down exactly what goes into this masterpiece. And remember, the key to a flawless graveyard pudding cup is the layering technique—each layer should be distinct yet cohesive.
Inside the Ingredient List
The Flavor Base
Chocolate pudding is the star of the show! Use instant chocolate pudding for a quick fix or opt for a richer dark chocolate version for an intense flavor. The pudding should be thick enough to hold its shape but still pourable, allowing it to layer neatly over the cookie base. If you skip the pudding, you’ll lose the essential chocolate depth that makes the entire dessert feel indulgent. For a silky finish, whisk the pudding until it’s glossy before pouring.
The Texture Crew
Crushed chocolate sandwich cookies add a delightful crunch and mimic the look of dirt. You can use any brand you like, or even make your own if you’re feeling adventurous! The texture of the cookies is critical; too fine and it will turn into a paste, too coarse and it will feel like gravel. A balanced crush gives a satisfying bite that contrasts with the smooth pudding. If you don’t have a food processor, place the cookies in a zip‑lock bag and crush them with a rolling pin—just be sure to keep the crush even.
The Unexpected Star
Gummy worms are essential for the spooky effect! Feel free to mix in other Halloween-themed candies for extra fun. The gummy worms add a chewy texture and a burst of fruity sweetness that cuts through the richness of the chocolate. They also serve as a visual cue that ties the dessert to a Halloween theme. If you’re not a fan of gummy worms, try using chocolate-dipped pretzel sticks or small chocolate hearts for a different twist.
The Final Flourish
Whipped cream: This fluffy topping creates a light, airy layer that balances the richness of the pudding. You can use store-bought or whip your own for a fresher taste. The whipped cream should be stiff enough to hold its shape when piped, but not so stiff that it becomes buttery. A touch of vanilla extract can enhance the flavor, giving the cream a subtle warmth. If you want a healthier version, try using Greek yogurt with a bit of honey and then whipping it until airy.
Chocolate sprinkles: A sprinkle of these adds a finishing touch, enhancing the ‘dirt’ look and making your cups even more festive. The sprinkles also give a subtle crunch and a glossy finish that catches the light. Use a small amount—just enough to mimic the look of dusted earth. If you’re looking for a healthier option, try using crushed dark chocolate or cocoa nibs instead.
Everything's prepped? Good. Let's get into the real action...
The Method — Step by Step
- Prepare the Cookie Base: Place 1 1/2 cups of crushed chocolate sandwich cookies in a large mixing bowl. Spread them evenly over the bottom of each serving cup or a shallow dish if you’re making a batch. The cookies should form a solid, slightly uneven layer that resembles the surface of a graveyard. Let them sit while you prepare the pudding.
- Mix the Pudding: In a separate bowl, whisk 2 cups of instant chocolate pudding mix with 2 cups of cold milk until it thickens to a pourable consistency. Add a pinch of sea salt to enhance the chocolate flavor. Stir until the mixture is smooth and glossy, like a midnight river.
- Layer the Pudding: Gently pour the chocolate pudding over the cookie base, allowing it to settle into the cracks. The pudding should cover the cookies completely, creating a dark, chocolatey surface. Let the pudding set for about 10 minutes so it firms up slightly before adding the next layer.
- Whip the Cream: In a chilled bowl, whip 2 cups of heavy cream with 1 tablespoon of vanilla extract until stiff peaks form. The cream should be airy but hold its shape when piped. If you prefer a lighter version, substitute half the cream with Greek yogurt and whisk until fluffy.
- Pipe the Whipped Cream: Using a piping bag fitted with a star tip, pipe the whipped cream over the pudding layer, creating a “mossy” cloud that floats like mist. The cream should cover the pudding but leave some gaps so the chocolate surface is visible. This contrast adds visual interest and a delicate texture.
- Add the Gummy Worms: Sprinkle 1 cup of gummy worms across the whipped cream, letting them “crawl” over the surface. The worms should be evenly spaced, creating a playful scene. If you’re using other candies, arrange them similarly to maintain the spooky vibe.
- Finish with Sprinkles: Lightly dust 1/2 cup of chocolate sprinkles over the top, mimicking dust or a light layer of earth. The sprinkles add a final glossy finish and a subtle crunch. Use a fine sieve to distribute them evenly.
- Refrigerate: Place the assembled cups in the refrigerator for at least 30 minutes to allow the pudding to set and the flavors to meld. This step is crucial for achieving the perfect texture—think of it as letting the graveyard settle into its final form.
- Serve: Just before serving, give each cup a quick shake to settle the layers. The final product should look like a miniature graveyard: dark chocolate ground, fluffy moss, and creepy crawlers. Serve immediately for the freshest taste.
That's it— you did it. But hold on, I've got a few more tricks that'll take this to another level. Trust me, a few small adjustments can transform a good dessert into a show‑stopper.
Insider Tricks for Flawless Results
The Temperature Rule Nobody Follows
Keep your ingredients cold, especially the cream and the pudding mix. If the cream is too warm, it won’t whip to stiff peaks and will collapse. Similarly, a warm pudding mix will lose its thickness. Chill your mixing bowl and whisk for 10 minutes before whipping the cream to ensure maximum volume.
Why Your Nose Knows Best
Before pouring the pudding, give it a quick sniff. A rich, chocolatey aroma indicates that the mixture is ready. If it smells more like milk, let it thicken for a few extra minutes. Your nose is your best quality control tool.
The 5-Minute Rest That Changes Everything
After piping the whipped cream, let the cups rest for 5 minutes before adding gummy worms. This brief pause allows the cream to set slightly, preventing the worms from sliding off. It also gives the flavors a moment to mingle, creating a more cohesive taste.
The Secret of the Crunch
If you want a crunchier cookie base, toast the crushed cookies in a skillet over medium heat for 2 minutes before layering. The slight toasting adds a nutty flavor and a firmer texture that holds up better against the pudding.
The Final Polish
Just before serving, lightly dust the tops with a pinch of cocoa powder or a few extra sprinkles for an extra sparkle. A subtle dusting can make the cups look like they’ve just been freshly dug out of a moonlit graveyard.
Creative Twists and Variations
This recipe is a playground. Here are some of my favorite ways to switch things up:
Citrus Graveyard
Add a splash of orange or lemon zest to the pudding mix for a bright, citrusy twist. The zing cuts through the chocolate and adds a refreshing note that feels like a sunrise over a haunted cemetery.
Nutty Graveyard
Replace the chocolate sandwich cookies with crushed almond biscotti or toasted walnuts. The nutty flavor adds depth, and the crunchy texture gives an earthy feel that complements the chocolate base.
Mocha Madness
Stir in a tablespoon of instant espresso powder into the pudding mixture. The mocha flavor gives the dessert a sophisticated, slightly bitter edge that pairs beautifully with the sweet whipped cream.
Vegan Version
Use a dairy-free chocolate pudding mix and coconut whipped cream. Swap the gummy worms for vegan gummy candies. The result is a creamy, chocolatey treat that’s entirely plant-based.
Fruit‑Infused Graveyard
Add a layer of fresh berries—raspberries, blueberries, or blackberries—between the pudding and whipped cream. The berries add a burst of tartness, creating a contrast that’s both sweet and tangy.
Dessert on a Stick
Instead of cups, pipe the pudding and cream onto a stick or small cone. This makes the dessert portable and perfect for a Halloween parade or a fun snack for kids.
Storing and Bringing It Back to Life
Fridge Storage
Store the assembled cups in an airtight container in the refrigerator for up to 24 hours. Keep the gummy worms and sprinkles separate until just before serving to maintain their texture. If you need to prep ahead, assemble the pudding and cookie base, then add the whipped cream and toppings right before serving.
Freezer Friendly
Freezing the cups is possible, but it changes the texture. Freeze the cups with just the pudding and cookie base, then add the whipped cream and toppings after thawing. This preserves the airy quality of the cream.
Best Reheating Method
Reheating is not recommended for the whipped cream layer, as it will lose its structure. If you must, gently warm the pudding base in a microwave at 20-second intervals, stirring between each burst. Add a splash of milk to keep it moist, then reapply the whipped cream and toppings immediately.