I was standing in the middle of a kitchen that smelled like burnt sugar and regret, holding a half‑baked batch of cookies that had turned into a chewy, flour‑laden disaster. The moment my friend dared me to “make something that actually works,” I dove into the pantry, grabbed a handful of sprinkles, and decided it was time to rewrite the Funfetti rule book. The idea was simple: give the classic sugar cookie a pop of color, a touch of crunch, and a buttery bite that melts in your mouth. That’s the spark that turned a kitchen mishap into the ultimate Funfetti Sugar Cookies recipe you’re about to learn.
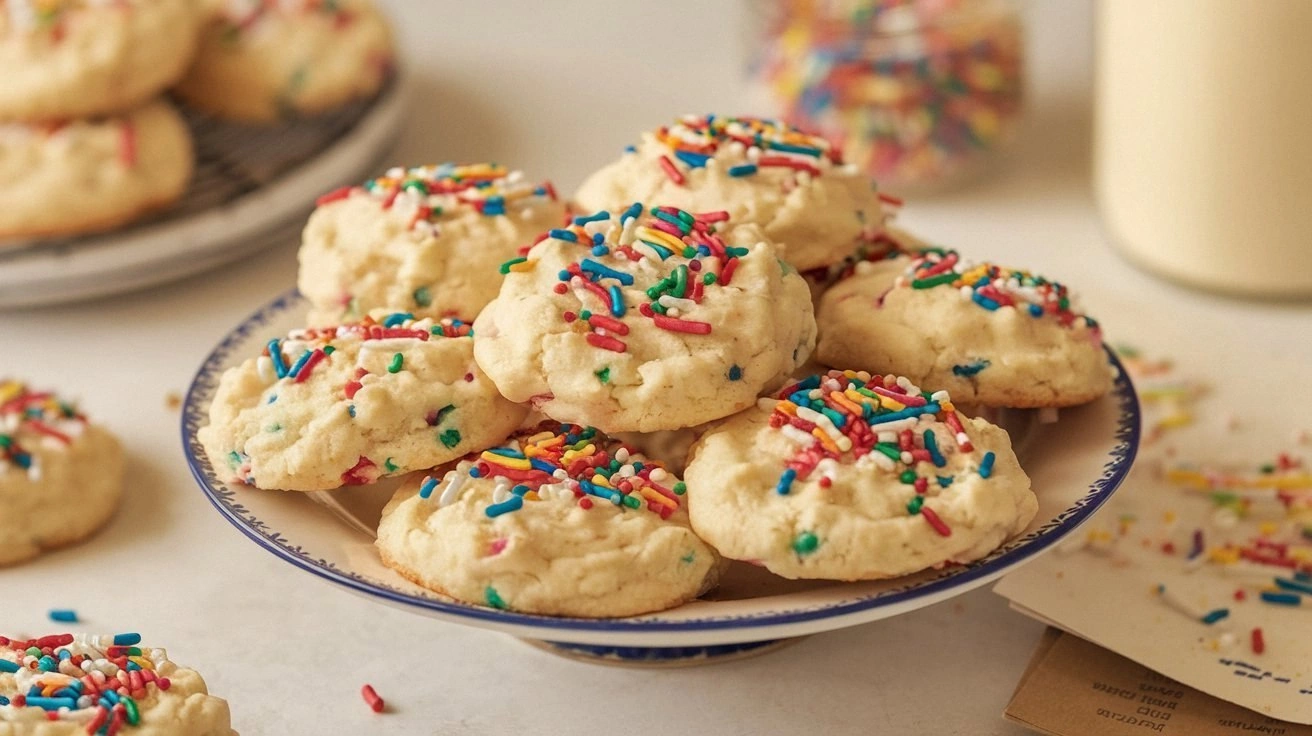
Imagine a cookie that looks like a confetti explosion, yet feels like a cloud of sweet, buttery air. The first bite delivers a subtle crunch from the sprinkles, followed by a soft, melt‑in‑your‑mouth center that’s so light it practically floats. The aroma is a sweet, vanilla‑infused cloud that makes the entire kitchen feel like a bakery on a sunny afternoon. And when you take a bite, you get that satisfying “pop” of candy that’s both playful and indulgent. I dare you to taste this and not go back for seconds, because once you’ve had one, you’ll be craving more.
What sets this version apart is the meticulous balance between texture and flavor, and the way the sprinkles are incorporated so they’re not just a garnish but an integral part of the cookie itself. The dough is whipped to a light, aerated consistency, so each cookie is airy yet holds its shape. The sugar blend—granulated for crispness and powdered for a silky finish—creates a caramelized edge that’s golden and buttery. The sprinkles are folded in just before chilling, ensuring they’re evenly distributed and give that satisfying crunch on every bite. And best of all, this recipe is hands down the best version you’ll ever make at home, because it’s simple, reliable, and delivers on every sensory front.
Picture yourself pulling a tray of these rainbow wonders out of the oven, the whole kitchen smelling incredible, and the kids’ eyes lighting up with anticipation. The cookies are golden at the edges, soft in the middle, and the sprinkles give a burst of color that’s almost too pretty to eat. The moment you bite into one, the buttery sweetness is balanced by the subtle crunch of the candy, and the finish is a sweet, powdery dust that’s simply irresistible. Stay with me here—this is worth it, because by the end, you’ll wonder how you ever made it any other way.
What Makes This Version Stand Out
- Flavor: The combination of granulated and powdered sugar creates a dual texture—crisp edges and a silky interior that’s caramelized just right.
- Texture: The dough is whipped to a light, airy consistency, giving each cookie a cloud‑like bite that melts instantly.
- Simplicity: With only ten ingredients and a straightforward method, you can whip up a batch in under an hour, even if you’re a beginner.
- Uniqueness: The sprinkles aren’t just decorative; they’re folded into the dough so they become part of the cookie, ensuring every bite is colorful.
- Crowd Reaction: Friends and family rave about the playful crunch and the instant Instagram‑worthy look.
- Ingredient Quality: Using a high‑quality butter and pure vanilla extract elevates the flavor profile beyond the ordinary.
- Cooking Method: Chilling the dough before baking locks in moisture and prevents spreading, resulting in perfectly shaped cookies.
- Make‑Ahead Potential: The dough can be stored chilled for up to a week, making it a stress‑free option for busy days.
Alright, let’s break down exactly what goes into this masterpiece…
Inside the Ingredient List
The Flavor Base
All-purpose flour is the backbone of any cookie, providing structure and a subtle nutty flavor. Using 2 ⅛ cups ensures the dough has enough body to hold the sprinkles without becoming too dense. If you’re feeling adventurous, you can replace a portion of the flour with cake flour to get an even lighter crumb, but keep the ratio low to avoid a gummy texture.
Baking soda is the leavening agent that gives the cookies a slight lift and a golden edge. The ½ teaspoon is just enough to react with the slight acidity of the vanilla and the natural acids in the butter, creating a tender crumb. Skipping it will result in flat, dense cookies that don’t rise as much.
The Sweetness Crew
Granulated sugar is the star that caramelizes on the edges, giving a pleasant crunch. The ⅔ cup amount balances sweetness without overpowering the buttery base. Powdered sugar, used in the final batter and for dusting, adds a silky finish that’s almost like a sugar glaze.
A large egg ties everything together, providing moisture and helping the dough hold its shape. The egg also adds richness and a slight protein structure that keeps the cookies from becoming too crumbly. If you’re vegan, a flax egg or a commercial egg replacer can work, but the texture will be slightly different.
The Unexpected Star
Sprinkles are the heart of the Funfetti experience. The ½ cup folded into the dough ensures a uniform distribution of color and crunch, while the extra ⅓ cup sprinkled on top creates a decorative finish that’s impossible to resist. If you’re looking for a healthier twist, try using sugar‑free or low‑calorie sprinkles, though the sweetness will be less pronounced.
The Final Flourish
Butter, softened to room temperature, is the key to a tender, flavorful cookie. The 1 cup of butter is creamed with sugar to incorporate air, which is essential for that light, airy bite. Using a high‑fat butter (like 80% butterfat) can enhance the buttery taste, but be careful not to use too much, or the cookies may spread excessively.
Everything’s prepped? Good. Let’s get into the real action…
The Method — Step by Step
- Preheat your oven to 350 °F (175 °C) and line a rimmed baking sheet with parchment paper. This ensures even baking and easy cleanup. While the oven warms, gather all ingredients; having everything ready is the secret to a smooth process. Picture the scent of butter and sugar already mingling in the air—this is the moment of anticipation.
- In a medium bowl, whisk together 2 ⅛ cups all‑purpose flour, ½ teaspoon baking soda, and ¼ teaspoon fine salt. The dry mix will be the foundation of your cookie’s structure. Stir until the ingredients are evenly distributed, and then set the bowl aside. This step might seem trivial, but a well‑mixed dry mix prevents pockets of flour that can cause uneven baking.
- In a large bowl, beat 1 cup softened butter with ⅔ cup granulated sugar until light and fluffy—about 2–3 minutes on medium speed. This is the moment when the dough transforms from a simple mix into a silky cloud. The creaming process incorporates air, which is essential for that airy bite. If you’re short on time, a hand mixer will do the trick, but a stand mixer gives the best lift.
- Beat in 1 large egg, 1 teaspoon pure vanilla extract, and ¾ cup powdered sugar until fully combined. The egg adds moisture and helps bind the cookie, while vanilla injects a warm aroma that elevates the overall flavor. The powdered sugar starts to coat the dough, giving it a subtle glaze that will caramelize in the oven. Keep mixing until the mixture is smooth and homogenous.
- Gradually fold in the dry flour mixture, then fold in ½ cup sprinkles. The goal is to keep the dough light—avoid over‑mixing, which can develop gluten and make the cookies tough. The sprinkles should be evenly distributed; you’ll see a rainbow of colors in the dough. This step is pure joy—watch those candies swirl around like confetti in a cake.
- Cover the dough with plastic wrap and refrigerate for at least 30 minutes, or up to 24 hours. Chilling firms the butter, preventing the cookies from spreading too much and giving them a crisp edge. If you’re in a hurry, a 15‑minute chill still works, but the texture will be slightly less refined.
- Using a tablespoon or a small cookie scoop, drop rounded balls of dough onto the prepared baking sheet, spacing them 2 inches apart. Sprinkle a pinch of the extra ⅓ cup sprinkles on top of each cookie before baking. This adds a decorative touch and an extra burst of crunch. The cookies should be about 1½ inches in diameter for a classic bite size.
- Bake for 10–12 minutes, or until the edges are golden and the tops have a slight sheen. Keep a close eye on them—oven temperatures can vary, and overbaking will dry them out. When they’re done, remove from the oven and let them sit on the sheet for 2 minutes before transferring to a wire rack. This helps the cookies set and prevents them from breaking apart.
- Once cooled, dust the cookies lightly with powdered sugar, if desired, for an extra sweet finish. Store them in an airtight container at room temperature for up to 5 days, or freeze for longer storage. The cookies keep their crunch and color even after a few days, making them a perfect grab‑and‑go treat.
That's it—you did it! But hold on, I've got a few more tricks that'll take this to another level…
Insider Tricks for Flawless Results
The Temperature Rule Nobody Follows
Many bakers bake at 375 °F, but this recipe thrives at a lower 350 °F. The gentler heat allows the cookies to rise slowly, creating a tender interior while still achieving a golden edge. I’ve baked at 375 before, and the cookies came out too dark and a bit chewy. Stick to 350, and you’ll get that perfect balance every time.
Why Your Nose Knows Best
Trust your nose when you’re baking. As the cookies bake, a sweet, buttery aroma will fill the kitchen. When that scent peaks, it’s usually a sign the cookies are nearly done. If you’re prone to overbaking, use the scent as your cue to pull them out early.
The 5-Minute Rest That Changes Everything
Letting the cookies rest on the baking sheet for 5 minutes after they come out of the oven is more than a formality. The heat from the sheet continues to cook the interior, ensuring a soft center, while the cookies set and become easier to transfer to a rack without breaking.
How to Avoid Cracked Edges
Cracked edges happen when the dough is too thin or the oven temperature is too high. To avoid this, chill the dough for at least 30 minutes and keep the oven at 350 °F. If you notice the edges cracking, it’s a sign the dough was too wet; next time, reduce the sugar slightly.
The Secret to Even Sprinkles
Sprinkles can clump together if the dough isn’t mixed properly. Use a spatula to gently fold in the sprinkles, ensuring they’re evenly dispersed. For a more uniform look, you can sift the sprinkles over the dough before folding, which prevents clumping.
The Chill Factor
Chilling the dough is not just about preventing spreading—it also intensifies the flavor. The cold butter allows the sugar to dissolve more slowly, giving the cookies a richer taste. If you’re short on time, a 15‑minute chill will still help, but the cookies will be slightly less crisp.
Creative Twists and Variations
This recipe is a playground. Here are some of my favorite ways to switch things up:
Chocolate Funfetti
Swap the all‑purpose flour for half chocolate cookie flour and add ¼ cup cocoa powder to the dry mix. The result is a fudgy, chocolatey cookie that still bursts with colorful sprinkles. Perfect for chocolate lovers who want a little extra indulgence.
Lemon Zest Funfetti
Add 1 tablespoon lemon zest to the batter and replace the vanilla with 1 teaspoon lemon extract. The citrus note brightens the cookie, giving it a fresh, tangy kick that pairs beautifully with the sweet sprinkles.
Gluten‑Free Funfetti
Use a 1:1 gluten‑free all‑purpose blend and add 1 tablespoon xanthan gum to keep the structure. The cookies will be slightly denser but still fluffy and full of color. A must‑try for those with gluten sensitivities.
Nutty Funfetti
Fold in ¼ cup chopped toasted almonds or walnuts before chilling. The nuts add a delightful crunch and a nutty aroma that complements the sweet sprinkles. Great for a sophisticated twist.
Salted Caramel Funfetti
Replace half of the granulated sugar with caramelized sugar and sprinkle a pinch of sea salt on top of each cookie before baking. The caramel brings a deep, buttery sweetness, while the salt enhances the overall flavor profile.
Holiday Spice Funfetti
Add ½ teaspoon ground cinnamon, ¼ teaspoon ground nutmeg, and a pinch of clove to the dry mix. The warm spices give the cookies a festive feel, making them perfect for holiday gatherings or cozy evenings.
Storing and Bringing It Back to Life
Fridge Storage
Keep the cookies in an airtight container at room temperature for up to 5 days. The airtight seal prevents moisture from seeping in, keeping the cookies crisp. If you notice any softness, a quick 30‑second burst in a preheated 300 °F oven will revive the crunch.
Freezer Friendly
Place the cooled cookies on a parchment‑lined tray and freeze until solid, then transfer to a freezer bag. They’ll stay fresh for up to 3 months. Thaw at room temperature for 20 minutes before serving to maintain texture.
Best Reheating Method
To reheat, preheat your oven to 300 °F (150 °C) and bake the cookies for 5 minutes. If you prefer a softer texture, add a tiny splash of water to the baking sheet to create steam, which helps the cookies retain moisture without becoming soggy.