I was standing in my kitchen on a snowy December evening, the kind of night where the only thing louder than the wind outside is the rumble of my stomach. I had just tried to make a classic cinnamon roll, and the dough turned out as flat as a pancake—no surprise there, because I’d forgotten the secret ingredient that makes a roll truly unforgettable. That disaster sparked a dare from my roommate: “If you can’t make a cinnamon roll that looks like a Christmas tree, you’re buying the eggnog for a month!” I laughed, rolled up my sleeves, and set out on a quest that would end with a dough so chewy, so fragrant, and so festive that even the Grinch would RSVP to my holiday party.
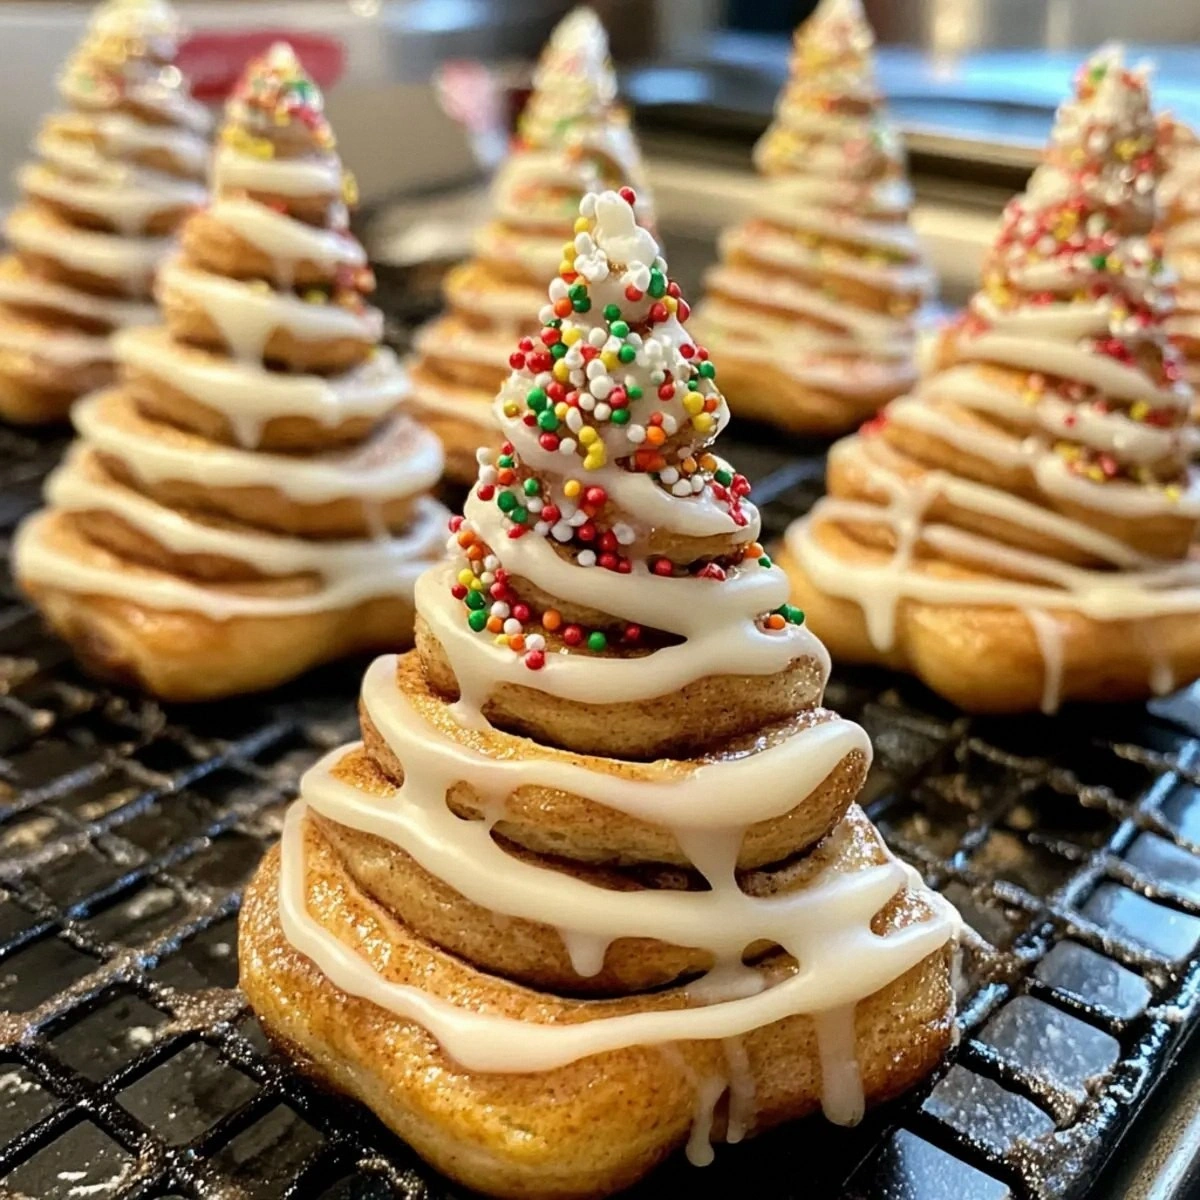
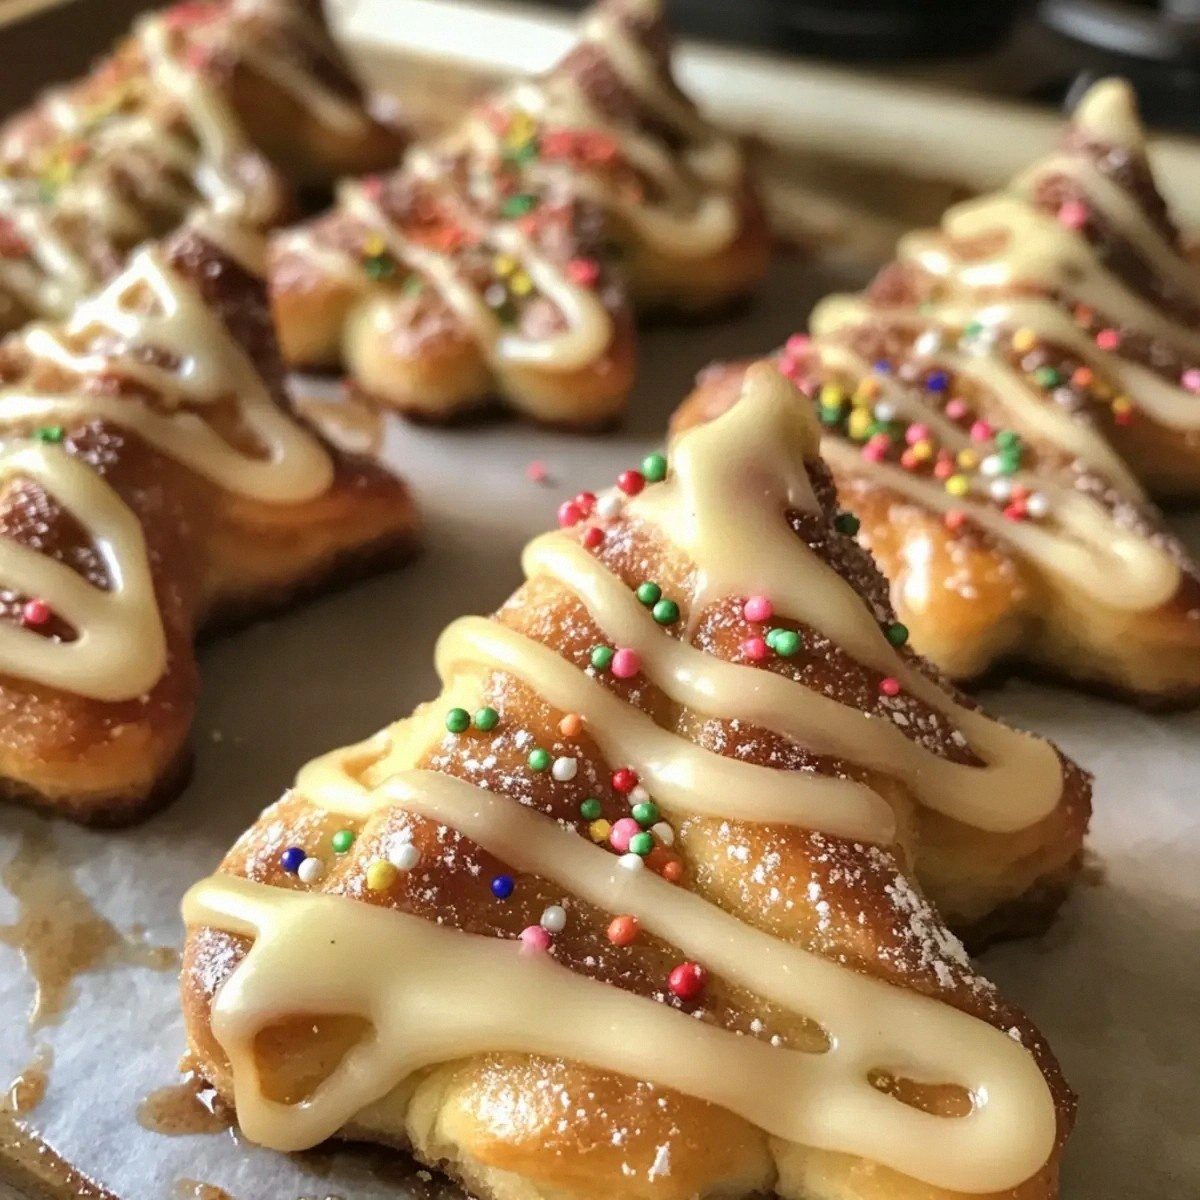
Picture this: a tray of golden‑brown rolls, each one shaped into a tiny evergreen, their surfaces dusted with sparkling red sprinkles that catch the kitchen light like tiny ornaments. The air is thick with the sweet, spicy perfume of cinnamon and butter, a scent that makes your heart beat a little faster and your taste buds do a happy dance. When you bite in, the outer crust cracks with a satisfying snap, giving way to a soft, almost gelatinous interior that reminds you of the best mochi you’ve ever had—only this time it’s wrapped around a warm, buttery cinnamon core. The icing drips down like fresh snow, glossy and sweet, and the whole thing feels like you’ve taken a bite out of a holiday postcard.
What makes this version stand out is simple: I swapped regular wheat flour for glutinous rice flour, turning the rolls into a mochi‑like marvel that stays tender for days. I also introduced a quick‑bake technique that gives you that perfect rise without the long proofing time most recipes demand. Most cinnamon roll recipes get the texture wrong—either too cakey or too dense. Here, the texture is a perfect balance of chewy and fluffy, and the flavor hits you like a choir of carolers: sweet, spiced, and just a touch buttery. And the best part? The whole thing is shaped into a Christmas tree, turning a simple pastry into a show‑stopping centerpiece.
I’m about to walk you through every single step—by the end, you’ll wonder how you ever made cinnamon rolls any other way. Okay, ready for the game‑changer? This next part? Pure magic. I dare you to taste this and not go back for seconds.
What Makes This Version Stand Out
- Taste: The combination of glutinous rice flour and a classic cinnamon‑sugar swirl creates a flavor profile that’s both nostalgic and novel, like discovering a secret level in your favorite video game.
- Texture: The mochi‑like chew on the outside paired with a buttery, soft interior is a textural duet that most recipes simply can’t pull off.
- Simplicity: No overnight proofing, no complicated kneading—just mix, shape, bake, and you’ve got a holiday masterpiece.
- Uniqueness: Shaping the rolls into Christmas trees turns a humble pastry into a festive sculpture that steals the spotlight at any gathering.
- Crowd Reaction: Expect gasps, oohs, and a line forming at the dessert table—people will actually ask for the recipe before the first bite.
- Ingredient Quality: Using real butter and fresh cinnamon elevates the flavor from “good” to “wow, I need this every year.”
- Cooking Method: The quick‑bake technique locks in moisture, giving you that perfect rise without a soggy bottom.
- Make‑Ahead Potential: These rolls keep beautifully for up to three days, and you can even freeze them for a holiday emergency.
Inside the Ingredient List
The Flavor Base
Glutinous rice flour is the hero of this recipe. It gives the dough that signature stretch and chew that sets these rolls apart from any traditional wheat‑based version. If you skip it, you’ll end up with a typical soft roll, and the whole “mochi” magic disappears. Look for a fine‑powdered flour in the Asian foods aisle; the fresher, the better, because older flour can develop a stale taste.
Sugar: The first quarter‑cup of sugar sweetens the dough just enough to balance the cinnamon’s spice without overwhelming the delicate mochi texture. If you’re watching sugar, you can trim it down to a tablespoon, but expect a milder flavor. For a deeper caramel note, try browning the sugar lightly before adding it to the wet mix.
The Texture Crew
Baking powder is the silent lift‑engineer here. One tablespoon is enough to give the rolls a light rise, ensuring they puff up into those adorable tree silhouettes. Too much, and you’ll get a metallic aftertaste; too little, and the trees will look more like flat pancakes. Always sift it with the flour to avoid clumps.
Salt: A pinch of 1/4 teaspoon is all you need to amplify the flavors. Salt is the unsung hero that makes the sweet and spicy notes sing. If you’re on a low‑sodium diet, you can cut it in half, but you’ll notice a flatter taste profile.
The Unexpected Star
Milk and butter combine to create a rich, velvety base that carries the cinnamon sugar inside the roll. The 3/4 cup of milk hydrates the glutinous rice flour, turning it into that pliable dough you can shape without tearing. The quarter‑cup of butter adds flavor and helps achieve that golden crust. If you’re dairy‑free, swap the milk for almond milk and the butter for a plant‑based alternative—just make sure it’s solid at room temperature for the best texture.
Egg: The single large egg acts as a binder, giving the dough enough elasticity to hold its shape during baking. It also adds a subtle richness that you can’t get from milk and butter alone. If you’re vegan, a flax‑egg (1 tbsp ground flaxseed + 3 tbsp water) works surprisingly well.
The Final Flourish
Cinnamon & Sugar Swirl: The second quarter‑cup of sugar pairs with a tablespoon of cinnamon to create that classic, comforting flavor. This mixture is rolled into the dough, creating layers of sweet spice that melt in your mouth. For a twist, add a pinch of nutmeg or cardamom to the swirl.
Icing Sugar & Milk/Water: The glaze is a simple blend of icing sugar and a splash of liquid, giving you a glossy finish that looks like freshly fallen snow. Adjust the liquid amount until you reach a drizzle‑ready consistency.
Colored Sprinkles: The final quarter‑cup of red sprinkles isn’t just for looks; they add a tiny crunch that contrasts with the soft interior. Feel free to swap for gold or silver non‑metallic sprinkles if you want a different festive vibe.
Everything's prepped? Good. Let’s get into the real action…
The Method — Step by Step
In a large mixing bowl, whisk together the glutinous rice flour, 1/4 cup sugar, baking powder, and salt until the dry ingredients are uniformly combined. The mixture should look like fine sand; any lumps will become stubborn pockets later. Power transition: Okay, ready for the game‑changer?
In a saucepan over medium heat, melt the 1/4 cup butter, then add the milk and whisk continuously. Once the butter is fully melted and the mixture starts to steam, remove from heat and let it cool for a minute. This step is crucial because too‑hot liquid will cook the flour prematurely, ruining the mochi texture.
Kitchen Hack: Warm the milk just until you see tiny bubbles forming—no full boil.Beat the large egg in a separate bowl, then slowly pour the warm butter‑milk mixture into the egg while whisking constantly. This tempering prevents the egg from scrambling and creates a smooth, glossy batter. You’ll notice the batter thickening slightly; that’s the magic of gluten‑free starch binding.
Combine the wet batter with the dry flour mixture, stirring with a wooden spoon until a sticky dough forms. It will pull away from the sides of the bowl but still cling to the spoon—a sign that the gluten‑free dough has the right consistency. If it feels too dry, drizzle in a tablespoon of milk; if too wet, sprinkle a bit more flour, but be careful not to over‑work.
Turn the dough onto a lightly greased surface and knead gently for about 30 seconds—just enough to bring it together. This is where the dough becomes smooth and pliable, ready for the cinnamon‑sugar swirl.
Watch Out: Over‑kneading will make the dough tough and lose its signature chew.Spread the dough into a rectangle about ½ inch thick. In a small bowl, mix the second 1/4 cup sugar with the tablespoon of cinnamon. Sprinkle this mixture evenly over the dough, then drizzle the 2 tbsp of softened butter across the surface. Using a rolling pin, roll the dough tightly from the long side, creating a log that’s packed with cinnamon goodness.
Slice the log into 12 equal pieces. For each piece, shape it into a small cone by gently pulling the ends apart and tucking the tip underneath—this forms the “tree” silhouette. Place the shaped trees on a parchment‑lined baking sheet, spacing them a couple of inches apart to allow for a little rise.
Preheat your oven to 375°F (190°C). While it heats, brush the tops of the trees with a light coating of melted butter; this encourages a golden crust and helps the sprinkles adhere. Sprinkle the red festive sprinkles generously—don’t be shy, this is the visual punch of the dish.
Slide the tray into the oven and bake for 18‑22 minutes, or until the edges turn a deep amber and the tops are glossy. The scent at this point is a symphony of cinnamon, butter, and toasted sugar—trust me, you’ll hear neighbors whisper “what’s baking?” through the walls.
While the rolls are still warm, whisk together the icing sugar with 2 tbsp of milk or water until you achieve a smooth, drizzle‑ready glaze. Drizzle the glaze over the trees, letting it cascade down like a gentle snowfall. Let the rolls cool for five minutes before serving, so the glaze sets just enough to give a slight sheen.
That’s it—you did it. But hold on, I’ve got a few more tricks that’ll take this to another level…
Insider Tricks for Flawless Results
The Temperature Rule Nobody Follows
Always let the butter melt just until it’s bubbling, not fully browned. This temperature ensures the fat stays liquid enough to coat the flour without creating a greasy dough. A friend once used fully melted butter and ended up with a dough that spread too thin, resembling a pancake rather than a roll. Keep the butter at a “sizzling” stage for that perfect chew.
Why Your Nose Knows Best
When the rolls are in the oven, trust the aroma more than the timer. The moment you smell the cinnamon turning caramel‑gold, you’re within seconds of perfect doneness. If you wait too long, the edges will become overly crisp, losing that tender interior. So, stay close, and let your nose be the ultimate timer.
The 5‑Minute Rest That Changes Everything
After baking, let the rolls rest for exactly five minutes before glazing. This short pause lets the interior steam settle, preventing the glaze from soaking in and making the rolls soggy. I’ve seen beginners skip this step, and the result is a gummy top that never sets. Five minutes—set a timer and trust the process.
Sprinkle Placement Precision
Instead of tossing sprinkles randomly, use a small spoon to place them in a line down the “trunk” of each tree. This creates a uniform look that looks professionally decorated. If you’re in a rush, a quick flick of the wrist works, but the line method guarantees every bite gets a pop of color.
The Secret of the Glaze Consistency
Add the milk or water to the icing sugar a tablespoon at a time, whisking after each addition. This incremental approach prevents the glaze from becoming too runny, which would slide off the rolls. A runny glaze looks sloppy; a thick, glossy glaze clings like a perfect snow‑drift.
Creative Twists and Variations
This recipe is a playground. Here are some of my favorite ways to switch things up:
Nutty Noel
Swap half of the butter for toasted almond butter and add a tablespoon of finely chopped toasted almonds to the cinnamon‑sugar swirl. The nutty undertone adds depth, and the almonds provide a pleasant crunch that mimics the sound of pine needles underfoot.
White Chocolate Wonder
Replace the regular icing sugar glaze with melted white chocolate, then drizzle a thin line of dark chocolate for contrast. The sweet, creamy finish pairs beautifully with the cinnamon core, turning each bite into a holiday indulgence.
Peppermint Twist
Add a teaspoon of crushed peppermint candy to the cinnamon‑sugar mixture and sprinkle crushed peppermint on top of the glaze. The cool mint cuts through the sweetness, delivering a refreshing surprise reminiscent of candy canes.
Vegan Victory
Use coconut oil instead of butter, almond milk in place of dairy milk, and a flax‑egg for binding. The flavor profile shifts slightly toward tropical, but the texture remains delightfully chewy, proving that festive doesn’t have to be dairy‑dependent.
Savory Spin
Omit the sugar and cinnamon, and instead roll the dough with a mixture of grated Parmesan, garlic powder, and dried herbs. Finish with a drizzle of olive oil and a sprinkle of sea salt. This savory version makes a brilliant appetizer for holiday parties, turning the sweet tradition on its head.
Storing and Bringing It Back to Life
Fridge Storage
Place the cooled rolls in an airtight container and store them in the refrigerator for up to three days. The glaze will firm up, but a quick 30‑second microwave burst or a brief steam in a covered pan will revive the softness.
Freezer Friendly
Arrange the rolls on a baking sheet, flash freeze for 15 minutes, then transfer to a zip‑top freezer bag. They’ll keep for up to two months. When you’re ready to serve, thaw overnight in the fridge, then reheat in a 350°F oven for 8‑10 minutes, adding a splash of water to the pan to create steam.
Best Reheating Method
The secret to reheating without losing that chewy interior is to use a covered skillet with a tablespoon of water. Cover, let steam for two minutes, then uncover for a quick sear to restore the glossy glaze. This method brings the rolls back to life as if they just left the oven.