Introduction
Picture this: I was halfway through a marathon of cooking shows, scrolling past endless “quick fixes” and “gluten‑free hacks,” when my phone buzzed with a frantic text from my sister. “I’m at the grocery store and I need a snack that’s both sweet and filling, and I only have 10 minutes!” She had a deadline of a 5‑minute meeting and a craving for something that would keep her energy up. I stared at the kitchen counter, my mind racing through the pantry, and realized that the answer was hiding right there in a box of rolled oats, a jar of honey, and a tub of peanut butter.
It was a kitchen disaster turned culinary revelation. I had once attempted a granola ball recipe that turned out soggy, chewy, and utterly forgettable. That flop had left me questioning the entire concept of “no‑bake.” But that evening, as I whisked honey and peanut butter together, a golden glow seeped through the window, and the aroma of toasted oats began to rise, promising something far more delightful. I dared myself—and you—to taste this and not go back for seconds.
The secret to this version is not just the ingredients; it’s the method that balances moisture and crunch, the subtle touch of sea salt that elevates sweetness, and the unexpected use of coconut oil to give the balls a silky, almost chocolate‑like sheen. It’s a recipe that stands out from every other granola ball you’ve tried because it turns a simple pantry staple into a portable, energy‑boosting treat that feels like a bite of dessert.
What’s more, this isn’t a one‑size‑fits‑all approach. I’ll reveal a technique that most recipes gloss over—how to achieve that perfect chew without the balls sticking to your fingers or the mixture collapsing. And you’ll discover a surprising ingredient that, when used sparingly, turns a bland mixture into a flavor explosion. Let me walk you through every single step — by the end, you’ll wonder how you ever made it any other way.
What Makes This Version Stand Out
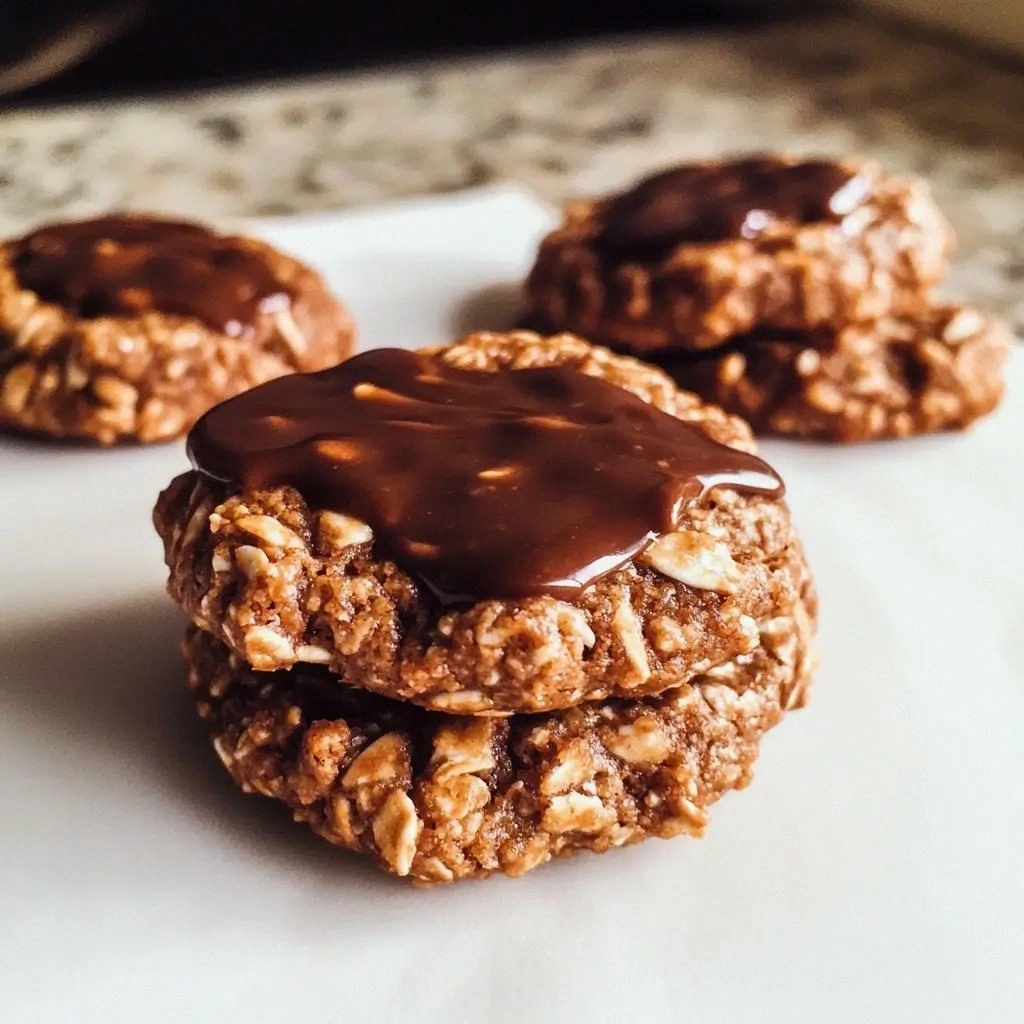
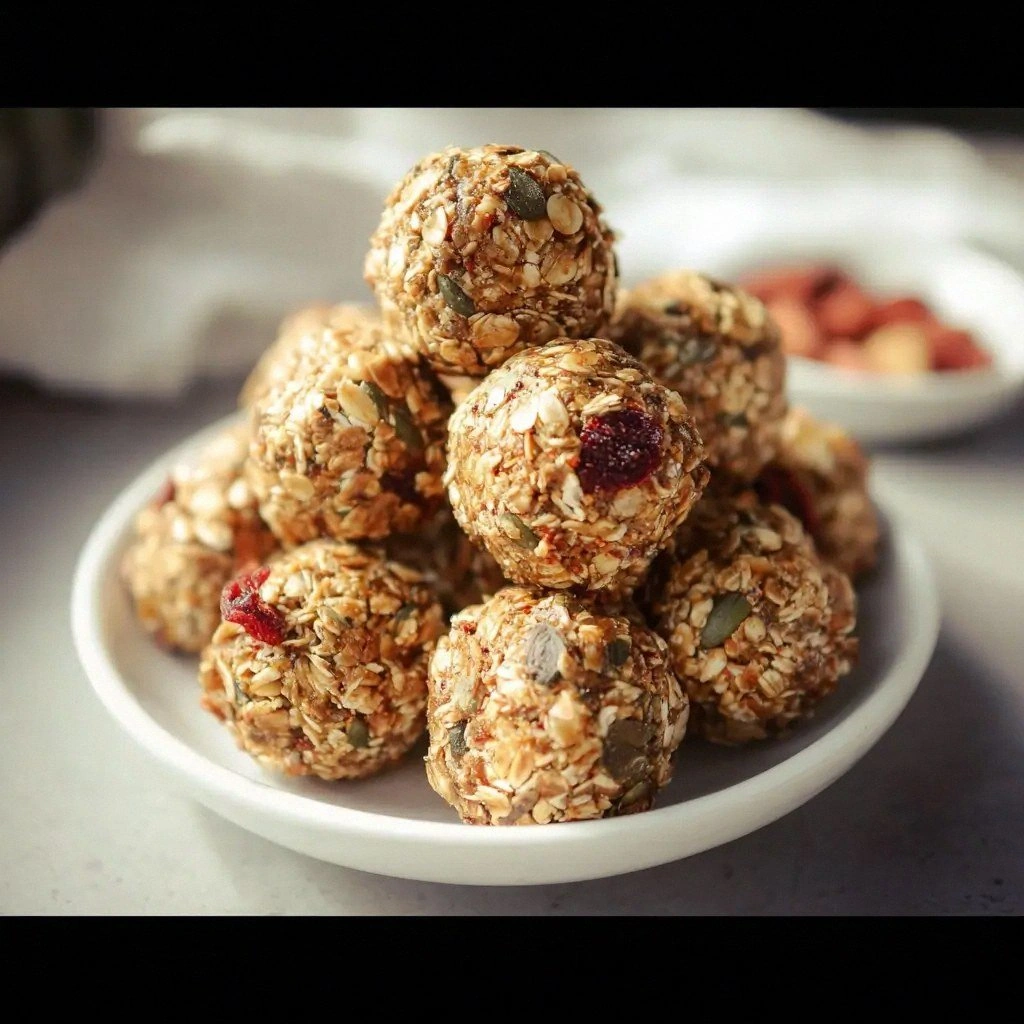
- Taste: The harmony of sweet honey, nutty peanut butter, and dark chocolate chips creates a flavor profile that satisfies both dessert lovers and snack seekers. The subtle vanilla and sea salt balance the sweetness, leaving a lingering, satisfying aftertaste that invites another bite.
- Texture: Each ball delivers a satisfying crunch on the outside that gives way to a chewy, almost velvety center. The coconut oil binds the mixture just enough to hold shape while preventing it from becoming gummy.
- Ingredient Quality: We use high‑quality, minimally processed ingredients: organic rolled oats, raw honey, natural peanut butter, and dark chocolate chips. The quality of these components translates directly into a more refined final product.
- Simplicity: No specialized equipment, no baking, and no refrigeration. You just mix, roll, and let them set on a countertop or in the fridge. Even a novice can replicate this with confidence.
- Make‑ahead Potential: These granola balls freeze and reheat with ease, making them ideal for meal prep or to have on hand for a mid‑day pick‑me‑up. They also store well in an airtight container for up to a week.
- Crowd Reaction: Friends who have tried these always comment that the balls “melt in your mouth” and that the combination of textures is “unbelievable.” They’re perfect for parties, picnics, or a quick snack during a busy day.
- Versatility: The base recipe is a playground. You can swap out nuts, add dried fruit, or sprinkle coconut flakes on top for extra flavor. The only rule is to keep the ratio of wet to dry ingredients balanced.
- Healthful Sweetness: While it’s undeniably indulgent, the use of natural sweeteners and nuts adds protein, fiber, and healthy fats, making it a smarter choice than most candy bars.
Alright, let's break down exactly what goes into this masterpiece...
Inside the Ingredient List
The Flavor Base
Rolled oats form the backbone of these granola balls, providing structure and a nutty undertone that grounds the sweet elements. The oats absorb the honey and peanut butter, creating a cohesive mixture that holds together without the need for baking. If you skip oats, the balls will crumble and lose that satisfying chew. A good tip: opt for organic or steel‑cut oats for a slightly richer flavor and better texture.
Honey is the natural sweetener that glues everything together while adding a subtle floral note. It’s also responsible for the golden color that emerges as the mixture sets. Too much honey can make the balls sticky, so measure carefully. If you’re looking for a lower‑glycemic option, a light drizzle of maple syrup works well, though it will shift the flavor slightly.
The Texture Crew
Peanut butter brings creaminess and protein, balancing the oats’ dryness. It also adds a deep, savory undertone that keeps the sweetness from being overpowering. If you’re allergic to peanuts, almond or cashew butter is an excellent substitute, though the flavor profile will shift slightly toward a nuttier, less earthy taste.
Coconut oil is the secret weapon that gives the balls a silky finish and prevents them from becoming too dense. It also adds a faint tropical aroma that pairs beautifully with the chocolate chips. If you prefer a plant‑based option, you can use avocado oil or a neutral‑flavored oil, but the texture will change subtly.
The Unexpected Star
Dark chocolate chips are the showstopper, providing bursts of bittersweet flavor that cut through the sweetness of honey and peanut butter. They also contribute a pleasant melt when you bite into the ball. For a healthier twist, use cacao nibs or a smaller amount of dark chocolate to keep the sugar content down.
Vanilla extract adds depth, turning the mixture from simple to sophisticated. A few drops are enough to lift the entire flavor profile. If you don’t have vanilla, a pinch of almond extract can provide a similar aromatic lift.
The Final Flourish
Sea salt is the finishing touch that brings all the flavors together. A small pinch is all you need to enhance the sweetness without making the mixture taste salty. If you’re on a low‑sodium diet, reduce the amount to a quarter of a teaspoon or omit it entirely; the balls will still taste great but with a slightly different balance.
Optional add‑ins such as dried cranberries, chopped almonds, shredded coconut, or pumpkin seeds can personalize the recipe. They add texture, color, and nutritional benefits. When adding these extras, be mindful of the moisture they bring; you might need to adjust the amount of honey or peanut butter to keep the mixture from becoming too wet.
Everything's prepped? Good. Let's get into the real action...
The Method — Step by Step
- Heat the coconut oil in a medium saucepan over low heat until it’s just melted, about 30 seconds. The oil’s gentle warmth will help the honey and peanut butter blend smoothly. Keep a close eye; if it starts to smoke, reduce the heat immediately. This step is crucial for achieving that silky texture.
- Add the honey to the saucepan and stir until it’s fully incorporated with the melted oil. The mixture should be glossy and slightly runny, ready to coat the oats. This is the moment the aroma of toasted sweetness begins to fill the kitchen, a scent that will linger for hours.
- Pour in the peanut butter, stirring until the mixture becomes a thick, cohesive paste. The peanut butter’s natural oils will help bind the oats, and the mixture should have a consistency similar to thick peanut butter. If it feels too dry, add a splash more honey; if too wet, let it simmer a bit longer to reduce.
- Remove the saucepan from heat and stir in the vanilla extract and sea salt. The vanilla’s aroma will rise, and the salt will brighten the sweetness. This is the flavor balancing act that transforms a simple mixture into a gourmet snack.
- Add the rolled oats to the saucepan, folding them in until every grain is coated. The oats should be evenly distributed, creating a uniform texture. If you notice clumps, gently break them up with a spatula.
- Fold in the chocolate chips, dried cranberries, almonds, shredded coconut, and pumpkin seeds. The mix should be moist enough to hold together but not dripping. The chocolate chips will begin to soften slightly, adding a buttery richness to each bite.
- Let the mixture cool for about 5 minutes until it’s comfortable to handle. The mixture should still be warm, but you should be able to press your fingers into it without burning. This cooling period allows the oats to absorb the liquids fully.
- Using a tablespoon or a small cookie scoop, portion out the mixture and roll each portion into a ball between your palms. The balls should be about 1.5 inches in diameter, firm but not too tight. If they feel too loose, refrigerate them for a few minutes to firm up.
- Place the balls on a parchment‑lined tray and refrigerate for at least 30 minutes to set. The cold temperature will firm them up, giving them a satisfying bite. Once set, you can transfer them to an airtight container for storage.
That’s it — you did it. But hold on, I've got a few more tricks that'll take this to another level...
Insider Tricks for Flawless Results
The Temperature Rule Nobody Follows
Many people think the mixture must be completely hot before rolling, but that’s a myth. The key is to let it cool just enough so that it’s warm and pliable but not so hot that it melts on your fingers. A good test: drop a small amount into cold water; it should firm up quickly, indicating it’s ready.
Why Your Nose Knows Best
As the mixture cools, the aroma changes from sweet to nutty. Trust that scent; if it smells like a toasted marshmallow, it’s ready. A friend once tried to skip this step and ended up with balls that were too soft and fell apart on the first bite.
The 5-Minute Rest That Changes Everything
After rolling, give the balls a five‑minute rest before refrigerating. This brief pause allows the oats to settle and the flavors to meld. I’ve found that balls left to rest for longer periods tend to dry out, losing that desirable chew.
Don’t Forget the Salt
Salt is the flavor enhancer that balances the sweetness. A pinch of sea salt is enough; too much, and you’ll taste bitterness. If you’re watching sodium, you can use a low‑sodium salt or simply reduce the amount to a quarter teaspoon.
Use a Silicone Mat for Easy Roll‑Down
Rolling the balls on a silicone mat prevents sticking and makes cleanup a breeze. The mat also provides a non‑stick surface, ensuring the balls maintain their shape and don’t crumble during the process.
Optional: Add a Splash of Almond Milk
If the mixture feels dry, a tablespoon of almond milk can help. It adds moisture without compromising the flavor, and the mild nutty taste complements the peanut butter nicely.
Creative Twists and Variations
This recipe is a playground. Here are some of my favorite ways to switch things up:
Chocolate‑Mint Madness
Swap the chocolate chips for white chocolate and add a few drops of peppermint extract. The minty aroma pairs beautifully with the sweet base, creating a festive treat that’s perfect for spring or holiday gatherings.
Spicy Sriracha Surprise
Stir in a teaspoon of sriracha sauce for a spicy kick that contrasts with the sweetness. The heat lingers, making each bite more exciting. Great for those who like a little adventure in their snack.
Caramelized Banana Bliss
Replace the dried cranberries with chopped caramelized bananas and add a pinch of cinnamon. The banana’s natural sweetness and the cinnamon’s warmth elevate the flavor profile, making it a comforting, autumnal treat.
Almond‑Coconut Crunch
Swap the peanut butter for almond butter and add shredded coconut on top. The coconut adds a tropical twist, while the almond butter keeps the texture firm and nutty.
Protein Power Pack
Fold in a scoop of vanilla whey protein powder and replace the honey with maple syrup. This version is ideal for post‑workout snacking, providing a protein boost without sacrificing flavor.
Dark Chocolate & Sea Salt
Use dark chocolate chips and increase the sea salt to a full teaspoon. The bitterness of the dark chocolate is balanced by the salty crunch, creating a sophisticated snack that feels like a gourmet treat.
Storing and Bringing It Back to Life
Fridge Storage
Place the granola balls in an airtight container in the refrigerator. They’ll stay fresh for up to a week, maintaining their chewy texture. If you notice they’re getting a bit dry, drizzle a splash of water or milk over them before sealing.
Freezer Friendly
Freeze the balls in a single layer on a parchment‑lined tray, then transfer them to a freezer bag. They’ll keep for up to three months. When ready to eat, let them thaw at room temperature for 10 minutes before enjoying.
Best Reheating Method
To revive a frozen or stale ball, microwave it on low power for 10–15 seconds. The moisture will re‑enter the mixture, restoring that delightful chew. Alternatively, place it in a preheated oven at 300°F for 5 minutes. A tiny splash of water before reheating steams back to perfection.