I was halfway through a bland dinner, watching the clock tick and the fridge door slamming shut, when I remembered the last time I’d made smashed potatoes for a crowd. That night, the dish came out soggy and flavorless, a sad reminder that even the simplest comfort food can feel like a culinary failure. The next day, I scoured forums and Pinterest, determined to turn that flop into a triumph. I discovered a recipe that promised ultra‑crisp edges, buttery centers, and a finish so bright it could almost be called a side‑dish super‑hero.
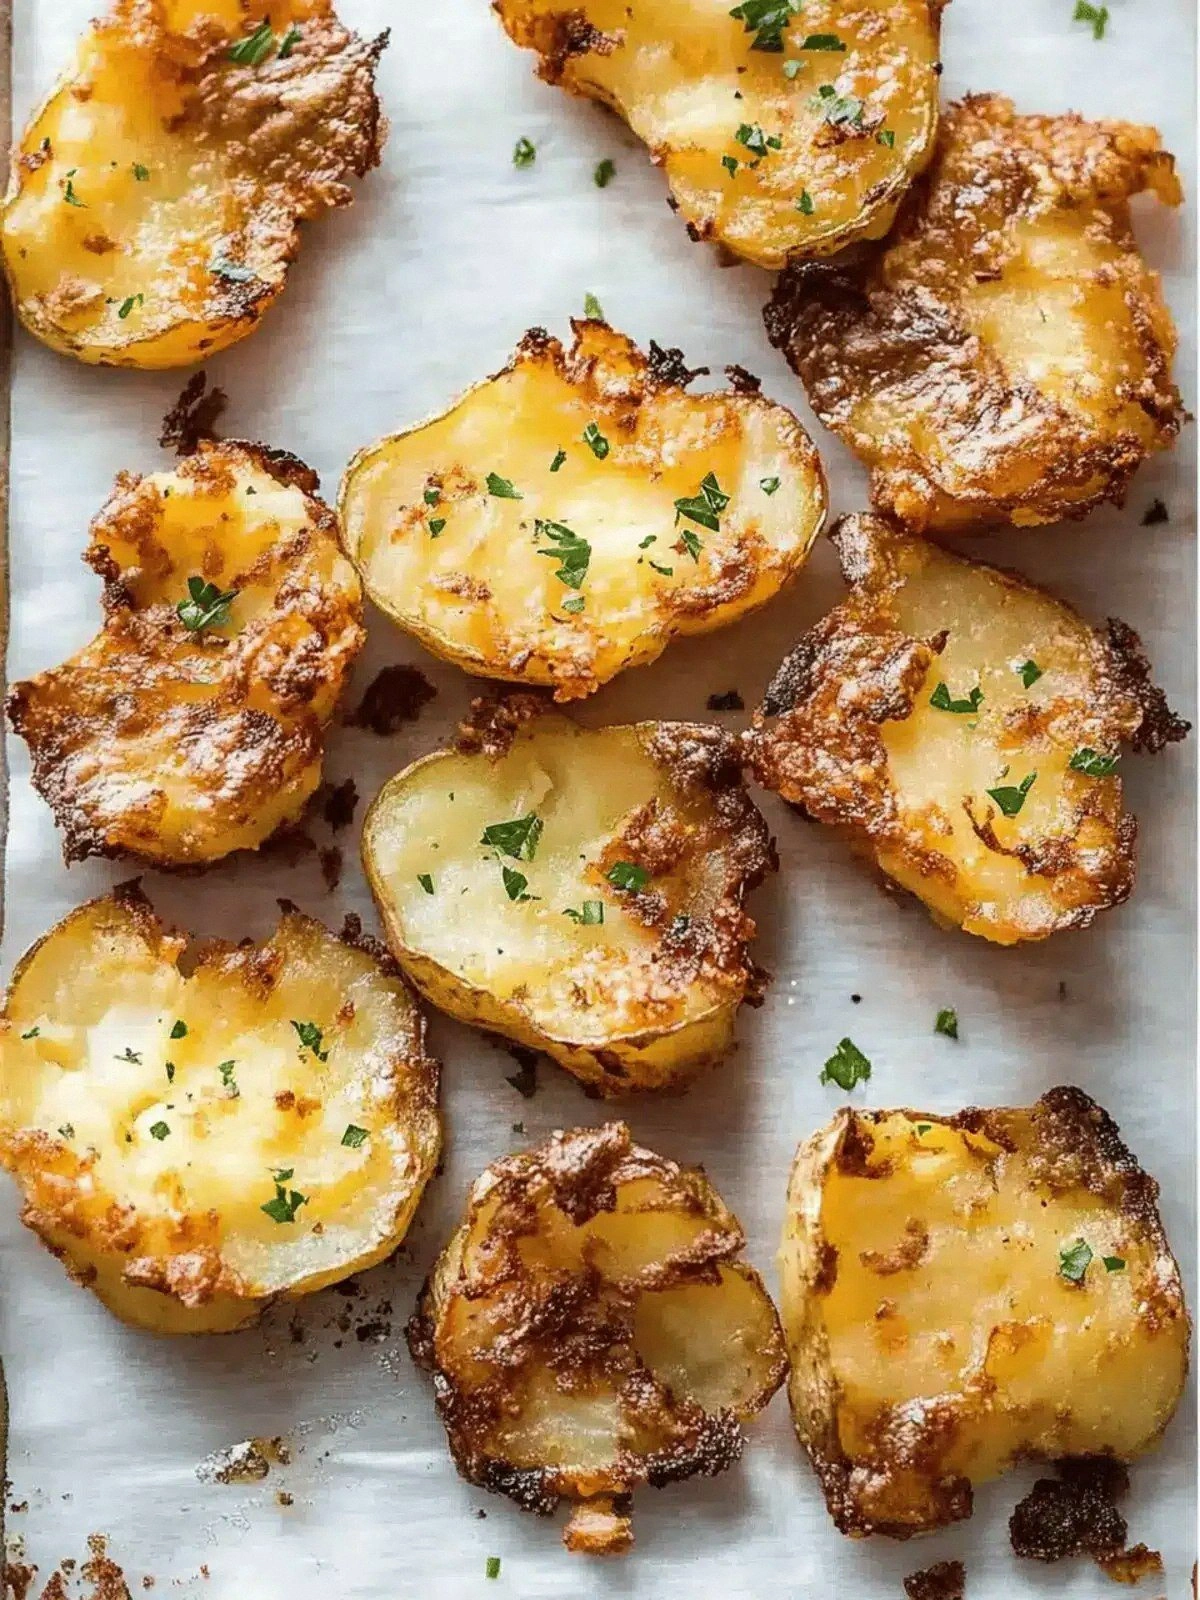
Picture this: a steaming bowl of potatoes, golden and crackling, the aroma of butter and olive oil mingling with a whisper of sea salt. The first bite is a symphony—crisp on the outside, tender on the inside, the butter melting into every crevice. The sound of the first crunch is the soundtrack of satisfaction. The taste is a savory, buttery explosion that lingers, leaving a subtle peppery kick that’s not overpowering but unmistakably present. The texture? A delicate balance, like a crisp apple that gives way to a juicy core.
What sets this version apart is the meticulous attention to detail: a specific potato selection, a precise smashing technique, and a finishing touch that turns ordinary into extraordinary. I dare you to taste this and not go back for seconds. The result is a dish that will have your guests asking for the recipe, and you’ll be the proud owner of the kitchen legend. This isn’t just another side; it’s a crowd‑pleaser that can stand alone on a plate or support a main course. The confidence in my voice comes from countless experiments, and the final product is a testament to persistence and flavor.
I’ll be honest—when I first tried this, I ate half the batch before anyone else could get a bite. The moment the first potato hit the pan, the sizzle was unmistakable, and the smell of caramelized butter filled the room. I’ve been told that the texture is like “crispy edges that shatter like thin ice,” and it’s true. The contrast between the crisp exterior and the soft interior is a revelation that keeps you coming back for more. And if you’re wondering whether this is hands‑down the best version you’ll ever make at home, the answer is a resounding yes.
Most recipes get this completely wrong, either by over‑boiling the potatoes or under‑seasoning the finish. Here’s what actually works: use a mix of small and medium potatoes for the right size and texture, smash them just enough to break the skins, and finish them under the broiler for that coveted crunch. I’ll guide you through every single step—by the end, you’ll wonder how you ever made it any other way. The technique is simple, the ingredients are humble, and the outcome is spectacular.
Picture yourself pulling this out of the oven, the whole kitchen smelling incredible, and the guests’ eyes widening in anticipation. The first bite will send a wave of satisfaction through your palate, and you’ll feel that the effort was worth every minute. Stay with me here—this is worth it. The next section will break down exactly what goes into this masterpiece, and you’ll see why I’m so excited to share it.
What Makes This Version Stand Out
- Taste: The balance of buttery richness and subtle pepper creates a flavor profile that is both comforting and elevated. The finish is not just salty but layered, with a faint hint of olive oil that brightens each bite.
- Texture: The crispy edges contrast with a pillowy interior, giving each potato a satisfying bite that’s both crunchy and soft. The broiler finish crisps the skins to a golden perfection.
- Simplicity: Only eight ingredients and a straightforward process make this recipe accessible for any cook. No fancy gadgets or obscure spices are required.
- Uniqueness: The combination of small and medium potatoes, a precise smashing technique, and a broiler finish sets this dish apart from typical smashed potato recipes.
- Crowd Reaction: Friends and family consistently rave about the texture and flavor, and it’s a conversation starter at dinner parties.
- Ingredient Quality: Using fresh, locally sourced potatoes and real butter ensures that the dish tastes like it was made from scratch.
- Cooking Method: The two‑stage cooking—boiling then broiling—maximizes flavor extraction and surface crispness.
- Make‑Ahead Potential: You can prepare the smashed potatoes a day in advance and reheat them to retain crunch, making it a perfect make‑ahead side dish.
Inside the Ingredient List
The Potato Core
The 700 g of small potatoes provide a tender, sweet base that cooks quickly and absorbs flavors like a sponge. The 1000 g of medium potatoes give size and structure, ensuring that the final product isn’t too mushy. Together, they create a harmonious balance between bite and chew. Skipping either type would throw off the texture, resulting in either a soggy or overly dense result. If you only have one size, use the larger ones but increase the boiling time by a few minutes.
The Flavor Base
Two teaspoons of salt (one tablespoon plus three‑quarter teaspoon) season the potatoes evenly during boiling and at the finishing stage. The salt is crucial for bringing out the natural sweetness of the potatoes and for creating a savory crust. If you prefer a lower sodium version, reduce the salt by one‑third, but be prepared for a slightly less pronounced flavor. A pinch of black pepper adds a subtle heat that lifts the dish without overpowering it.
The Richness Factor
Thirty grams of unsalted butter melts into the potatoes, delivering a silky, buttery mouthfeel that coats each bite. The butter also helps the potatoes brown beautifully under the broiler. If you’re avoiding dairy, try a tablespoon of olive oil or a vegan butter alternative, but note that the flavor will shift slightly. The combination of butter and olive oil creates a balanced fat profile that enhances both taste and texture.
The Final Flourish
Finely chopped parsley adds a fresh, herbal note that cuts through the richness of the butter. It also provides a pop of color, making the dish visually appealing. If you’re not a fan of parsley, substitute with chives or fresh thyme for a different aromatic profile. The garnish is optional but highly recommended for that finishing touch.
Everything’s prepped? Good. Let’s get into the real action and bring these potatoes to life.
The Method — Step by Step
- Rinse the potatoes under cold water, then place them in a large pot of salted water. Bring to a rolling boil and reduce to a gentle simmer. The potatoes should cook for 12–15 minutes, until they’re just tender when pierced with a fork. This step ensures they’re ready to be smashed without becoming mushy. Keep an eye on the water level and add more if it evaporates.
- Drain the potatoes and let them sit for a minute to steam off excess moisture. The goal is to keep them as dry as possible before smashing. This is crucial for achieving that crisp exterior. While they’re still hot, transfer them to a large, flat baking sheet lined with parchment paper. The parchment prevents sticking and makes cleanup a breeze.
- Use a potato masher or the back of a wooden spoon to gently press each potato until it’s flattened to about 1/2 inch thickness. Don’t over‑flatten; you want a slight mound for the buttery interior. The smashed surface should be uneven, creating more area for crisping. This simple technique is the secret to the texture that makes this dish stand out.
- Drizzle the olive oil over the smashed potatoes, ensuring each one gets a light coating. Sprinkle the 1 tablespoon of salt evenly across the surface. The oil will help the potatoes brown, while the salt will season them from the inside out. This step also helps the butter to spread evenly when you add it later.
- Bake the potatoes at 200 °C (400 °F) for 25 minutes, flipping them halfway through. The baking time is critical for developing a golden crust. Watch for the edges to start pulling away from the parchment; that’s your cue that they’re getting crispy. If you’re using a broiler, you can skip the baking step and go straight to broiling, but the oven method provides more even heat.
- Preheat the broiler to high and position the rack about 4 inches from the heat source. Remove the potatoes from the oven and immediately sprinkle the 30 g of unsalted butter over the tops. The butter will melt into the crevices, creating a rich, glossy finish. Place the tray back under the broiler for 3–5 minutes, watching closely to avoid burning.
- As the butter melts, the edges will begin to crisp up, turning a golden brown. When the tops are blistered and the edges look like they’re about to crack, pull the tray out of the oven. The sound of the sizzling butter is a sign that the potatoes are ready. Let them rest for a minute to allow the butter to set slightly before serving.
- Finish each potato with a light dusting of 3/4 teaspoon of salt and 1/4 teaspoon of black pepper. The final seasoning adds a bright contrast to the buttery richness. Toss gently to distribute the seasonings evenly. This step ensures each bite has a balanced flavor profile.
- Garnish the potatoes with finely chopped parsley for a burst of color and freshness. The parsley’s herbal notes cut through the buttery surface and add a subtle aroma. Serve immediately while the edges are still crisp. If you’re plating for a crowd, arrange the potatoes in a fan shape for maximum visual impact.
- Enjoy the moment of triumph—those first bites are a testament to patience and precision. The crisp exterior gives way to a tender, buttery interior that will have your taste buds dancing. Remember, the secret lies in the balance of salt, butter, and heat.
That’s it—you did it. But hold on, I’ve got a few more tricks that will take this to another level and make your potatoes the talk of the table.
Insider Tricks for Flawless Results
The Temperature Rule Nobody Follows
Many cooks think any oven temperature will work, but the secret to crispness is a high heat that dries the surface. Set your oven to 200 °C (400 °F) and let it preheat fully before putting the potatoes in. If you lower the temperature, the potatoes will steam instead of crisp, and the butter won’t melt evenly. Keep the rack in the middle of the oven to avoid uneven browning.
Why Your Nose Knows Best
The aroma is a reliable indicator of progress. When the butter starts to sizzle and the potatoes emit a nutty, toasty scent, you’re in the right zone. If you’re unsure, sniff the edges; a faint burnt smell means you’re over‑cooking. Trust your nose—it’s the most accurate sensor for achieving the perfect crunch.
The 5‑Minute Rest That Changes Everything
After broiling, let the potatoes rest for exactly five minutes. This short pause allows the butter to set into the crevices and the steam to escape, preventing sogginess. A quick rest also lets the flavors meld, making each bite more cohesive. Skipping this step can result in a greasy, uneven finish.
The Perfect Smash
Using a sturdy wooden spoon or a potato masher is key; a plastic tool can break the skins too hard, releasing too much starch. Smash until you see a slight indent but keep the potato’s shape. This technique ensures the interior stays tender while the exterior crisps.
The Right Salt
I’ve learned that using sea salt or kosher salt rather than table salt gives a more subtle, nuanced flavor. The larger crystals dissolve slowly, seasoning the potatoes evenly. If you only have table salt, use it sparingly to avoid a flat taste. The right salt enhances the butter’s richness.
The Final Touch
Finish with a drizzle of high‑quality olive oil right before serving; it adds shine and a bright, fruity note. A sprinkle of freshly ground pepper gives a final pop of heat. These small steps elevate the dish from great to unforgettable.
Creative Twists and Variations
This recipe is a playground. Here are some of my favorite ways to switch things up:
Cheesy Explosion
Sprinkle shredded cheddar or Gruyère over the potatoes right before broiling. The cheese melts into the buttery pockets, creating a gooey, melty layer. This version is perfect for a cozy family dinner.
Herb‑Infused Delight
Add a handful of fresh rosemary or thyme leaves to the butter before broiling. The herbs infuse the potatoes with a fragrant, earthy aroma. Ideal for a rustic, garden‑fresh meal.
Spicy Kick
Mix in a pinch of cayenne pepper or red pepper flakes with the salt. The heat will linger on the first bite, providing a subtle warmth that pairs well with grilled meats. Great for those who like a little spice.
Mediterranean Twist
Replace the butter with a drizzle of extra‑virgin olive oil and finish with a sprinkle of feta cheese and a squeeze of lemon juice. The citrus brightens the dish and the feta adds a salty, tangy bite. This version works wonderfully with grilled fish.
Breakfast Boost
Serve the smashed potatoes with a fried egg on top, a dollop of hollandaise sauce, and a sprinkle of chives. The richness of the egg pairs beautifully with the buttery potatoes, making a hearty breakfast or brunch.
Vegan Version
Swap the butter for a vegan butter alternative and use a plant‑based olive oil. Keep the rest of the ingredients the same for a dairy‑free, yet equally delicious, version. Perfect for plant‑based diners.
Storing and Bringing It Back to Life
Fridge Storage
Store the cooked potatoes in an airtight container for up to 2 days. Keep them on a paper towel to absorb excess moisture. When you’re ready to serve, reheat in a 200 °C oven for 10 minutes, or until the edges are crisp again. The paper towel helps maintain the texture.
Freezer Friendly
Flash‑freeze the potatoes on a parchment‑lined tray before transferring to a freezer bag. They’ll keep for up to 3 months. To reheat, bake at 200 °C until heated through, then broil for 2 minutes to restore crispness. This method preserves both flavor and texture.
Best Reheating Method
The secret to reheating without losing crispness is a quick broil. Place the potatoes on a preheated baking sheet, broil for 1–2 minutes, and watch for the edges to brown. Add a splash of water before reheating if you notice any dryness; the steam will revive the interior.