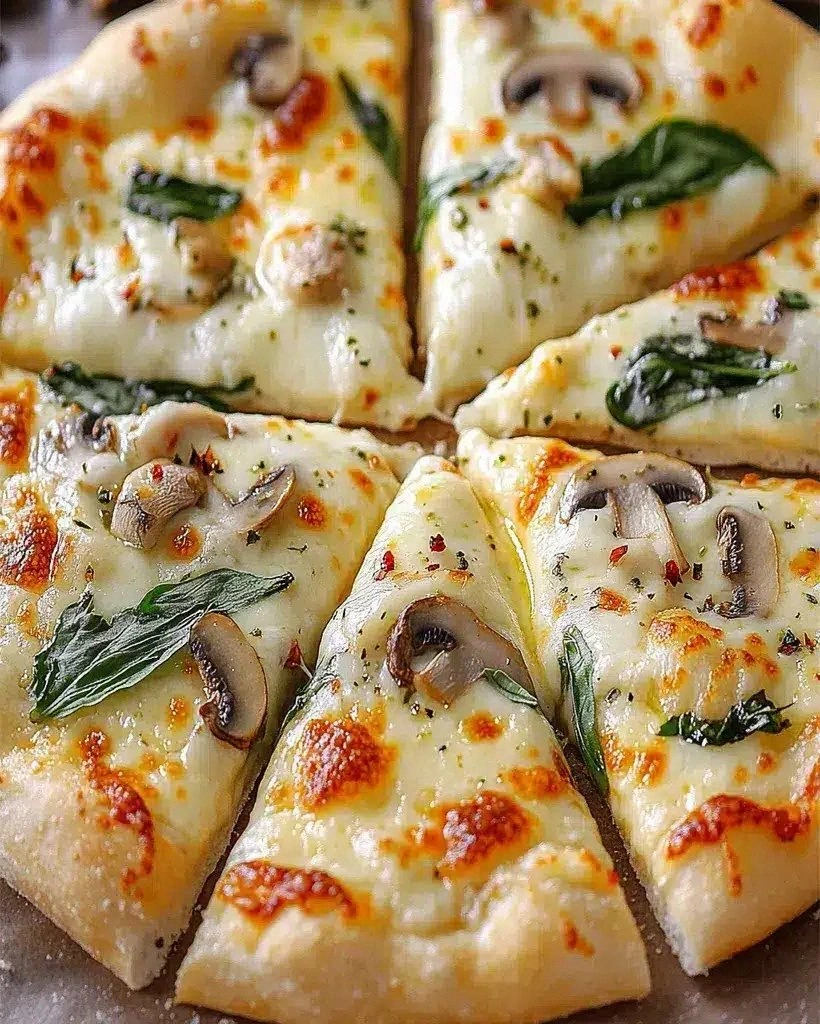
I'll be honest — I ate half the batch before anyone else got to try it. There I was, standing in my kitchen at 11:47 PM, hovering over a cutting board scattered with pizza crust remnants and garlic-scented evidence of my latest culinary obsession. The house was quiet, my family was asleep, and I was shamelessly polishing off slice number four of what might be the most outrageously delicious pizza I've ever created. This wasn't just any pizza night gone wild — this was the birth of my White Garlic Bliss Pizza, a creamy, garlicky masterpiece that would make any self-respecting food lover weak in the knees.
Picture yourself pulling this out of the oven, the whole kitchen smelling like a garlic lover's paradise, with wisps of steam curling up from molten cheese and herbs dancing in the air like they're celebrating their own delicious existence. The first bite hits different — it's not just pizza, it's an experience. The crust shatters like thin ice under your teeth, giving way to a river of creamy garlic sauce that coats your tongue like liquid velvet. Most recipes get this completely wrong, drowning their pies in heavy tomato sauce or bland cheese blends that taste like they came from a sad cafeteria line. But this? This is what happens when you treat garlic like the culinary rockstar it truly is.
Okay, ready for the game-changer? Instead of the usual red sauce parade, we're building layers of flavor that start with slow-roasted garlic cloves that melt into the creamiest, dreamiest white sauce you've ever tasted. I dare you to taste this and not go back for seconds — actually, I dare you to stop at seconds. The combination of fresh mozzarella, aged Parmigiano-Reggiano, and a secret blend of herbs creates a flavor profile so addictive, you'll find yourself making excuses to have "just one more slice" until suddenly the entire pizza has vanished like a magic trick.
If you've ever struggled with homemade pizza that turns out soggy, bland, or disappointingly average, you're not alone — and I've got the fix. This recipe came from three months of obsessive testing, starting with a dare from my friend Marcus who claimed no home cook could ever match restaurant-quality white pizza. Challenge accepted, my friend. After countless trials, several smoke alarm incidents, and one memorable evening where I accidentally used salt instead of sugar (don't ask), I've cracked the code. Let me walk you through every single step — by the end, you'll wonder how you ever made it any other way.
What Makes This Version Stand Out
Garlic Glory: We're not talking about a measly teaspoon of garlic powder here. This recipe uses a whole head of fresh garlic, slow-roasted until it becomes sweet, mellow, and spreadable like butter. The transformation from sharp and pungent to deep and caramelized is what separates amateur hour from pizza perfection.
Creamy Dream Sauce: Most white pizza recipes rely on heavy cream or ricotta, but we're creating a luxurious garlic cream sauce that starts with a roux base. This technique — borrowed from French cooking — ensures your sauce won't separate or become greasy under high heat, giving you that perfect creamy consistency in every bite.
Crust That Actually Crunches: The secret lies in the pre-bake method and a screaming hot pizza stone. While other recipes leave you with disappointing, doughy centers, this technique creates those coveted leopard spots underneath and crispy edges that shatter like thin ice when you bite into them.
Cheese Strategy: Forget the random cheese blend from a plastic bag. We're using a specific ratio of fresh mozzarella for stretch, aged Parmigiano-Reggiano for umami depth, and just a whisper of fontina for complexity. Each cheese plays a role, creating a symphony rather than a cacophony.
Herb Timing: Fresh herbs go on at two different stages — some before baking to infuse their oils into the cheese, others after to keep their brightness intact. This technique elevates the pizza from good to "I need to sit down, this is too good" territory.
Make-Ahead Magic: The garlic cream sauce can be prepared up to five days in advance, and the dough improves with a slow, cold fermentation. This means you can have restaurant-quality pizza on a Tuesday night without breaking a sweat or ordering takeout.
Leftover Love: Here's where most recipes fail — they don't tell you that this pizza is actually better the next day. The flavors meld overnight, and a quick reheat in a cast-iron skillet creates new textural dimensions that might be even better than fresh from the oven.
Alright, let's break down exactly what goes into this masterpiece...
Inside the Ingredient List
The Foundation Squad
The dough is where most home pizza makers lose the battle before they even begin. Bread flour isn't just a suggestion — it's the backbone of that chewy, blistered crust you're dreaming about. All-purpose flour simply doesn't have enough protein to develop the gluten structure that creates those beautiful air pockets and that satisfying chew. The high protein content, usually around 12-14%, gives your dough the strength to hold up under the weight of all that creamy, garlicky goodness without becoming a soggy mess.
Instant yeast might seem interchangeable with active dry, but trust me on this one — instant yeast works faster and more reliably, especially when you're dealing with a cold fermentation method. The tiny granules dissolve quickly and evenly, ensuring your dough rises consistently rather than creating those frustrating dense spots that make you want to throw the whole thing in the trash.
Good olive oil isn't just for drizzling on top — it's integral to the dough structure, creating a more extensible dough that stretches without tearing. Plus, it adds a subtle fruitiness that plays beautifully with the garlic. Don't even think about using that ancient bottle that's been sitting in your pantry since the Obama administration. Fresh, quality olive oil makes a difference you can taste.
The Flavor Powerhouse
Fresh garlic is non-negotiable here — and I mean the real deal, not those sad pre-peeled cloves that taste like disappointment and regret. A whole head of garlic, slow-roasted until it becomes spreadable and sweet, is what transforms this from "yeah, it's good" to "holy mother of flavor, what is this magic?" The roasting process caramelizes the natural sugars, mellowing the harsh bite and creating something that tastes like garlic's sophisticated older cousin.
Heavy cream forms the base of our sauce, but here's where we get technical — you want cream with at least 36% fat content. Anything less will break under the high heat of your oven, leaving you with an oily, separated mess that would make any Italian grandmother weep. The higher fat content helps the sauce stay creamy and luxurious, even when subjected to the blazing temperatures needed for proper pizza crust.
Butter might seem redundant when you're already using cream, but it's essential for creating the roux that thickens our sauce perfectly. European-style butter, with its higher fat content and lower water content, gives you a richer, more stable sauce that won't turn grainy or greasy.
The Texture Champions
Fresh mozzarella isn't just for caprese salads — it's the key to that Instagram-worthy cheese pull that makes everyone at the table reach for their phones. The high moisture content creates steam pockets that help the cheese melt evenly without becoming rubbery or oily. Look for the kind packed in water, not the dense, dry blocks that taste like nothing and melt like plastic.
Parmigiano-Reggiano aged for 24 months brings an umami bomb that fresh mozzarella simply can't provide. Those little crystals that crunch between your teeth? They're amino acid clusters called tyrosine, and they're responsible for that complex, nutty flavor that makes you close your eyes and sigh with satisfaction. Don't even think about substituting with the powdered stuff in the green can — that's not cheese, that's a crime against pizza.
Fontina might seem like an unusual choice, but its excellent melting properties and mild, nutty flavor bridge the gap between the fresh mozzarella and the sharp Parmigiano. It melts into a smooth, creamy layer that helps bind everything together, preventing the dreaded cheese slide-off when you pick up a slice.
The Aromatic Accents
Fresh thyme and oregano aren't just pretty garnishes — they're essential oils that infuse the entire pizza with Mediterranean sunshine. Dried herbs simply can't compete with the bright, complex flavors of fresh herbs. The trick is adding them at the right time: some go on before baking to release their oils into the melting cheese, others are scattered on after to preserve their fresh, vibrant character.
Red pepper flakes provide just enough heat to cut through the richness of all that cheese and cream. It's not about making the pizza spicy — it's about creating balance and preventing palate fatigue. You want just enough heat to make your taste buds sit up and pay attention, not so much that they're running for a glass of milk.
Everything's prepped? Good. Let's get into the real action...
The Method — Step by Step
- Start your dough the night before — this isn't optional if you want that complex, slightly tangy flavor that separates amateur pizza from the restaurant-quality stuff. Combine 3 cups bread flour, 1 teaspoon instant yeast, 1.5 teaspoons salt, and 1.25 cups cold water in a large bowl. Mix with your hands until it forms a shaggy mess (yes, it should look terrible at this stage). Cover and let it sit for 20 minutes — this autolyse period allows the flour to fully hydrate and starts developing gluten without any effort on your part. After the rest, add 2 tablespoons good olive oil and knead for just 3-4 minutes until it comes together. It doesn't need to be perfectly smooth — in fact, over-kneading can make your crust tough and dense.
- Now comes the patience test — cold fermentation. Place your dough in a lightly oiled bowl, cover tightly with plastic wrap, and refrigerate for at least 24 hours and up to 72 hours. This slow fermentation develops incredible flavor complexity and improves the dough's extensibility. The yeast produces organic acids that give the crust that addictive tang you find in artisanal pizzerias. Don't rush this step — future you will thank present you for the wait.
- Roast your garlic while the dough is doing its thing in the fridge. Preheat oven to 400°F, slice the top off a whole head of garlic to expose the cloves, drizzle with olive oil, wrap in foil, and roast for 40-45 minutes until the cloves are golden and spreadable like butter. Your house will smell like garlic heaven — embrace it, don't apologize for it. Let it cool, then squeeze out the cloves and mash them into a paste. This is liquid gold, and you're going to use every last bit of it.
- Make your white garlic cream sauce — this is where the magic happens. Melt 2 tablespoons butter in a saucepan over medium heat, whisk in 2 tablespoons flour to make a roux, and cook for 2 minutes until it smells nutty but hasn't browned. Slowly whisk in 1 cup heavy cream, then add your roasted garlic paste, 1/2 cup grated Parmigiano-Reggiano, a pinch of nutmeg, salt, and white pepper. The sauce should coat the back of a spoon — if it's too thick, thin with a splash of milk. Too thin? Let it reduce for a few more minutes. This sauce is so good you'll be tempted to eat it with a spoon, and honestly, I won't judge you if you do.
- Heat your oven to its maximum temperature — usually 500-550°F. If you have a pizza stone, place it on the lowest rack and let it heat for at least 45 minutes. This isn't the time for shortcuts — a screaming hot oven is what creates that leopard-spotted crust with the perfect chew. While you're waiting, take your dough out of the fridge and let it come to room temperature for about an hour. Cold dough won't stretch properly and will fight back like an angry cat.
- Shape your dough on a well-floured surface — and now the fun part. Don't use a rolling pin unless you want to destroy all those beautiful air bubbles you've spent days developing. Instead, use your fingertips to gently press from the center outward, leaving a 1-inch border for the crust. Pick it up and let gravity do the work, rotating as you go. If it tears, don't panic — just patch it up and keep going. Even the pros get holes sometimes.
- Assemble quickly — the longer your toppings sit on the dough, the more likely you'll end up with a soggy bottom (the horror!). Spread a thin layer of your garlic cream sauce, leaving that border we talked about. Add fresh mozzarella torn into irregular pieces — the uneven sizes create different melting textures and those Instagram-worthy cheese pulls. Sprinkle with fontina and Parmigiano, then add fresh thyme leaves and a drizzle of good olive oil. Less is more here — you're not making a casserole with pizza crust.
- Slide your masterpiece onto the hot stone — this is the moment of truth. That sizzle when it hits the stone? Absolute perfection. Bake for 10-12 minutes until the crust is golden with charred spots, the cheese is bubbling and just starting to brown in places. Your kitchen will smell like a trattoria in Naples, and your neighbors will probably show up at your door with empty plates and hopeful expressions.
- Let it rest for 5 minutes — I know, I know, but this step is crucial. The cheese needs time to set, or you'll end up with molten cheese lava that removes the skin from the roof of your mouth. Use this time to pour yourself a glass of wine, plate some arugula for the side, and practice your "oh, this old thing?" modest face for when everyone starts raving about how this is the best pizza they've ever had.
That's it — you did it. But hold on, I've got a few more tricks that'll take this to another level...
Insider Tricks for Flawless Results
The Temperature Rule Nobody Follows
Here's where most home cooks go wrong — they don't let their ingredients come to room temperature before assembling. Cold cheese doesn't melt properly, cold sauce can make your dough tough, and cold dough won't stretch without springing back like a rubber band. Take everything out of the fridge at least an hour before you plan to cook. Your cheese will melt into creamy puddles instead of rubbery islands, your sauce will spread smoothly without tearing the dough, and your crust will stretch like taffy instead of fighting back like it's personally offended by your existence.
Why Your Nose Knows Best
That moment when your kitchen fills with the aroma of roasting garlic and melting cheese? Don't ignore it — your nose is telling you exactly when to check your pizza. When you can smell it from the next room, that's usually when it's about 2 minutes from perfect. Open the oven and take a peek — the cheese should be bubbling actively, with some golden spots just starting to form. If you wait for it to look "done" through the oven door, you'll overcook it every time. Trust your senses, not just your eyes.
The 5-Minute Rest That Changes Everything
I mentioned resting before, but let me drive this home — cutting into a pizza immediately out of the oven is like opening presents before Christmas morning. The cheese needs time to settle, the sauce needs to cool slightly so it doesn't scorch your tongue, and the crust finishes cooking from residual heat. Use these five minutes to your advantage: toss some arugula with lemon and olive oil, open that bottle of wine you've been saving, and set the table like you're hosting royalty. When you finally slice into it, the cheese will hold its shape instead of sliding off like a dairy avalanche, and you'll actually be able to taste the complex flavors instead of just feeling pain from molten cheese burns.
The Cheese Grating Revelation
A friend tried skipping this step once — let's just say it didn't end well. Freshly grated cheese melts infinitely better than pre-grated stuff from a bag. Those anti-caking agents that keep pre-grated cheese from clumping in the bag also prevent it from melting smoothly on your pizza. Buy your cheese in blocks and grate it yourself — your food processor makes quick work of it, and the difference in melting quality is night and day. Plus, freshly grated cheese tastes brighter and more complex, with none of that chalky, stale flavor that comes from sitting in a bag for months.
The Steam Secret
Here's a pro move that seems counterintuitive but works like magic — add a small pan of water to the bottom of your oven while it preheats. The steam helps the crust develop a better texture, creating that perfect balance between crispy exterior and chewy interior. It also prevents the cheese from drying out and becoming rubbery. Just a shallow pan with about an inch of water is all you need — you're not trying to create a sauna, just a slightly humid environment that helps everything cook more evenly.
Creative Twists and Variations
This recipe is a playground. Here are some of my favorite ways to switch things up:
The Mushroom Madness
Add sautéed wild mushrooms — cremini, shiitake, and oyster — scattered over the cheese before baking. The earthiness of mushrooms plays beautifully with the creamy garlic sauce, and their meaty texture makes this variation satisfying enough for even the most devoted carnivores. Sauté them first with butter, thyme, and a splash of white wine until they're golden and all the moisture has evaporated. Nobody wants a soggy pizza, and mushrooms are notorious water bombs if you don't cook them down first.
The Spicy Honey Drizzle
Transform your white garlic pizza into something that hits every taste bud by drizzling it with hot honey right after baking. The sweetness of honey laced with chili heat creates an incredible contrast with the rich, garlicky base. Make your own by warming honey with dried chilies, or buy Mike's Hot Honey if you're feeling lazy. Either way, that sweet-heat combination will have everyone asking for your secret.
The Breakfast Pizza Remix
Add some cooked pancetta and crack a few eggs right on top during the last 5 minutes of baking. The eggs cook to perfect runny-yolked perfection, creating built-in sauce when you break them open. This is weekend brunch goals — serve it with mimosas and watch your friends lose their minds over the fact that you're serving pizza for breakfast and somehow making it look classy.
The Truffle Upgrade
For special occasions, finish with a drizzle of white truffle oil and some shaved fresh truffles if you're feeling fancy (and flush with cash). The truffle aroma elevates the entire pizza to restaurant-quality levels, but use a light hand — truffle oil is powerful stuff, and you want it to enhance, not overwhelm. A few drops go a long way toward making this taste like a $30 appetizer from that trendy restaurant downtown.
The Veggie Delight
Add thinly sliced zucchini ribbons and cherry tomatoes that have been halved and drained on paper towels. The zucchini adds freshness and a slight crunch, while the tomatoes provide bright acidity to cut through all that richness. Roast the tomatoes first to concentrate their flavor and evaporate excess moisture — nobody invited water to this pizza party.
The Everything Bagel Pizza
Sprinkle everything bagel seasoning around the crust edge before baking, and add some smoked salmon after it comes out of the oven. This brunch-inspired variation combines the best of bagels and pizza, creating something that tastes like Sunday morning in New York City. Add some capers and a schmear of cream cheese mixed with your garlic sauce for the full effect.
Storing and Bringing It Back to Life
Fridge Storage
Let the pizza cool completely — I mean completely, not just "warm-ish" — before storing. Wrap individual slices in plastic wrap, then store in an airtight container. They'll keep for up to 4 days, but honestly, good luck having any left after day 2. The key is preventing air exposure, which turns your beautiful crust into cardboard and makes the cheese taste like it's been sitting in a high school cafeteria warmer.
Freezer Friendly
Freeze slices on a baking sheet first, then transfer to a freezer bag once solid. This prevents them from freezing into one giant pizza brick that requires an ice pick to separate. Properly frozen, they'll keep for up to 2 months, though I question your willpower if you can wait that long. Label the bag with the date — future you will appreciate knowing whether you're about to eat month-old pizza or a potential science experiment.
Best Reheating Method
Add a tiny splash of water before reheating — it steams back to perfection. Skip the microwave unless you enjoy rubbery cheese and soggy crust (no judgment, but seriously, don't). Instead, heat a skillet over medium heat, add your slice, and cover with a lid. The steam from the water creates a mini-oven effect that reheats the toppings while the skillet bottom crisps up the crust. In about 4-5 minutes, you've got pizza that's arguably better than fresh — the flavors have melded, and the texture is incredible.