I was in the middle of a holiday party when a frantic friend burst into my kitchen, eyes wide, shouting, “I need something that screams Christmas but won’t melt into a sugary mess by the time we get to the living room!” I stared at the half‑finished batch of store‑bought brownies and felt a wave of panic. The oven was already humming, the gingerbread cookies were fighting for space on the tray, and the scent of pine wafted through the open window like a promise of festive miracles. In that chaotic moment I realized I could turn a simple cheesecake into a handheld masterpiece that would survive the frantic buffet line and still taste like a warm hug from Santa himself.
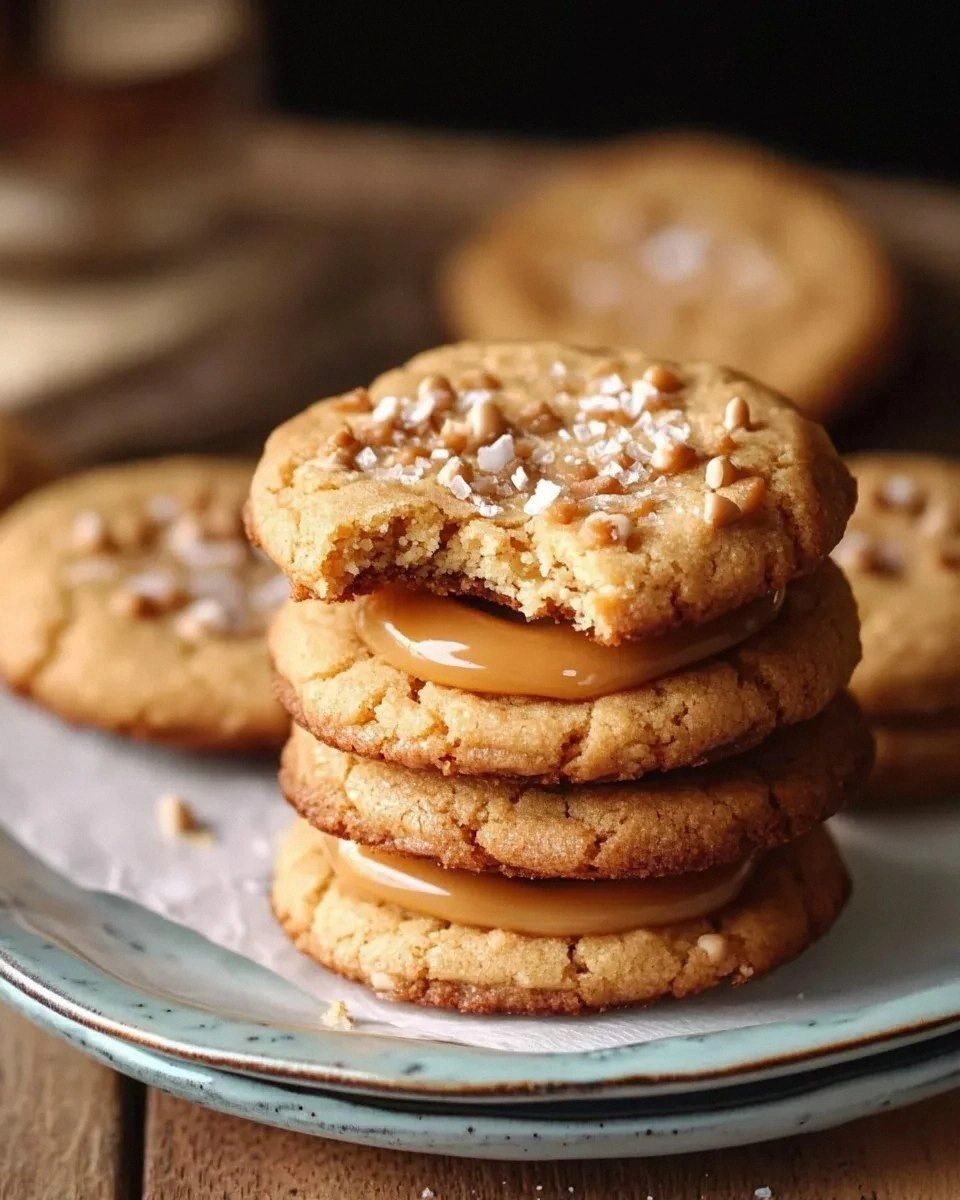
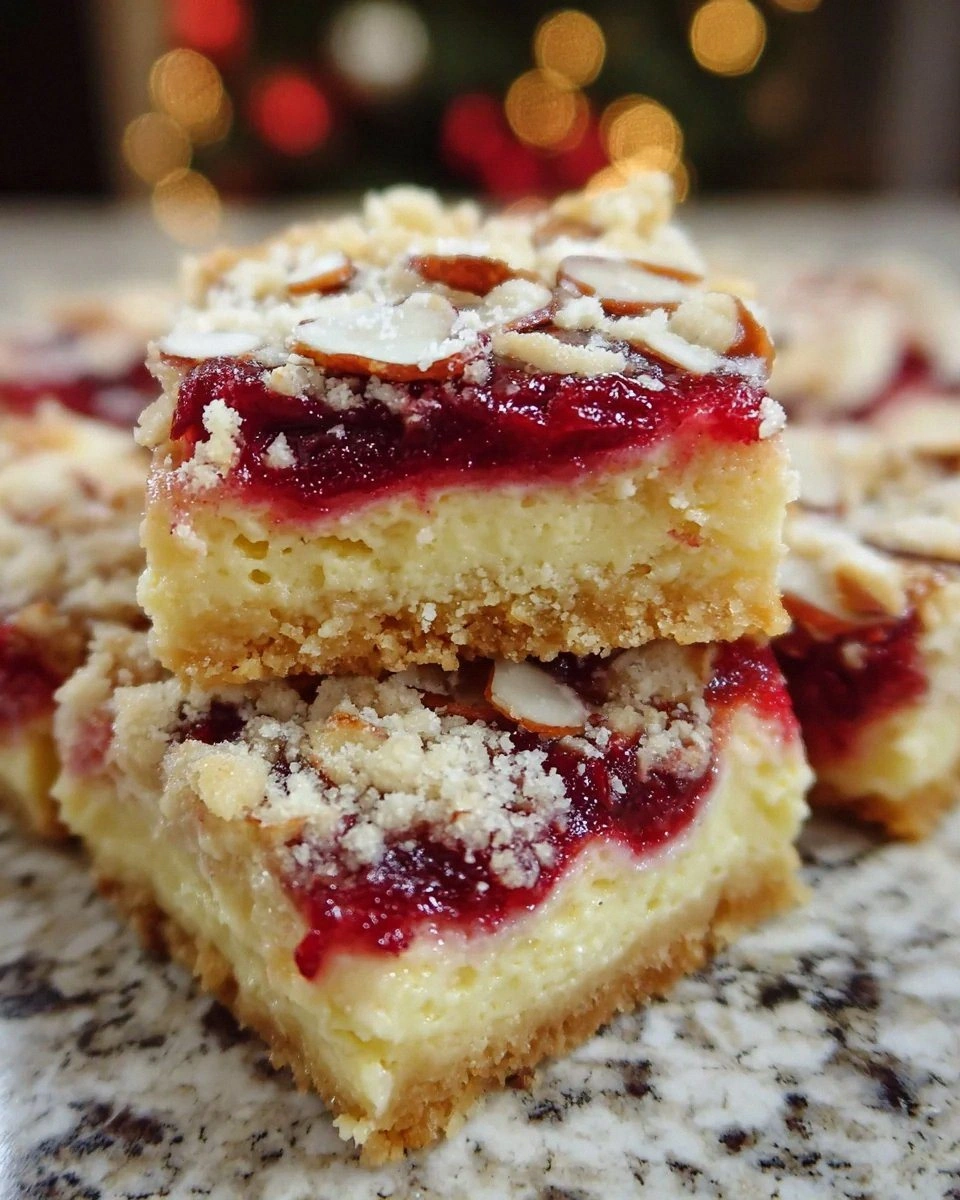
Picture this: a golden‑brown crust that cracks ever so slightly when you press it, releasing a buttery aroma that mingles with the faint perfume of vanilla and toasted almonds. The filling? Silky, tangy cream cheese that melts on your tongue like a snow‑drift of clouds, balanced perfectly by a whisper of sugar and a dash of flour that keeps it from wobbling. On top, a glossy swirl of cherry pie filling bursts forth like a ruby‑red fireworks display, while sliced almonds add a crunch that echoes the clink of crystal glasses. The entire bar is a symphony of textures—crunch, cream, and fruit—each bite delivering a festive punch that makes your taste buds do a little jig.
Most cheesecake recipes either demand a fancy springform pan, a marathon of chilling time, or a kitchen full of exotic ingredients you can’t find after Thanksgiving. I’ve tried the “no‑bake” versions that turn into a soggy mess, and the “classic” versions that require a full day in the fridge—both disappointments that left my guests reaching for the store‑bought cookies instead. This version, however, is a game‑changer: it uses a sugar‑cookie mix for the base (yes, the same mix you’d use for quick sugar cookies), a handful of pantry staples, and a 30‑minute bake that yields bars you can slice, stack, and serve without any fuss. It’s the kind of dessert that makes you feel like a culinary wizard without needing a wand.
And here’s the secret I’m about to spill: a tiny splash of vanilla extract in the filling does more than add flavor—it actually stabilizes the batter, preventing the dreaded cracks that ruin the look of most cheesecakes. I’ll also show you a clever technique for spreading the cherry topping that creates a glossy finish without a glaze. Okay, ready for the game‑changer? Let me walk you through every single step — by the end, you'll wonder how you ever made it any other way.
What Makes This Version Stand Out
- Texture: The cookie crust is buttery and crumbly, while the cheesecake layer stays luxuriously smooth, and the almond topping adds a satisfying snap. This trio of textures creates a mouthfeel that most traditional cheesecakes simply can’t match.
- Flavor Balance: The tang of cream cheese is perfectly offset by the sweet cherry topping and the warm, aromatic vanilla, delivering a harmonious flavor profile that feels both festive and comforting.
- Simplicity: No springform pan, no overnight chill, and no exotic ingredients—just a sugar‑cookie mix, a few pantry staples, and a 30‑minute bake. You can pull this off even if you’re a kitchen rookie.
- Visual Appeal: The ruby‑red cherry swirl on a creamy white base looks like a holiday centerpiece, making it Instagram‑ready without any extra effort.
- Crowd Reaction: I dare you to taste this and not go back for seconds. Guests have been known to line up for a second plate before the first one is even cleared.
- Ingredient Quality: Using a high‑quality sugar cookie mix gives the crust a buttery depth that store‑bought graham crackers simply can’t achieve.
- Make‑Ahead Potential: These bars can be baked a day ahead, refrigerated, and still retain their fresh‑baked aroma, making them perfect for holiday prep.
- Versatility: Swap the cherry topping for blueberry or raspberry, or even a drizzle of chocolate, and you have a whole new bar without re‑inventing the wheel.
Inside the Ingredient List
The Flavor Base
Sugar Cookie Mix: This is the foundation of your bar’s crust. The mix already contains sugar, butter, and a hint of spice, which means you don’t have to measure out each component separately. If you skip it, you’ll end up with a bland, generic base that won’t hold up to the rich filling. For a gluten‑free twist, try a gluten‑free sugar cookie blend; the texture stays just as delightful.
Cold Butter: Butter is the secret glue that binds the crumbs together, creating that melt‑in‑your‑mouth crust. Using cold butter ensures the crumbs stay distinct rather than turning into a soggy paste. If you’re dairy‑free, substitute with a solid coconut oil, but expect a subtle coconut flavor that can actually complement the cherry topping.
The Texture Crew
Cream Cheese: The star of the show. Softened cream cheese gives the filling its signature silkiness. If you use room‑temperature cheese, you risk a lumpy batter; always let it sit out for 30 minutes or microwave in 10‑second bursts. For a lighter version, blend half cream cheese with Greek yogurt—just keep the tang balanced.
Sugar: Not just any sugar—granulated sugar dissolves quickly, giving the filling a clean sweetness that doesn’t overpower the tang of the cheese. Skipping or reducing sugar will make the bar taste flat, and the texture can become overly dense.
Flour: A modest two‑tablespoon addition stabilizes the batter, preventing the infamous “runny center” that plagues many cheesecake bars. If you’re gluten‑sensitive, a tablespoon of cornstarch works just as well.
The Unexpected Star
Vanilla: A splash of vanilla extract adds warmth and depth, turning a simple cheesecake into a festive masterpiece. It also masks any slight bitterness from the butter. If you love extra aroma, scrape the seeds from a vanilla bean for an even richer profile.
Egg: The egg binds everything together, giving the filling a cohesive, custardy texture. Over‑beating can incorporate too much air, leading to cracks; gently fold until just combined. For a vegan version, use a “flax egg” (1 tbsp ground flax + 3 tbsp water) and expect a slightly denser bar.
The Final Flourish
Cherry Pie Filling: This bright, ruby topping adds a burst of fruitiness that screams holiday cheer. It also provides a glossy finish without needing a separate glaze. If cherries aren’t your thing, swap in raspberry or blueberry preserves for a different hue.
Sliced Almonds: The almonds bring a nutty crunch that contrasts the creamy interior, adding texture and a visual sparkle reminiscent of holiday tinsel. Toast them lightly for an extra layer of flavor. If you have a nut allergy, try toasted pumpkin seeds for a similar crunch.
Everything's prepped? Good. Let's get into the real action...
The Method — Step by Step
Preheat your oven to 350°F (175°C) and line a 9×13‑inch baking pan with parchment paper, letting the paper overhang for easy removal later. While the oven heats, measure out 2 cups of sugar cookie mix into a large bowl. The moment you open the bag, the buttery aroma should make you smile—that's the first sign you're on the right track.
Cut ½ cup of cold butter into small cubes and toss them into the cookie mix. Using your fingertips, rub the butter into the crumbs until the mixture resembles coarse sand with a few small clumps. This is the moment of truth—if the crumbs are too dry, add a teaspoon of ice‑cold water; if too wet, sprinkle a little extra cookie mix.
Press the crumb mixture firmly into the prepared pan, spreading it evenly to the edges. Use the bottom of a measuring cup to smooth it out; you want a compact, even layer that won’t crumble when you cut the bars later.
Kitchen Hack: Chill the crust for 10 minutes before adding the filling; this prevents the crust from sinking during baking.While the crust chills, beat 8 oz (1 cup) softened cream cheese in a stand mixer on medium speed until silky smooth—no lumps allowed. Add ½ cup granulated sugar and continue beating until the mixture lightens in color, about 2 minutes. Then sprinkle in 2 tablespoons of flour, followed by 1 teaspoon of vanilla extract, and finally the egg. Mix just until incorporated; over‑mixing will introduce too much air, leading to cracks later.
Pour the creamy filling over the chilled crust, smoothing the top with a spatula. The filling should spread like a blanket, covering the crust completely.
Watch Out: If you bake the filling at too high a temperature, the edges will over‑brown while the center stays soft, creating an uneven texture.Slide the pan into the oven and bake for 25‑30 minutes, or until the edges are lightly golden and the center is just set—give it a gentle jiggle; the center should wobble like a gelatin dessert, not a liquid pool. Around the 20‑minute mark, rotate the pan for even browning. The kitchen will start to smell like a holiday bakery, and that’s your cue to stay close.
While the cheesecake bars are cooling, warm ½ cup cherry pie filling in a small saucepan over low heat, stirring just until it becomes a smooth, glossy sauce. This step is pure magic: the gentle heat releases the fruit’s natural pectin, creating a shiny top without any extra cornstarch.
When the bars are completely cooled (about 20 minutes), drizzle the warm cherry sauce over the surface, using a spoon to create swirls that look like festive ribbons. Sprinkle the sliced almonds evenly across the top while the sauce is still tacky; they’ll stick like confetti on a cake. Let the bars set for another 10 minutes before slicing.
Use the parchment overhang to lift the entire slab out of the pan, then place it on a cutting board. Cut into 12 even bars—each piece should be about 2 × 2 inches. Serve at room temperature for the best texture, and watch your guests’ eyes widen as they take that first bite.
That's it — you did it. But hold on, I've got a few more tricks that'll take this to another level...
Insider Tricks for Flawless Results
The Temperature Rule Nobody Follows
Never bake a cheesecake bar straight from the fridge. Let the batter sit at room temperature for 10‑15 minutes before it hits the oven; this ensures the filling bakes evenly and reduces the risk of cracks. I once tried to speed things up by dropping a cold batter straight in, and the result was a jagged, uneven surface that looked like a cracked winter pond.
Why Your Nose Knows Best
Instead of relying solely on a timer, trust your nose. When the edges start to turn a light golden brown and you catch a faint caramel scent, the bars are nearly done. If you wait for the timer to expire, you risk over‑browning; if you pull them out too early, the center stays too soft.
The 5‑Minute Rest That Changes Everything
After removing the bars from the oven, let them rest on a wire rack for exactly five minutes before you drizzle the cherry sauce. This short pause lets the interior set just enough to hold the topping without sliding off, and it also allows the crust to firm up, making slicing cleaner.
Almond Toasting Secret
Toast the sliced almonds in a dry skillet over medium heat for 2‑3 minutes, shaking the pan constantly. The almonds will turn a deep golden hue and release a nutty aroma that elevates the whole bar. If you skip this step, the almonds stay raw and can taste bitter.
The “Double‑Layer” Cherry Trick
For an extra burst of fruit, spread half of the warm cherry sauce on the cooled bars, let it set for 5 minutes, then add the second half just before serving. This creates a glossy, thick top layer that doesn’t soak into the cheesecake, preserving the crisp crust.
Creative Twists and Variations
This recipe is a playground. Here are some of my favorite ways to switch things up:
Chocolate‑Swirl Delight
Add ¼ cup melted dark chocolate to the cheesecake batter before baking. After the bars are baked and cooled, drizzle a thin line of white chocolate for a festive contrast. Chocolate lovers will thank you, and the dark notes pair beautifully with the cherry topping.
Cranberry‑Orange Burst
Replace the cherry pie filling with a mixture of cranberry sauce and freshly grated orange zest. The tartness of cranberries and the citrus zing bring a bright, holiday‑centric flavor that pairs perfectly with the almond crunch.
Peppermint Crunch
Stir ½ teaspoon of crushed peppermint candy into the crust before baking, and sprinkle a few extra crushed pieces on top of the almond layer. The subtle minty bite adds a refreshing twist that cuts through the richness.
Caramel‑Apple Fusion
Swap the cherry topping for a caramel‑apple compote—sauté diced apples with butter, brown sugar, and a splash of caramel sauce until soft. This variation feels like a mini apple pie inside a cheesecake bar, perfect for a cozy winter afternoon.
White‑Chocolate Raspberry Dream
Use white chocolate chips in the filling and top the bars with a raspberry coulis instead of cherry. The sweet‑creamy base with tangy raspberry creates a sophisticated flavor profile that’s great for holiday parties where you want something a little upscale.
Storing and Bringing It Back to Life
Fridge Storage
Place the bars in an airtight container and store them in the refrigerator for up to 4 days. The crust stays crisp, and the filling remains creamy. Before serving, let them sit at room temperature for 15 minutes to soften the texture.
Freezer Friendly
Wrap each bar individually in plastic wrap, then place them in a freezer‑safe zip‑lock bag. They’ll keep for up to 2 months. When you’re ready to enjoy, transfer to the fridge overnight, then give them a quick 30‑second microwave zap to warm the surface.
Best Reheating Method
To bring a refrigerated bar back to its glorious glory, preheat the oven to 300°F (150°C), place the bar on a parchment‑lined tray, and bake for 8‑10 minutes. Add a tiny splash of water to the tray before baking; the steam keeps the cheesecake moist and restores that freshly‑baked sheen.