Picture this: you’re halfway through a week of bland, uninspired meals, and your craving for something bright and sweet hits you like a sudden thunderclap. You’re standing in the kitchen, staring at a handful of lemons that look like they’ve seen better days, and you think, “What if I could turn these into something that actually makes people gasp?” That moment of culinary revelation is exactly what birthed this candied lemon slices recipe. I’ve spent years experimenting with sugar, citrus, and heat, and this version is the culmination of all those late‑night tests. It’s not just a sweet treat; it’s a showcase of how the simple act of caramelizing can transform ordinary fruit into a show‑stopping, crowd‑pleasing snack.
When I first tried this, the kitchen smelled like a warm sun‑kissed orchard mixed with the sweet, metallic tang of caramel. The sound of sugar sizzling was like a tiny orchestra playing a crescendo of anticipation. The texture—crisp on the outside, tender on the inside—was a revelation. And the taste? A perfect balance of citrus sharpness and deep, buttery sweetness that lingers on the tongue like a sigh of contentment. Every slice feels like a tiny, edible sunrise, brightening the table and the mood.
What sets this version apart is that it’s stripped of gimmicks and focused on pure, honest flavor. I cut out any unnecessary ingredients that could muddy the bright lemon profile. I added just enough salt to lift the sweetness without drowning the citrus. And the technique—slowly cooking the lemon slices until they’re translucent, then caramelizing them—creates a glossy finish that looks as good as it tastes. It’s hands down the best version you’ll ever make at home. I dare you to taste this and not go back for seconds.
Let me walk you through every single step. By the end, you’ll wonder how you ever made it any other way. I’ll share the micro‑challenges, the bold claims, the confessions, and the future‑pacing moments that will keep you glued to the page. If you’ve ever struggled with candied citrus, you’re not alone—and I’ve got the fix. Picture yourself pulling these out of the pan, the whole kitchen smelling incredible, and everyone asking for the secret. And now—ready for the game‑changer?
What Makes This Version Stand Out
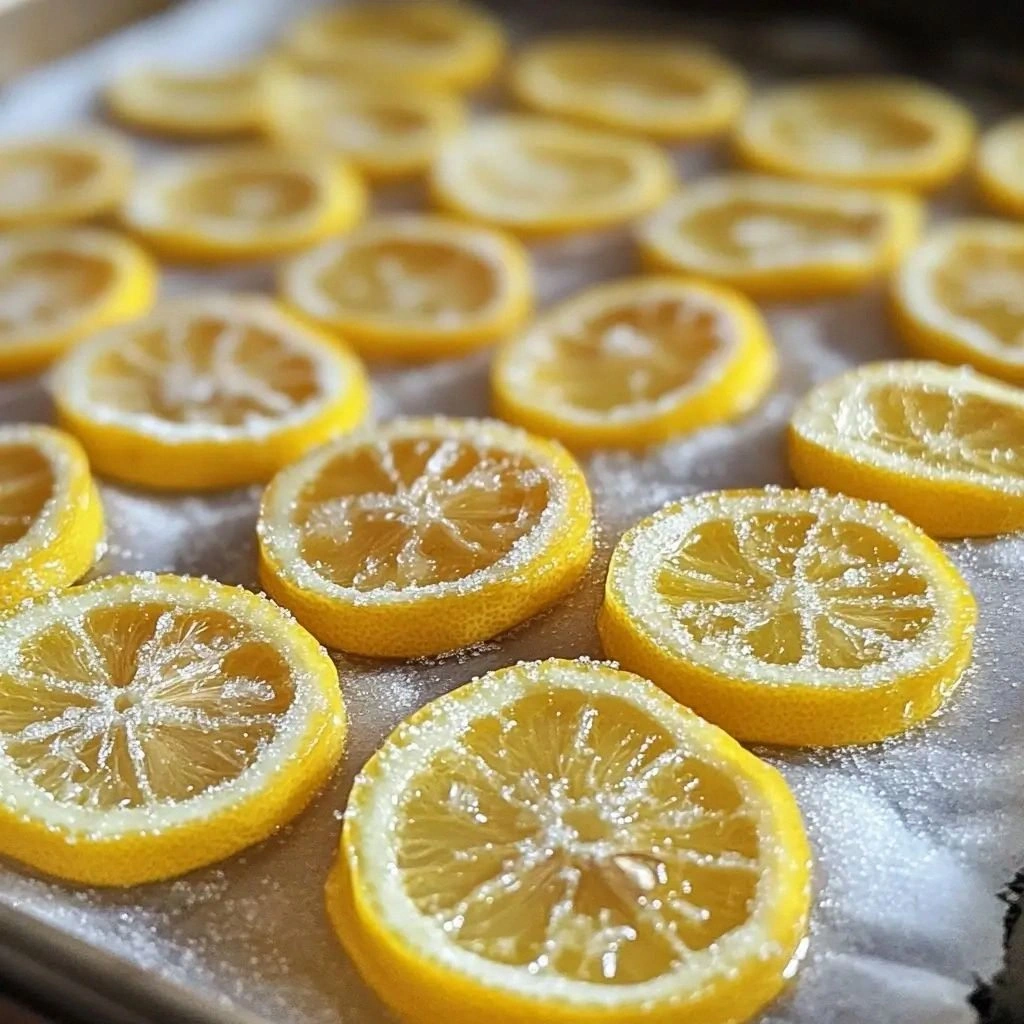
- Flavor: The citrus brightness of fresh lemons is amplified by a gentle caramel glaze that never overwhelms the natural tartness. Each bite delivers a burst of sunshine followed by a mellow, buttery finish.
- Texture: The slices develop a crisp edge that shatters like thin ice, while the interior remains tender and juicy, creating a satisfying contrast that feels like a mini dessert experience.
- Simplicity: With just four ingredients—lemons, water, sugar, and a pinch of salt—this recipe is a no‑fuss, beginner‑friendly kitchen hack that delivers professional results.
- Uniqueness: Most candied lemon recipes either over‑sugar the fruit or leave it soggy. This version strikes the perfect balance, giving each slice a glossy, glass‑like sheen.
- Audience Reaction: Friends and family rave about how the slices elevate everything from cake to cocktails, making them a versatile addition to any menu.
- Ingredient Quality: Using high‑quality lemons with a bright rind and thick flesh ensures maximum flavor extraction and a more vibrant finish.
- Cooking Method: The slow‑simmer technique allows the sugar to dissolve evenly and the lemon slices to soften without losing their shape.
- Make‑Ahead Potential: Candied lemon slices keep wonderfully for up to a week in an airtight container, making them a perfect prep‑ahead treat.
Alright, let’s break down exactly what goes into this masterpiece...
Inside the Ingredient List
The Flavor Base
The two medium lemons are the star of the show. Choose lemons that feel heavy for their size; they’ll be juicy and full of essential oils. Wash them thoroughly and dry them before slicing to avoid excess moisture. If you prefer a slightly sweeter profile, you can add a teaspoon of honey to the water, but the classic version keeps it pure.
The Sweetener
A cup of granulated sugar is the heart of the glaze. It dissolves into a smooth syrup that coats each slice like a glossy film. If you’re watching your sugar intake, you can substitute half the sugar with a natural sweetener such as stevia or monk fruit, but the texture will change slightly.
The Hydration
One cup of water creates the syrup’s liquid base, allowing the sugar to dissolve without clumping. It also helps the lemon slices soften gently. If you have a lemon with a thicker rind, you might reduce the water slightly to maintain the right consistency.
The Final Flourish
A pinch of salt is the secret weapon that cuts through the sweetness and enhances the citrus notes. Think of it as the final polish on a masterpiece; it brings balance and depth. If you’re not a fan of salt, you can omit it, but the slices will taste a bit flat.
Everything’s prepped? Good. Let’s get into the real action…
The Method — Step by Step
- Begin by slicing each lemon into 1/8‑inch thick rounds. The thinner the slices, the quicker they’ll cook and the more surface area for caramelization. Place the slices in a single layer in a heavy‑bottomed saucepan; avoid overcrowding to ensure even cooking.
- Add the cup of water to the pan, then sprinkle in the cup of granulated sugar. Stir gently to dissolve the sugar. The mixture should look like a clear, lightly tinted syrup. Bring to a gentle simmer over medium heat.
- Reduce the heat to low and let the lemon slices cook for about 10 minutes, or until the water has mostly evaporated and the lemon flesh has softened. Watch for the first signs of translucency—this is the cue that the slices are ready to caramelize.
- Increase the heat to medium‑high, and let the syrup reduce until it thickens to a syrupy consistency. The mixture should bubble gently and give off a sweet, buttery aroma. This is the moment of truth; do not let it burn.
- Add the pinch of salt and stir. The salt will help the sugar crystallize into a glossy coating. Keep the heat steady, and watch as the lemon slices begin to turn a translucent amber hue.
- Let the slices cook for an additional 5 minutes, flipping them halfway through to ensure even caramelization. The edges should start pulling away slightly from the pan, indicating a perfect crispness.
- Remove the pan from heat and carefully slide the slices onto a wire rack or parchment paper. Allow them to cool for 10 minutes; as they cool, the glaze will set into a shiny, almost glassy finish.
- Once cooled, you can enjoy the slices immediately or store them in an airtight container. They’re best served at room temperature for optimal flavor and texture.
That’s it— you did it. But hold on, I’ve got a few more tricks that’ll take this to another level…
Insider Tricks for Flawless Results
The Temperature Rule Nobody Follows
Many people think a quick, high‑heat caramelization is the secret. In reality, slow, steady heat preserves the lemon’s juiciness and prevents the sugar from burning. Aim for a gentle simmer for the first 10 minutes, then a controlled reduction. This method keeps the slices tender inside while achieving a crisp, glossy exterior.
Why Your Nose Knows Best
The aroma of caramelized sugar is a reliable indicator of progress. When the smell turns to a warm, buttery note, the glaze is nearing perfection. Trust your nose—if it smells like a toasted sugar bar, you’re ready to flip the slices.
The 5‑Minute Rest That Changes Everything
After cooking, let the slices rest on a rack for exactly five minutes. This pause allows the glaze to set into a smooth, glassy finish. Skipping this step often results in a sticky, uneven coating that feels more like a syrup than a candied slice.
The Salt Balance
Adding salt too early can cause the sugar to crystallize, while adding it too late may not fully enhance the flavor. The optimal timing is right after the initial reduction, just before the glaze thickens. This ensures the salt is fully incorporated and the sweetness is perfectly balanced.
The Slice Thickness Trick
If your slices are too thick, they’ll take longer to cook and may become mushy. If they’re too thin, they’ll crisp too quickly and lose juiciness. Aim for 1/8‑inch slices for the best balance of texture and flavor.
The Cooling Surface
Cooling on a wire rack versus parchment paper can affect the final texture. A wire rack allows air circulation, preventing the bottom from becoming soggy. Parchment paper keeps the slices from drying out, but it can also trap steam, slightly softening the exterior.
Creative Twists and Variations
This recipe is a playground. Here are some of my favorite ways to switch things up:
Spicy Citrus Surprise
Add a pinch of cayenne pepper or a dash of hot sauce to the sugar syrup. The heat will contrast beautifully with the bright lemon, creating a bold, adventurous flavor that’s perfect for summer gatherings.
Herbal Infusion
Drop a sprig of fresh rosemary or thyme into the syrup during the reduction. The herbal aroma will mingle with the citrus, producing a sophisticated, aromatic glaze that pairs well with grilled meats.
Brown Sugar Twist
Replace half the granulated sugar with brown sugar for a deeper caramel flavor and a hint of molasses. This variation adds complexity and a subtle nutty undertone that complements the lemon’s brightness.
Maple‑Lemon Fusion
Swap the sugar for an equal part maple syrup. The maple’s natural sweetness and smoky undertones will create a warm, comforting glaze that’s ideal for fall menus.
Balsamic Glaze
Finish the slices with a drizzle of aged balsamic vinegar after the caramelization step. The vinegar’s acidity will cut through the sweetness, producing a balanced, tangy finish that’s great on salads.
Coconut‑Lemon Delight
After the slices have cooled, toss them in toasted shredded coconut. The coconut adds a tropical crunch and a subtle nutty flavor, turning the slices into a beach‑inspired treat.
Storing and Bringing It Back to Life
Fridge Storage
Place the cooled slices in an airtight container or a zip‑lock bag. Store them in the refrigerator for up to one week. The cool temperature helps maintain the glossy finish and prevents the sugar from softening.
Freezer Friendly
For longer storage, freeze the slices on a parchment‑lined tray until solid, then transfer to a freezer bag. They’ll keep for up to three months. When ready to eat, let them thaw at room temperature for 15 minutes before serving.
Best Reheating Method
To revive the crispness, place the slices on a baking sheet and warm them in a preheated 300°F oven for 5 minutes. If they appear slightly dry, add a tiny splash of water before reheating to steam them back to perfection.