Picture this: it’s a frigid December evening, the kind where the wind howls like a choir of disgruntled wolves, and you’re stuck in a kitchen that smells like burnt toast and desperation. I had just attempted a “quick” chocolate chip cookie that turned out flatter than a pancake left in the freezer for a week. My friend dared me to create something that would make even the Grinch melt, and I accepted the challenge with a mischievous grin. I raided the pantry, grabbed every cocoa‑laden treasure I could find, and set out to craft a cookie that would redefine holiday indulgence.
From the moment the butter hit the bowl, a buttery perfume swirled around the room, mingling with the sweet perfume of sugar and the deep, earthy sigh of unsweetened cocoa. The sound of the mixer whirring was like a tiny tornado, lifting tiny snowflakes of flour into the air, while the occasional pop of marshmallow bits hitting the steel bowl reminded me of fireworks on New Year’s Eve. My fingertips felt the silky texture of the dough as it came together, warm and pliable, promising a bite that would be both crisp at the edges and gooey at the heart. When the first batch emerged from the oven, the aroma was a full‑blown celebration—rich hot chocolate, toasted marshmallows, and a whisper of vanilla that made my kitchen feel like a winter wonderland boutique.
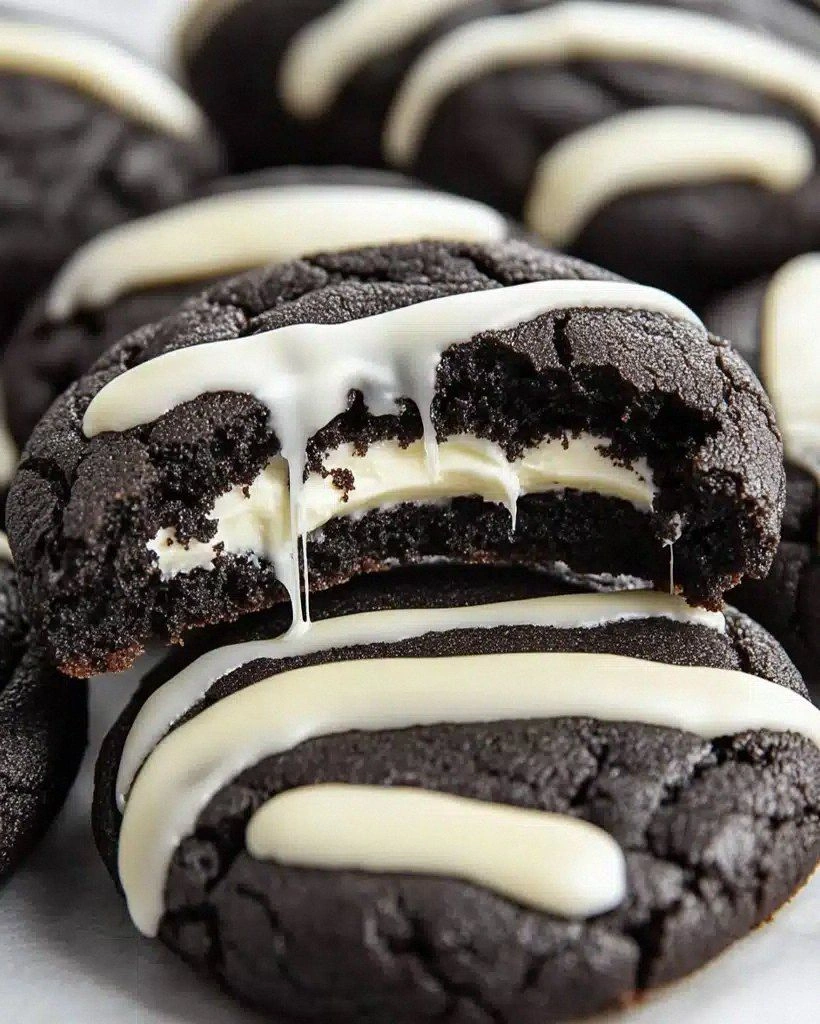
This version isn’t just another cookie; it’s the culmination of every holiday cookie nightmare I’ve ever endured, turned on its head. Most recipes get the chocolate‑to‑marshmallow balance wrong, ending up either overly bitter or cloyingly sweet. I’ve cracked the code by layering a powdered hot cocoa mix for that instant‑hot‑chocolate punch, then folding in unsweetened cocoa for depth, and finally sprinkling in marshmallow bits that melt into pockets of sugary clouds. The secret weapon? A dash of extra chocolate chips that give you that satisfying snap when you bite, while the semi‑sweet chips keep the sweetness from overwhelming the palate.
And here’s the kicker: I’m about to reveal a technique that most bakers overlook—a quick chill of the dough that locks in the moisture, ensuring each cookie stays soft in the middle while the edges turn golden and crisp. I dare you to taste this and not go back for seconds. Let me walk you through every single step — by the end, you’ll wonder how you ever made it any other way.
What Makes This Version Stand Out
- Flavor Explosion: The combination of powdered hot cocoa mix and unsweetened cocoa creates a layered chocolate experience that’s as complex as a holiday spice blend, yet familiar enough to comfort any palate.
- Texture Symphony: Expect a crisp, caramelized edge that gives way to a melt‑in‑your‑mouth center studded with chewy marshmallow pockets and crunchy chocolate chips.
- Simplicity Meets Luxury: Despite the gourmet taste, the ingredient list is pantry‑friendly, and the steps are straightforward enough for a beginner to nail on the first try.
- Unique Ingredient Twist: The inclusion of a powdered hot cocoa mix is the game‑changer that turns an ordinary cookie into a holiday masterpiece.
- Crowd‑Pleaser Factor: Even the pickiest eaters—yes, even the one who claims “I don’t like chocolate”—will be reaching for more, thanks to the balanced sweetness and texture.
- Ingredient Quality: Using real butter and high‑quality cocoa powders ensures a rich mouthfeel that cheap shortcuts simply can’t match.
- Cooking Method Magic: A brief chill of the dough before baking prevents spreading, giving you uniform, thick cookies every time.
- Make‑Ahead Potential: These cookies freeze beautifully, so you can bake a batch now and enjoy them throughout the holiday season without losing any of that fresh‑out‑of‑the‑oven magic.
Inside the Ingredient List
The Flavor Base
Butter (1 cup): Real butter provides a rich, creamy foundation that oil simply can’t replicate. Its milk solids brown during baking, adding a nutty depth that elevates the chocolate. If you substitute with margarine, expect a flatter flavor and a slightly greasy mouthfeel.
Sugar (1 cup) & Brown Sugar (1 cup): The duo creates a perfect balance—white sugar for crispness and brown sugar for moisture and caramel notes. Skipping the brown sugar will make the cookies dry, while omitting white sugar will result in a gummy texture.
Egg (1 large): The egg acts as an emulsifier, binding the butter and sugars while adding lift. Using a smaller egg will make the dough crumbly; a larger egg can cause excess spread.
The Texture Crew
Milk (2 tbsp) & Vanilla Extract (1 tbsp): Milk adds a subtle creaminess, while vanilla amplifies the chocolate aroma. If you’re out of vanilla, a splash of almond extract works but will shift the flavor profile toward nutty.
Flour (2 cups): All‑purpose flour provides structure. For an even softer crumb, you can swap half with cake flour, but be careful—too much cake flour may make the cookies fragile.
Powdered Hot Cocoa Mix (1 cup): This is the secret weapon—a pre‑sweetened, finely milled cocoa that mimics the taste of a steaming mug of hot chocolate. It dissolves quickly, ensuring no gritty pockets.
Unsweetened Cocoa Powder (1 cup): Adds a deep, bitter counterpoint that prevents the cookies from becoming cloyingly sweet. If you only have Dutch‑process cocoa, you’ll get a smoother flavor but lose some acidity.
The Unexpected Star
Baking Soda (1 tsp) & Salt (1 tsp): Baking soda creates lift and a tender crumb, while salt balances the sweetness and enhances the chocolate. Forgetting the salt is a rookie mistake that leaves the cookie tasting flat.
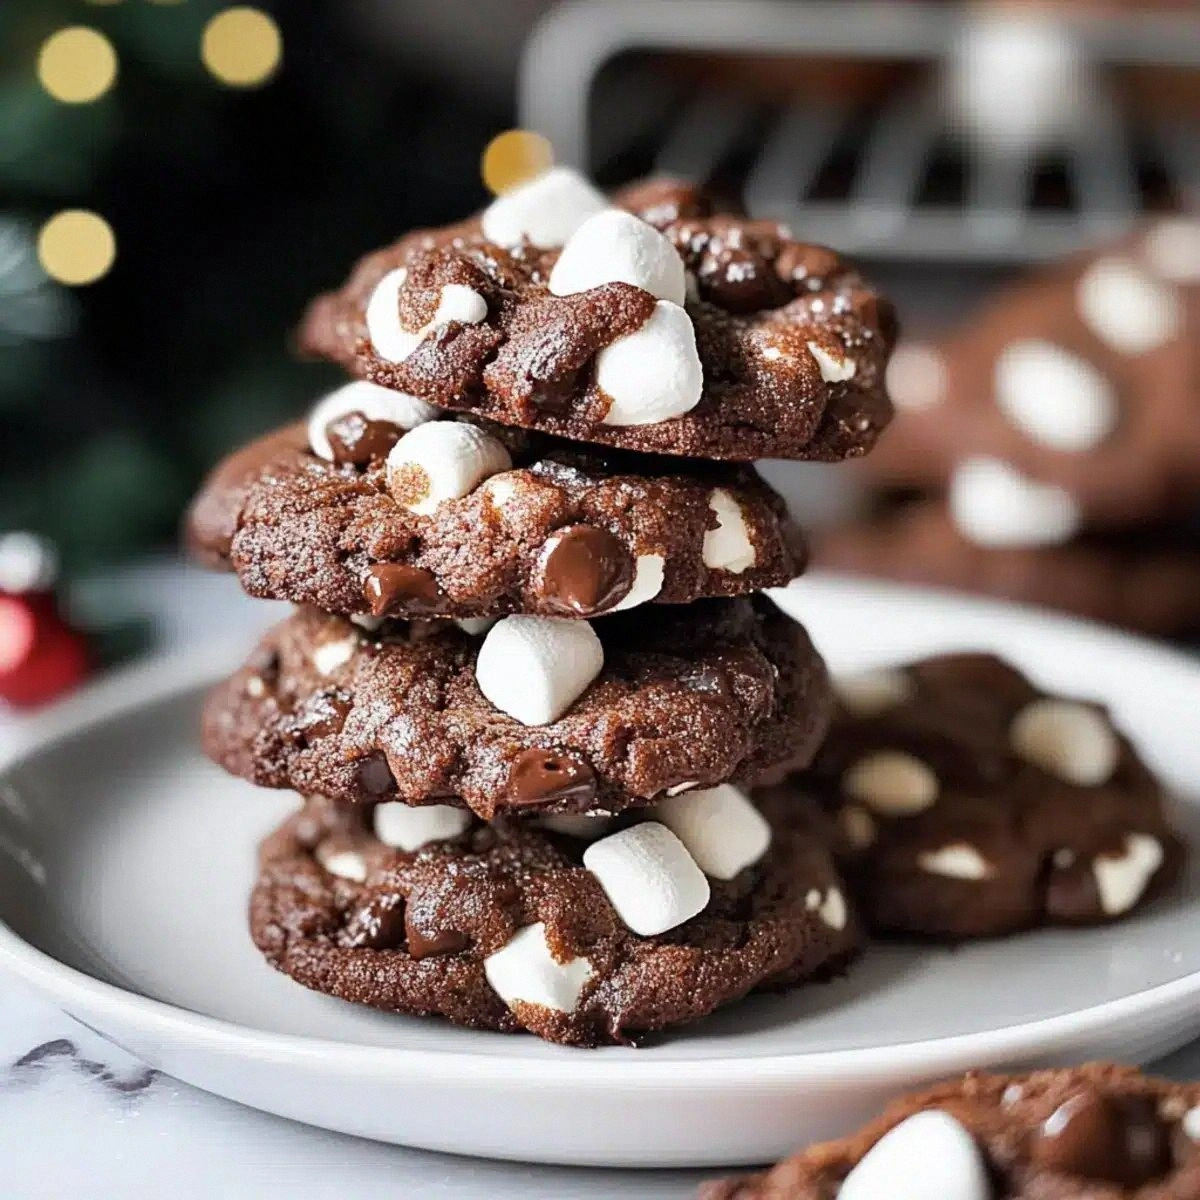
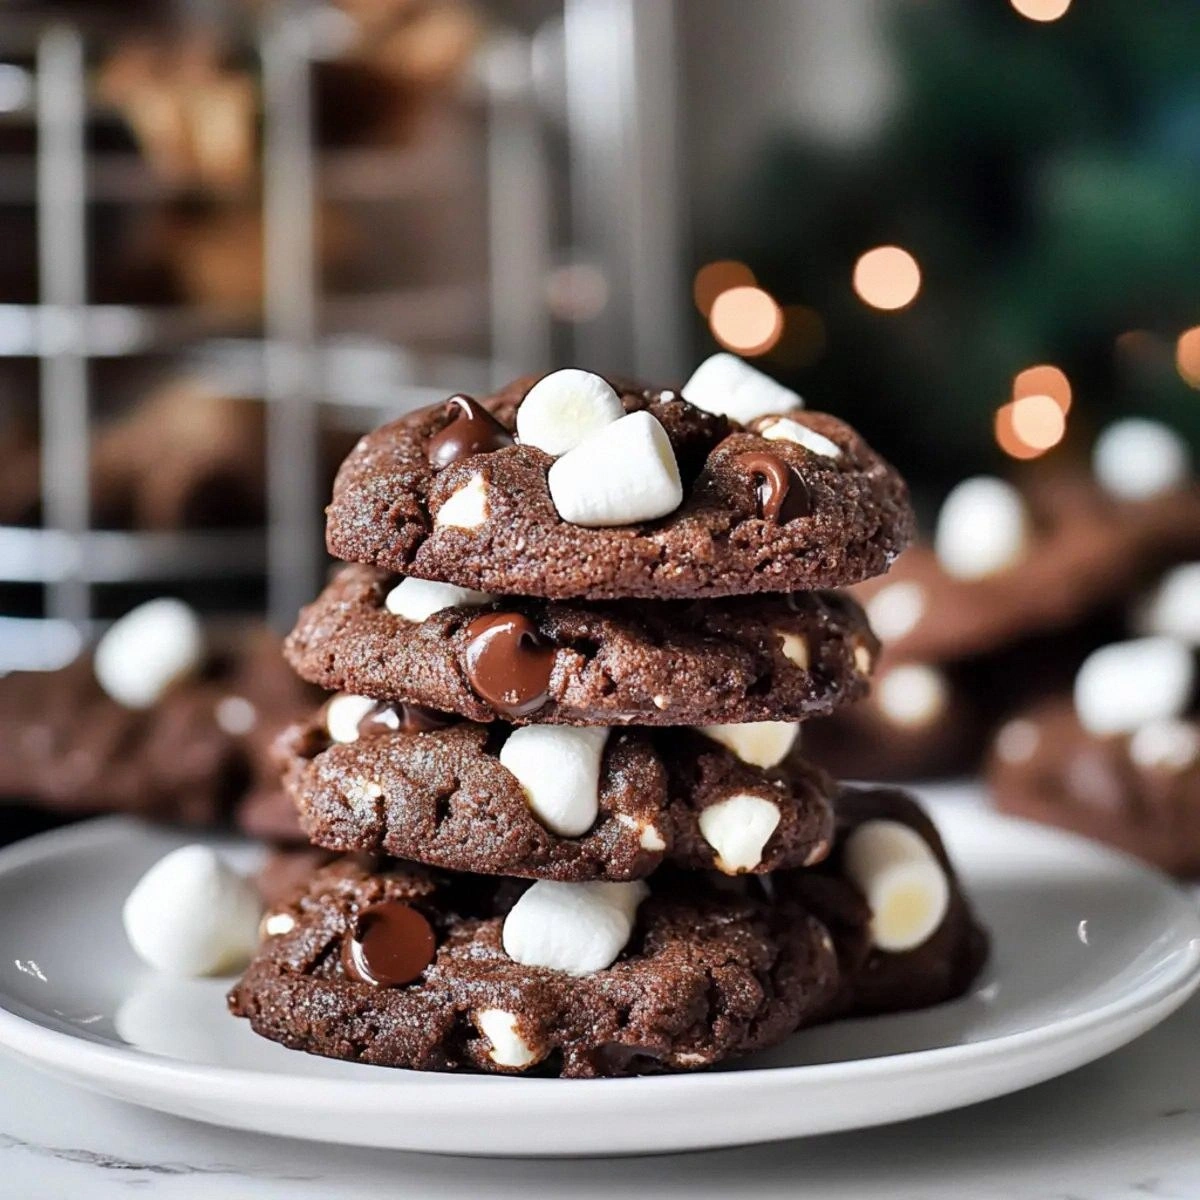
Marshmallow Bits (1 cup) – twice! The first cup is folded in before baking, creating gooey pockets that melt into sweet clouds. The second cup is sprinkled on top just before baking, forming a caramelized crust that crackles like festive fireworks.
Semi‑Sweet Chocolate Chips (1 cup) & Extra Chocolate Chips (1 cup): The mix of chip types gives you both a subtle bitterness and a burst of pure chocolate sweetness. If you’re a dark‑chocolate lover, swap the semi‑sweet for bittersweet.
Everything's prepped? Good. Let's get into the real action…
The Method — Step by Step
Preheat your oven to 350°F (175°C) and line two baking sheets with parchment paper. The moment the oven clicks on, you’ll hear a low hum that promises warmth—this is the first sensory cue that magic is about to happen. While the oven heats, gather all your ingredients within arm’s reach; a tidy workspace saves you from frantic rummaging later. I like to set a timer for the preheat so I don’t lose track while measuring.
Cream the butter, sugar, and brown sugar together in a large bowl until the mixture is light, fluffy, and a shade paler than a winter sunrise. This should take about 3–4 minutes on medium speed; you’ll notice the bowl’s sides loosening as the sugars dissolve. Power transition: Okay, ready for the game‑changer? Add the egg, milk, and vanilla extract now, and beat just until incorporated.
In a separate bowl, whisk together the flour, powdered hot cocoa mix, unsweetened cocoa powder, baking soda, and salt. The dry ingredients should form a deep, velvety brown cloud—think of a freshly fallen snowdrift tinged with midnight chocolate. Gradually add this dry mix to the wet mixture, stirring on low speed. Stop mixing as soon as you see no more streaks of flour; overmixing will develop gluten and make the cookies tough.
Fold in the semi‑sweet chocolate chips, extra chocolate chips, and the first cup of marshmallow bits. This is the moment of truth: the dough should look speckled with dark islands and fluffy white clouds. Watch Out: If the dough feels too dry, add a teaspoon of milk; if it’s too sticky, sprinkle a tablespoon of flour. The goal is a pliable, slightly sticky dough that holds together when you roll it into a ball.
Cover the bowl with plastic wrap and chill the dough for exactly 30 minutes. This chill is the secret that keeps the cookies from spreading too much, resulting in thick, chewy centers. While you wait, clean up your workspace—nothing feels better than a tidy kitchen when the cookies are cooling on the rack.
While the dough chills, pre‑heat a second baking sheet with a silicone mat for a quick “second batch” later. This trick saves you 2‑3 minutes per batch and prevents the cookies from sticking.
When the timer dings, remove the dough from the fridge. Gently roll each portion into a ball, then press lightly to flatten just a touch. Sprinkle the second cup of marshmallow bits on top of each cookie—these will caramelize and create a crackly, sweet crust. Place the cookies on the prepared sheets, leaving about 2 inches between each.
Bake for 12‑14 minutes, or until the edges are golden brown and the tops have a faint sheen. The centers will still look soft—that’s exactly what you want; they’ll continue to set as they cool. The aroma at this stage is intoxicating—imagine walking into a café where hot chocolate is being brewed right at the counter.
Remove the cookies from the oven and let them sit on the sheet for 3 minutes before transferring to a wire rack. This short rest lets the cookies firm up just enough to move without breaking. As they cool, you’ll notice the marshmallow bits turning a caramel‑gold color, adding a subtle crunch to each bite.
That's it — you did it. But hold on, I've got a few more tricks that'll take this to another level...
Insider Tricks for Flawless Results
The Temperature Rule Nobody Follows
Most bakers bake at 350°F, but I’ve found that dropping the temperature to 325°F and extending the bake by 2‑3 minutes yields a chewier interior while preserving that perfect crisp edge. The lower heat allows the butter to melt slowly, creating a more uniform spread. A friend tried the 350°F shortcut once—let's just say the cookies were too flat and lacked that coveted chew.
Why Your Nose Knows Best
When the cookies are about halfway through baking, pause and sniff. If you catch a faint toasty scent, the edges are beginning to caramelize—this is your cue to start checking for doneness. Trusting your nose prevents overbaking, which can turn that luscious interior into a dry crumb. I’ve missed this cue a few times and learned the hard way that a 30‑second overbake can ruin the whole batch.
The 5‑Minute Rest That Changes Everything
After the cookies have cooled on the rack, let them sit for an additional five minutes before serving. This brief rest lets the sugars re‑crystallize, giving each bite a perfect snap on the edge while the center stays melt‑in‑your‑mouth soft. If you’re impatient and dive right in, you’ll miss that magical contrast.
Double‑Dunk for Extra Gooeyness
For an indulgent twist, dip the warm cookie halfway into a mug of hot chocolate, then let it sit for 30 seconds before eating. The cookie absorbs the liquid, turning the interior into a luscious, chocolate‑soaked core. This technique is a crowd‑pleaser at holiday parties—just be prepared for the inevitable “more, please!” chorus.
Seasonal Swap Savvy
If you’re making these for a non‑holiday occasion, consider swapping the marshmallow bits for toasted coconut flakes. The coconut adds a tropical crunch that pairs beautifully with the chocolate, giving the cookies a fresh spin while retaining that holiday‑like decadence.
Creative Twists and Variations
This recipe is a playground. Here are some of my favorite ways to switch things up:
Minty Magic
Replace half of the semi‑sweet chocolate chips with mint chocolate chips and add a teaspoon of peppermint extract to the wet mix. The result is a refreshing burst that cuts through the richness, perfect for a post‑dinner treat.
Spiced Holiday
Stir in a pinch of ground cinnamon, a dash of nutmeg, and a whisper of clove into the dry ingredients. The spices echo classic holiday flavors, making these cookies a nostalgic centerpiece for any winter gathering.
Nutty Crunch
Fold in ½ cup of chopped toasted pecans or walnuts along with the chocolate chips. The nuts add a buttery crunch that contrasts the soft marshmallow pockets, creating a multi‑textured experience.
White Chocolate Wonder
Swap the semi‑sweet chips for white chocolate chips and add a tablespoon of dried cranberries. The tangy cranberries brighten the sweet profile, while the white chocolate offers a creamy melt that feels luxurious.
Espresso Kick
Dissolve 1 tablespoon of instant espresso powder in the milk before adding it to the batter. The coffee notes deepen the chocolate flavor, turning the cookies into a sophisticated dessert for adult palates.
Gluten‑Free Glory
Use a 1‑to‑1 gluten‑free flour blend in place of all‑purpose flour. The texture remains delightfully chewy, and the cookies keep their characteristic spread thanks to the same amount of butter.
Storing and Bringing It Back to Life
Fridge Storage
Place the cooled cookies in an airtight container with a slice of bread on top. The bread releases moisture, keeping the cookies soft for up to a week. If you notice any dryness, replace the bread slice with a fresh one.
Freezer Friendly
Layer cookies between sheets of parchment and seal the container tightly before freezing. They’ll stay fresh for up to three months. When you’re ready, let them thaw at room temperature for 15 minutes, then pop them in a 300°F oven for 5 minutes to revive the crisp edges.
Best Reheating Method
To bring a cookie back to its glorious state, place it on a microwave‑safe plate, splash a tiny droplet (no more than 1/4 teaspoon) of water beside it, and microwave for 10‑12 seconds. The steam revives the interior while the outer layer re‑crispes. This trick works wonders for cookies that have been sitting out for a day.