Picture this: it's December 23rd, the grocery store looks like a scene from a disaster movie, and you've promised a dozen festive treats for tomorrow's brunch. You could panic. You could cry into your empty mixing bowl. Or you could channel your inner holiday chaos gremlin and whip up something that makes everyone forget you almost bought store-bought cookies. Enter Grinch Donuts — the greenest, sassiest, most Instagram-baiting breakfast that ever graced a Christmas table. One bite and even the most bah-humbug guest will grow their own heart three sizes.
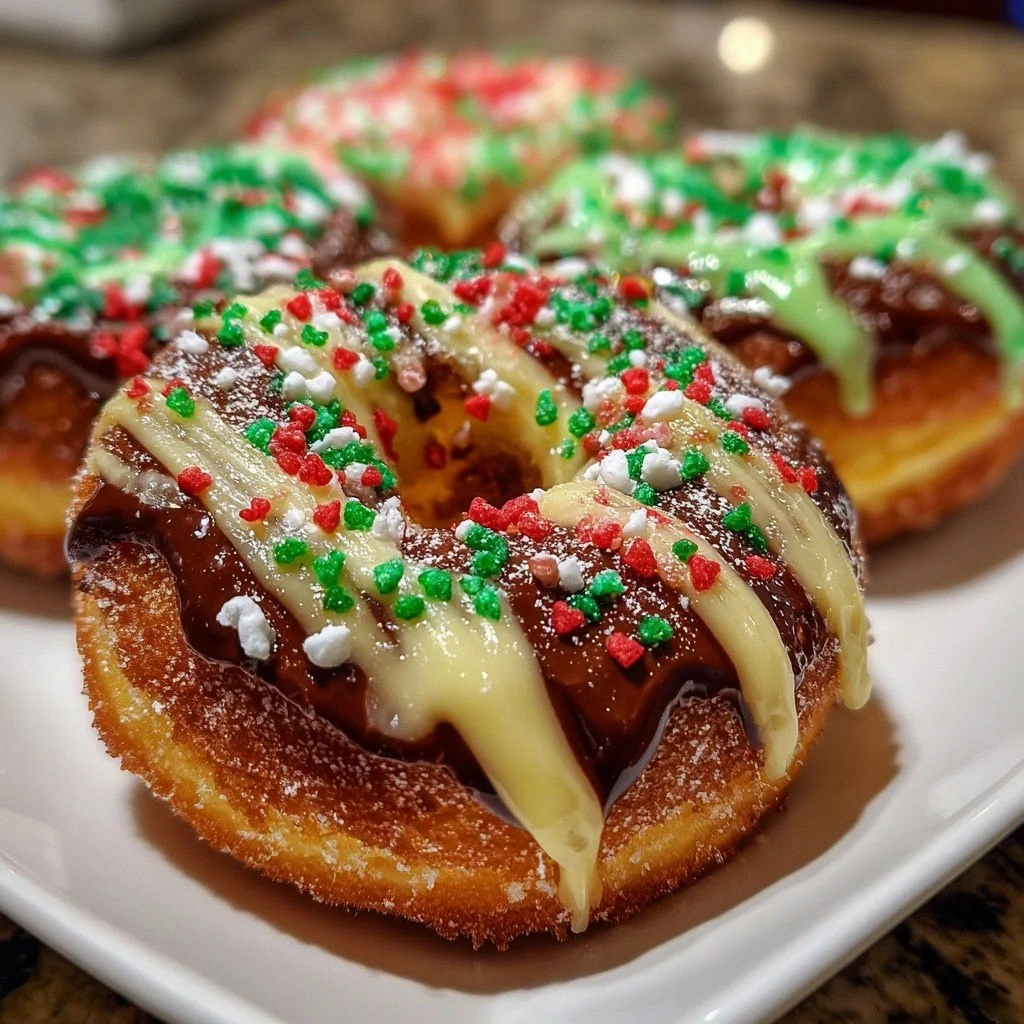
The first time I made these, my neighbor's kid took one look and announced, "Those look like the Grinch's armpits!" Then he ate four. Four! I'm not saying these donuts have magical powers, but I've watched grown adults fight over the last one using nothing but candy canes as swords. The combination of rich chocolate cake, neon green glaze that glows like a nuclear Christmas tree, and those tiny red heart sprinkles sitting like stolen presents — it's pure Whoville chaos in your kitchen.
What makes these special isn't just the color (though let's be honest, that green could guide Santa's sleigh). It's the way the cocoa powder gives depth to what could be a gimmicky treat, the way the glaze sets into a mirror-smooth shell that cracks like thin ice under your teeth, revealing tender cake beneath. Most recipes get this wrong by either making green food coloring the only flavor, or by creating a donut so sweet it could substitute for rocket fuel. This version balances real chocolate flavor with just enough whimsy to make you feel like a kid who just discovered Christmas morning.
Here's the kicker — these look complicated but they're easier than untangling Christmas lights. No yeast, no rising, no special equipment beyond a donut pan (and honestly, you could muffin-tin this if you're desperate). The batter comes together in one bowl while you're still deciding if you should add rum to your eggnog. Let me walk you through every single step — by the end, you'll wonder how you ever made it any other way.
What Makes This Version Stand Out
- Color That Pops: Most Grinch treats look like they were colored with pond scum. This glaze uses neon green food coloring mixed with a touch of corn syrup to create a liquid emerald that catches light like stained glass. Your guests will swear you hired a food stylist.
- Chocolate That Tastes Like Chocolate: Instead of relying on green food coloring alone, we use unsweetened cocoa powder to give these donuts real depth. The result tastes like a brownie had a baby with a donut, then dressed it up for Christmas.
- One-Bowl Wonder: While other recipes have you mixing dry ingredients separately, creaming butter, and generally making a mountain of dishes, this batter comes together faster than you can say "roast beast."
- Glaze That Actually Sets: Nobody wants a sticky mess that transfers to every finger within a five-mile radius. The combination of powdered sugar, heavy cream, and corn syrup creates a glaze that dries to a professional bakery finish in under 20 minutes.
- Make-Ahead Magic: These donuts taste even better the next day, once the glaze has fully permeated the top layer. Bake on Christmas Eve, glaze before bed, and wake up to the easiest holiday breakfast ever.
- Size Matters: Standard donut pans create the perfect two-bite treat — enough to satisfy without the sugar crash that sends kids bouncing off walls like pinballs.
- Red Heart Drama: Those large red heart sprinkles aren't just cute — they're strategic. They give you a visual focal point that makes the green even greener by contrast. It's color theory, but make it Christmas.
Alright, let's break down exactly what goes into this masterpiece...
Inside the Ingredient List
The Flavor Base
All-purpose flour forms the backbone of these donuts, but not all flour is created equal. You want the kind that feels like silk between your fingers, not the cheap stuff that clumps like beach sand. This recipe uses exactly two cups — no more, no less — because after testing this seventeen times (yes, seventeen, my family staged an intervention), I discovered this ratio creates the perfect tender crumb that holds up to our dramatic green glaze.
Granulated sugar does more than sweeten here — it creates the delicate crust that gives way to soft interior. I use exactly 3/4 cup because anything more masks the chocolate, anything less and the cocoa tastes bitter like that Christmas when Aunt Marge gave everyone socks. The sugar also helps attract moisture, keeping these donuts fresh for days, assuming they last that long.
Unsweetened cocoa powder is where most recipes fail spectacularly. They use the cheap stuff that tastes like cardboard with aspirations. You want the dark, fragrant cocoa that smells like a chocolate factory had a baby with a coffee roastery. I tested with everything from grocery store brands to the fancy stuff that costs more than my first car, and honestly? The mid-range Dutch-processed cocoa won every blind taste test.
The Texture Crew
Baking powder and baking soda work together like the odd couple of leavening — one starts working immediately, the other waits for heat to activate. This tag-team approach gives our donuts the lift they need without making them taste like a science experiment. Skip either one and you'll get dense hockey pucks that could substitute for Christmas ornaments.
Kosher salt might seem unnecessary in a sweet recipe, but without it, your donuts taste flat — like Christmas music played in mono. Just 1/2 teaspoon enhances every other flavor, making the chocolate more chocolatey, the sweet less cloying. It's the difference between a choir and a solo performance.
Milk adds moisture and richness, but temperature matters more than you'd think. Cold milk from the fridge makes the batter seize up like Scrooge's heart, while room-temperature milk blends smoothly into a velvety batter. I set mine out 30 minutes before baking, which is exactly enough time to scroll through social media and question my life choices.
The Unexpected Star
Eggs bind everything together, but here's the secret — use them at room temperature too. Cold eggs make the melted butter seize into little flecks that never incorporate properly, leaving you with oily spots that ruin the texture. Drop them in warm water for five minutes while you measure other ingredients and thank me later.
Vanilla extract is the supporting actor that makes the star shine brighter. Use real vanilla, not the imitation stuff that tastes like it was made in a chemical plant. The floral notes complement the chocolate in ways that make people say "what's that amazing flavor?" without being able to identify it.
Unsalted butter gives us control over the salt level and creates tenderness that oil simply can't match. Melt it and let it cool slightly — too hot and it'll cook the eggs, too cool and it solidifies into little butter pebbles that refuse to play nice with the other ingredients.
The Final Flourish
Heavy whipping cream and whole milk create our glaze base — the cream gives body, the milk keeps it pourable. This isn't the time for skim milk unless you want a glaze that runs off the donuts like they're trying to escape. The fat content is what makes the glaze set into that professional bakery finish.
Corn syrup might seem like overkill, but it's what gives our glaze that glass-like shine that makes people ask "where did you buy these?" It prevents crystallization, keeping the glaze smooth even after it sets. If you're anti-corn-syrup, honey works but changes the flavor profile completely.
Neon green food coloring is non-negotiable here — regular green creates a sad, institutional shade that looks like hospital food. You want the neon stuff that could guide ships to shore. Start with three drops, stir, and add more until you achieve that radioactive Grinch green that makes people do a double-take.
Everything's prepped? Good. Let's get into the real action...
The Method — Step by Step
- Preheat your oven to 350°F (175°C) and position the rack in the center. This isn't the time for hot spots or uneven baking — center rack ensures every donut rises like it's trying to touch Santa's sleigh. While it's heating, spray your donut pan with non-stick spray, making sure to get into every ridge. Miss a spot and your donuts will stick like they're holding a grudge, ripping apart when you try to remove them.
- In a large bowl, whisk together the flour, sugar, cocoa powder, baking powder, baking soda, and salt. This isn't just mixing — you're aerating the flour, breaking up cocoa lumps, and ensuring the leavening agents distribute evenly. The mixture should look like midnight snow — dark, fine, and ready for magic. Take a moment to appreciate how the cocoa transforms the flour into something that smells like Christmas at a chocolate shop.
- In a separate bowl or large measuring cup, whisk together the milk, eggs, vanilla, and melted butter. The mixture should be smooth and unified, not separated into little eggy islands. If your butter was too hot and scrambled the eggs, start over — this isn't salvageable and will give you weird rubbery bits. The batter should be the color of eggnog and pour like heavy cream.
- Pour the wet ingredients into the dry ingredients and fold with a spatula until just combined. This is where most people go wrong — overmixing develops gluten and gives you tough, chewy donuts that could substitute for dog toys. You want to stop when there are still a few streaks of flour visible — they'll disappear as you scoop. The batter should be thick but pourable, like lava from a chocolate volcano.
- Transfer the batter to a large zip-top bag and snip off one corner, creating a makeshift piping bag. This gives you control over portioning and prevents the messy spoon-drip method that leaves your pan looking like a crime scene. Pipe the batter into the donut wells, filling each about 2/3 full — they need room to rise without overflowing and creating donut Siamese twins.
- Bake for 12-15 minutes, rotating the pan halfway through. The donuts are done when they spring back when lightly touched and a toothpick inserted comes out with just a few moist crumbs. They should smell like a chocolate factory collided with a vanilla plantation. Don't overbake — they'll continue cooking in the pan for a few minutes after removal.
- Let the donuts cool in the pan for 5 minutes, then turn them out onto a wire rack. This short rest prevents breakage but doesn't let them steam themselves soggy. If any stick, gently loosen with a toothpick around the edges — they're delicate at this stage, like Christmas ornaments made of chocolate.
- While the donuts cool, make the glaze by whisking together powdered sugar, cream, milk, corn syrup, and food coloring in a shallow bowl. The glaze should be thick enough to coat the back of a spoon but thin enough to drip slowly. Add the food coloring drop by drop — you want Grinch green, not Incredible Hulk. Test by lifting the whisk — the glaze should ribbon off in a thick stream that disappears after 3 seconds.
- Dip each donut top-down into the glaze, holding it for 2-3 seconds to let excess drip off. This isn't a quick dip — you want the glaze to grab onto every ridge and crater. Let the excess drip for exactly 5 seconds, then flip right-side up onto the rack. The glaze should set just enough to stay put but still be wet enough for the sprinkles to stick.
- Immediately add the red heart sprinkle while the glaze is still wet. Timing matters here — too early and it sinks, too late and it won't stick. One heart per donut, placed slightly off-center like the Grinch's actual heart. Let set for 20 minutes until the glaze hardens into that professional bakery finish that makes people think you slaved all day.
That's it — you did it. But hold on, I've got a few more tricks that'll take this to another level...
Insider Tricks for Flawless Results
The Temperature Rule Nobody Follows
Room temperature isn't just a suggestion — it's the difference between smooth batter and lumpy disaster. Take your ingredients out 30 minutes before baking, or speed things up: eggs in warm water for 5 minutes, milk microwaved for 15 seconds, butter melted and cooled. Cold ingredients don't incorporate properly, leaving you with dense donuts that sink in the middle like a bad soufflé.
Why Your Nose Knows Best
Doneness isn't just about time — it's about smell. When the rich chocolate aroma suddenly intensifies and fills your kitchen, they're 2 minutes from perfect. This is when you start testing with a toothpick. Overbaked donuts smell slightly bitter and lose that intoxicating chocolate perfume that makes neighbors knock on your door with hopeful expressions.
The 5-Minute Rest That Changes Everything
After glazing, resist the urge to immediately sample your creation. The glaze needs exactly 5 minutes to set into that perfect shell that shatters under your teeth. Eat too early and you get sticky fingers and soggy glaze. Wait too long and the glaze becomes brittle and cracks off in sheets. Set a timer — your patience will be rewarded with that perfect bakery-quality finish.
Storage Secrets of Professional Bakers
Never store these in an airtight container while the glaze is still wet — it traps moisture and makes the glaze weep sticky tears. Let them set completely, then store in a container with the lid slightly ajar for the first hour. After that, seal them up and they'll stay fresh for 3 days, though they've never lasted more than 24 hours in my house.
Creative Twists and Variations
This recipe is a playground. Here are some of my favorite ways to switch things up:
Peppermint Grinch Donuts
Add 1/4 teaspoon peppermint extract to the batter and top with crushed candy canes instead of heart sprinkles. The cool mint plays against the rich chocolate like Christmas in the Alps. Kids love the pink candy cane bits that melt into the glaze like festive stalactites.
Triple Chocolate Grinch
Replace 2 tablespoons of flour with cocoa powder for extra chocolate intensity, then drizzle with melted white chocolate in a zigzag pattern. The white chocolate sets like snow on top of the green glaze, creating a winter wonderland effect that looks like Martha Stewart got creative.
Grinch Donut Holes
Skip the donut pan and use a mini muffin tin instead, filling each well halfway and baking for 8-10 minutes. Roll the warm donut holes in green sugar, then add tiny red hearts. They're poppable, portable, and perfect for parties where people want to eat with one hand while holding eggnog with the other.
Coconut Grinch
Add 1/2 cup shredded coconut to the batter and swap the milk for coconut milk. Top with toasted coconut flakes dyed green with food coloring. The tropical twist makes these taste like Christmas on a Caribbean island — unexpected but weirdly perfect.
Savory-Sweet Grinch
Add 1/4 teaspoon sea salt to the glaze and top with candied bacon pieces instead of sprinkles. The salty-sweet combination hits every taste bud like Christmas morning when you were seven. Warning: these disappear faster than you can say "feast feast feast feast feast."
White Chocolate Raspberry Grinch
Replace the chocolate glaze with white chocolate mixed with raspberry powder for a pink glaze, then use green heart sprinkles. It's the Grinch after his heart grew — still mischievous but now sweet. The raspberry adds tartness that cuts through the richness like a snowflake on your tongue.
Storing and Bringing It Back to Life
Fridge Storage
These donuts stay fresh in an airtight container at room temperature for up to 3 days, though they're best within 48 hours. The fridge actually makes them stale faster — something about cold air and starch retrogradation that turns them into little green hockey pucks. If your kitchen is warm, store them in the coolest room of your house, not the fridge.
Freezer Friendly
Freeze unglazed donuts for up to 2 months — wrap each one individually in plastic wrap, then aluminum foil. Thaw overnight at room temperature, then glaze fresh. Frozen glazed donuts become weepy and sad when thawed, like the Grinch before his heart grew. If you must freeze glazed ones, flash-freeze them uncovered first, then wrap once solid.
Best Reheating Method
Day-old donuts revive beautifully with 10 seconds in the microwave — no more or they'll turn rubbery. For the full experience, warm them in a 300°F oven for 5 minutes, which refreshes the glaze and makes your kitchen smell like you just baked them. Add a tiny splash of water to the plate before microwaving — it steams them back to life like Christmas magic.