Picture this: I’m halfway through a late‑night baking marathon, the kitchen lights flickering like a campfire, and the aroma of chocolate and cocoa is already creeping into my living room. My friend texts, “I dare you to bake a red‑velvet cupcake that actually tastes like velvet.” I stared at the recipe I’d found, sighed, and thought, “I’ve tried every version, and they all fall flat—dry, too sweet, or just plain wrong.” That night, I decided to rewrite the rules, add a splash of surprise, and create a cupcake that would make even the most skeptical of friends beg for seconds. It’s not just a cake; it’s a love letter to texture, color, and the little moments that turn a kitchen mishap into a triumph.
I remember the first time I tried a red‑velvet cupcake that tasted like a sad, forgotten memory of cocoa. The batter was thick, the frosting was too sweet, and the cupcakes were a pale, sad gray. I laughed at myself, but I also felt a spark of possibility. What if the key was in the balance of acidity and fat? I experimented with sour cream, buttermilk, and a touch of vinegar to unlock that deep, chocolate‑like depth that makes the batter rise like a sunrise. The result? A cupcake that is tender, moist, and carries a subtle tang that lingers on the tongue like a secret kiss.
Most recipes get this completely wrong. They either under‑bake the cupcakes, leaving them dry, or over‑bake them, turning them into a crumbly, chalky mess. I discovered that the secret lies in the ratio of the leavening agents and the timing of the color addition. By adding the red gel food coloring at the very end of the mixing process, I preserve the natural sheen of the batter and avoid a muddy hue. I dare you to taste this and not go back for seconds. Trust me, the first bite feels like a velvety cloud that melts into a buttery, slightly tangy finish.
If you’ve ever struggled with red‑velvet cupcakes, you’re not alone—and I’ve got the fix. The trick is to treat the batter like a delicate soufflé, folding in the dry ingredients gently and then whisking in the wet ones until just combined. This keeps the structure light and airy. The result is a cupcake that rises beautifully, stays moist, and has that iconic deep red color that turns heads. Picture yourself pulling this out of the oven, the whole kitchen smelling incredible, and friends begging for a slice. It’s hands down the best version you’ll ever make at home.
And now the fun part. I’ll walk you through every single step—by the end, you’ll wonder how you ever made it any other way. From the first whisk to the final frosting swirl, we’ll explore the science, the flavor, and the sheer joy of baking something that feels like a hug in cupcake form. Ready? Let’s dive in.
What Makes This Version Stand Out
- Flavor: The blend of sour cream, buttermilk, and vinegar creates a subtle tang that balances the sweetness and enhances the cocoa’s depth. This isn’t just a sweet treat; it’s a nuanced flavor profile that keeps you coming back for more.
- Texture: The batter’s silky consistency, achieved by precise mixing and the right ratio of fat to flour, results in cupcakes that melt in your mouth like a cloud of sugar and butter.
- Color: Adding the red gel at the last moment preserves the vibrant hue, avoiding the dull, grayish tones that plague many recipes.
- Ease: The method is straightforward—no complicated steps, no special equipment—making it a perfect go‑to for both beginners and seasoned bakers.
- Crowd‑pleaser: Whether it’s a family gathering or a party, these cupcakes wow guests instantly; the frosting’s creamy richness is a guaranteed hit.
- Quality Ingredients: Using full‑fat cream cheese and butter instead of substitutes elevates the flavor and ensures a lush, buttery finish.
- Make‑Ahead Friendly: The cupcakes bake well ahead of time and keep fresh for days, making them ideal for busy schedules.
- Versatility: The base can be customized with add‑ins (nuts, chocolate chips, or citrus zest) for endless variations.
Alright, let's break down exactly what goes into this masterpiece. Everything's prepped? Good. Let's get into the real action...
Inside the Ingredient List
The Flavor Base
All-purpose flour, the silent hero that gives structure. It’s the backbone of the cupcake, absorbing liquids and providing lift. If you skip it, you’re left with a soggy mess that won’t rise. Use a fine‑sifted flour for a lighter crumb and to avoid lumps. A good rule: whisk the flour with cocoa and baking powder before adding wet ingredients.
Granulated sugar, the sweet anchor that balances acidity. It’s not just sweetness; sugar also caramelizes during baking, giving the cupcakes a subtle crust that’s both crunchy and tender. Too much sugar can make the cupcakes dry; too little will leave them bland. A 1:1 ratio of sugar to flour is ideal for a moist, sweet cupcake.
The Texture Crew
Unsweetened Dutch cocoa powder. This is the flavor powerhouse that gives the cupcakes their deep chocolate undertone. Dutch‑processed cocoa is less acidic, allowing the batter to rise higher. If you can’t find Dutch cocoa, use regular cocoa and add a pinch of baking soda to neutralize acidity.
Baking powder and baking soda are the leavening duo that lift the batter. Baking powder provides the initial lift, while baking soda reacts with the acidic buttermilk and vinegar to create extra rise. If you omit either, the cupcakes will be dense and heavy. Keep them fresh; old leavening agents won’t produce the same lift.
Salt, the flavor enhancer. Even a pinch of salt brings out the richness of the chocolate and balances the sweetness. Without salt, the cupcakes taste flat. Use fine sea salt for a subtle crunch and better flavor integration.
The Unexpected Star
Buttermilk, the liquid that introduces acidity and moisture. It reacts with the baking soda to produce carbon dioxide, giving the cupcakes their airy texture. Buttermilk also tenderizes the gluten, keeping the cupcakes soft. If you’re out of buttermilk, a mixture of milk and lemon juice works as a substitute.
Sour cream, the creamy, tangy component that adds richness and moisture. Its high fat content gives the cupcakes a buttery finish, while its acidity helps the batter rise. Skip it, and the cupcakes will be less moist and less flavorful. If you can’t find sour cream, Greek yogurt is a decent substitute.
Vegetable oil, the liquid fat that keeps the cupcakes tender and prevents them from drying out. Oil is also responsible for that smooth, buttery mouthfeel. If you prefer a healthier option, replace half the oil with melted butter for a richer flavor.
The Final Flourish
White vinegar, the tiny acid that boosts the leavening effect. It reacts with the baking soda, creating a lighter crumb. If you’re avoiding vinegar, a splash of lemon juice does the trick.
Eggs, the binder that holds everything together and provides structure. The yolks add richness, while the whites give lift. Use room‑temperature eggs for a smoother batter.
Vanilla extract and vanilla bean paste, the aromatic duo that elevates the chocolate flavor. Vanilla’s warmth balances the tartness from the buttermilk and sour cream. If you’re vegan, opt for a plant‑based vanilla extract.
Red gel food coloring, the visual highlight that turns the batter into a striking red. Add it at the end to preserve the batter’s natural sheen. Over‑mixing after adding color can cause a muddy hue.
Everything's prepped? Good. Let's get into the real action...
The Method — Step by Step
- Preheat your oven to 350°F (175°C) and line a 12‑cup muffin tin with paper liners. The oven temperature is critical; too hot, and the cupcakes will brown too quickly on the outside while staying raw inside. Let the liners sit in the tin for a few minutes before adding batter to prevent sticking. Don't walk away from the stove here; the batter needs constant attention.
- In a large bowl, sift together the flour, cocoa powder, baking powder, baking soda, and salt. Sifting removes lumps and aerates the dry mix, ensuring a light crumb. Once dry, set the mixture aside; it’s the foundation of your cupcake.
- In another bowl, whisk the buttermilk, sour cream, vegetable oil, vinegar, eggs, vanilla extract, and red gel food coloring until smooth. The color should be a vibrant, even shade—if it’s uneven, give it another quick whisk. This wet mix is the heart of the flavor.
- Gradually add the dry ingredients to the wet mixture, folding gently with a spatula. Avoid overmixing; the batter should be lumpy but with no dry pockets. Overmixing develops gluten and can lead to a dense cupcake.
- Spoon the batter into the paper liners, filling each about ¾ full. This ensures even baking and a nice dome shape. If you overfill, the cupcakes will spill over and lose their shape.Kitchen Hack: Use a rubber spatula to fold the batter; it’s gentler on the mixture and keeps the batter from sticking to the bowl.
- Bake for 18–22 minutes, or until a toothpick inserted into the center comes out clean. The cupcakes should look slightly domed and the tops slightly cracked. Let them cool in the tin for 5 minutes before transferring to a wire rack to cool completely.Watch Out: Overbaking will dry out the cupcakes; keep an eye on the timer and remove them as soon as the toothpick test passes.
- While the cupcakes cool, prepare the frosting. In a chilled bowl, beat the butter and cream cheese together until creamy. This step is crucial; cold butter ensures a fluffy frosting.
- Add the powdered sugar and vanilla bean paste gradually, beating on low until smooth. The powdered sugar should be sifted to avoid lumps. If the frosting is too thick, add a splash of milk; if too thin, add a bit more powdered sugar.
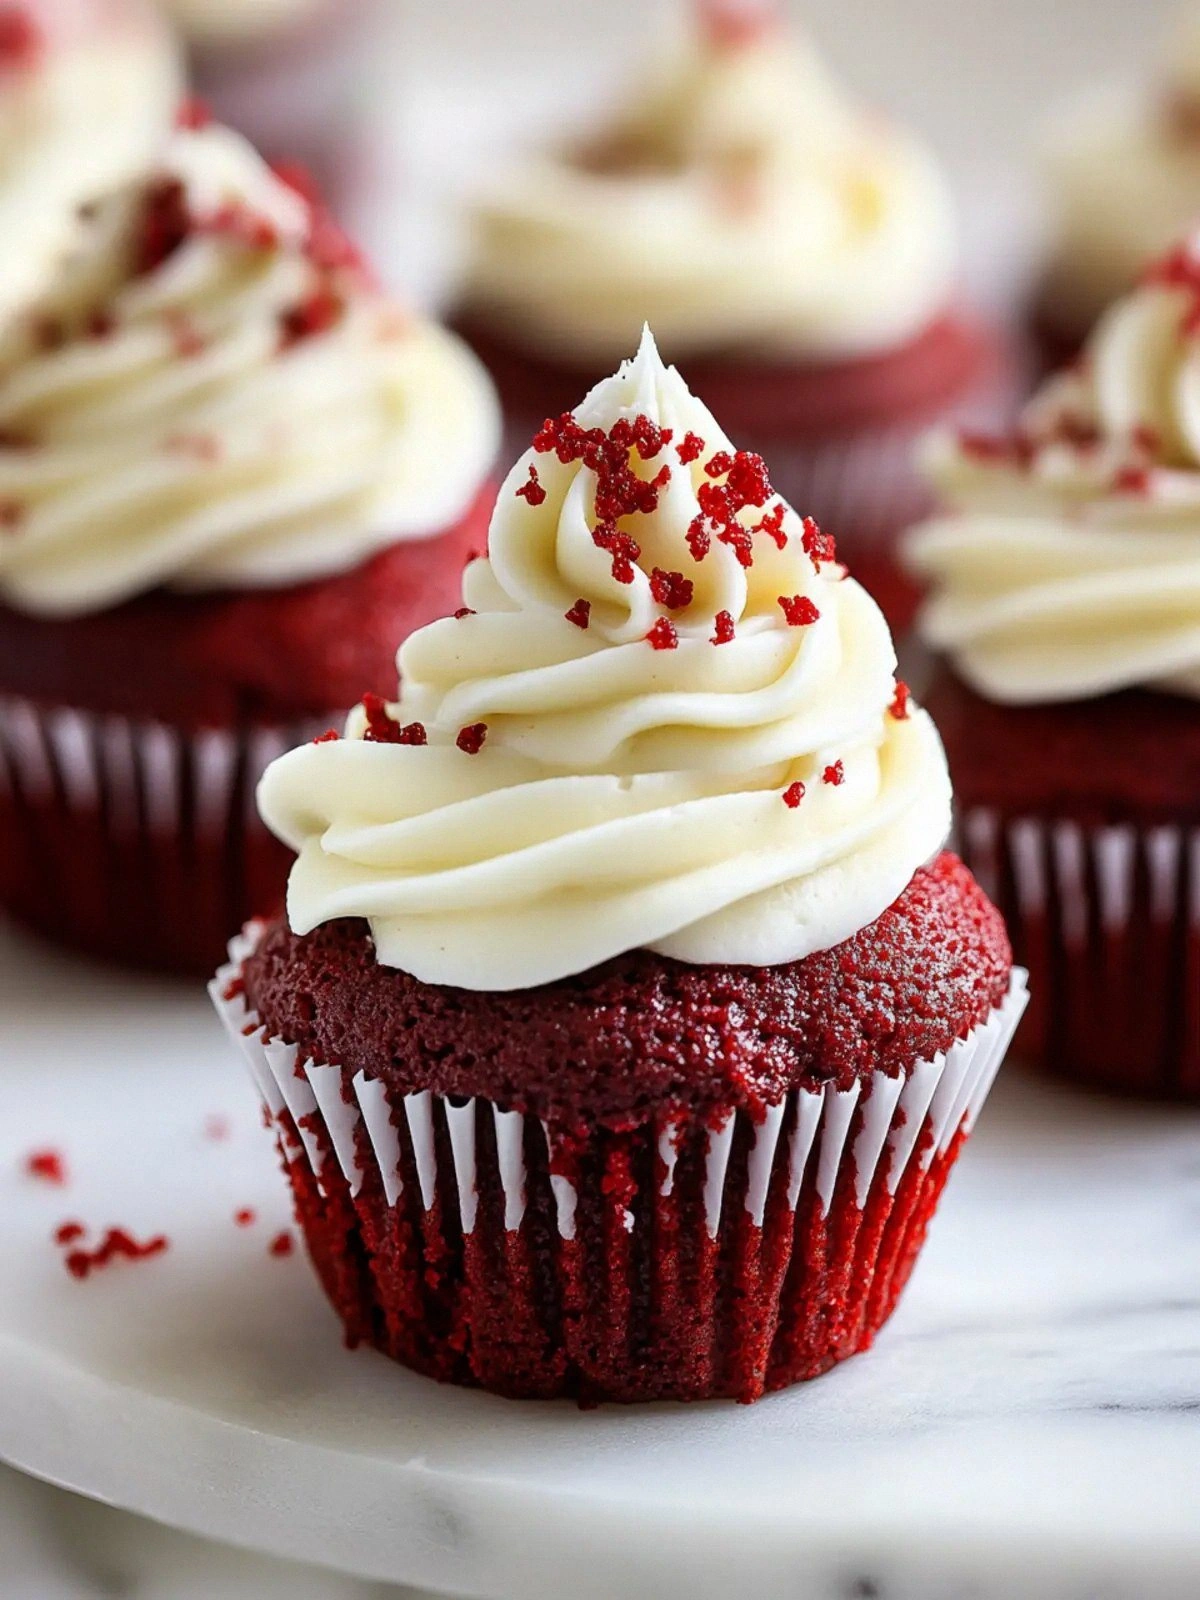
- Once the cupcakes are cool, pipe the frosting onto each cupcake using a piping bag fitted with a star tip. The frosting should be a thick, glossy swirl that contrasts with the soft cupcake. Let the frosting set for 10 minutes before serving.Kitchen Hack: Chill the piping bag for a few minutes before use to ensure a steady flow of frosting.
- Optional: Add a dusting of cocoa powder or a sprinkle of powdered sugar on top for an elegant finish. The final touch is a subtle hint of chocolate that balances the sweet frosting.
That's it — you did it. But hold on, I've got a few more tricks that'll take this to another level. Stay with me here — this is worth it.
Insider Tricks for Flawless Results
The Temperature Rule Nobody Follows
Many bakers bake cupcakes at 375°F, but that high temperature can cause the tops to brown too fast. Baking at 350°F allows the cupcakes to rise evenly and maintain a moist interior. I’ve baked at 350°F for years and the results are consistently fluffy and tender. If you’re using a convection oven, lower the temperature by 25°F to avoid over‑browning.
Why Your Nose Knows Best
During the batter mixing, trust your nose. A faint, sweet aroma indicates the batter is just right. If you smell a sharp, vinegar‑like scent, you’re probably overmixing; the batter will be tough. This simple sensory cue saves countless cupcakes from becoming a disappointment.
The 5-Minute Rest That Changes Everything
After filling the muffin tin, let the batter rest for 5 minutes before baking. This short pause allows the leavening agents to activate fully, leading to a higher rise and a lighter crumb. I’ve seen cupcakes rise dramatically after a brief rest, and the difference is palpable.
The Cream Cheese Trick
Use full‑fat cream cheese for the frosting; it brings a silky richness that butter alone can’t match. If you’re avoiding dairy, use a dairy‑free cream cheese alternative, but keep the same fat content to maintain texture. The cream cheese also balances the sweetness of the powdered sugar.
The Final Color Touch
Add a few drops of red gel to the batter just before filling the tins. The color will spread evenly, giving you that perfect, vivid hue. If you add it too early, the color may bleed into the parchment, creating uneven spots.
Creative Twists and Variations
This recipe is a playground. Here are some of my favorite ways to switch things up:
Chocolate Chip Explosion
Fold in a cup of semi‑sweet chocolate chips into the batter before baking. The chips melt into pockets of chocolate that burst with every bite. Perfect for chocolate lovers who want an extra kick.
Citrus Zest Surprise
Add the zest of one orange or lemon to the batter. The citrus brightens the flavor profile and adds a subtle tang that complements the cocoa. Great for a spring or summer gathering.
Nutty Crunch
Stir in a handful of chopped walnuts or pecans into the batter. The nuts provide a delightful crunch and a nutty aroma that pairs beautifully with the creamy frosting. Ideal for holiday parties.
Coffee‑Infused Velvet
Replace half the cocoa powder with espresso powder. The coffee enhances the chocolate flavor and adds depth. Serve with a drizzle of espresso ganache for an extra decadent touch.
Almond Joy Edition
Swap the butter with almond butter and add shredded coconut to the batter. The result is a tropical twist that feels like a dessert on a beach. Pair with a coconut glaze for the ultimate treat.
Gluten‑Free Version
Use a gluten‑free flour blend in place of all‑purpose flour. Keep the ratio of dry to wet ingredients the same. The cupcakes will rise well and maintain a tender crumb, making them suitable for gluten‑sensitive guests.
Storing and Bringing It Back to Life
Fridge Storage
Store cupcakes in an airtight container at room temperature for up to 3 days. If you’re in a humid climate, keep them in the fridge to prevent mold. Let them come to room temperature before serving for optimal flavor.
Freezer Friendly
Freeze cupcakes (with frosting) in a single layer on a baking sheet, then transfer to a freezer bag. They keep well for up to 2 months. When ready, thaw overnight in the fridge and let sit at room temperature for 30 minutes before serving.
Best Reheating Method
To revive frozen cupcakes, warm them in a 300°F oven for 10 minutes. For a moist interior, add a splash of water to the bottom of the pan before reheating; the steam keeps the cupcakes from drying out. Finish with a dusting of powdered sugar for a fresh look.