I’ll be honest — I ate half the batch before anyone else got to try it, and that was only because the aroma was so intoxicating it felt like a personal invitation to the kitchen. It all started on a rainy Saturday when a friend dared me to recreate that classic pineapple upside‑down cake, but in cookie form, and I thought, “Why not turn a nostalgic dessert into bite‑size fireworks?” The moment I opened the pantry, the soft hum of the refrigerator, the clink of a butter knife against a ceramic bowl, and the sweet perfume of canned pineapple slices hitting the counter set the stage for something spectacular. I could already picture the glossy caramel glaze glistening like sunrise on a tropical beach, the buttery dough tender enough to melt on your tongue, and the cherries peeking out like little red buoys.
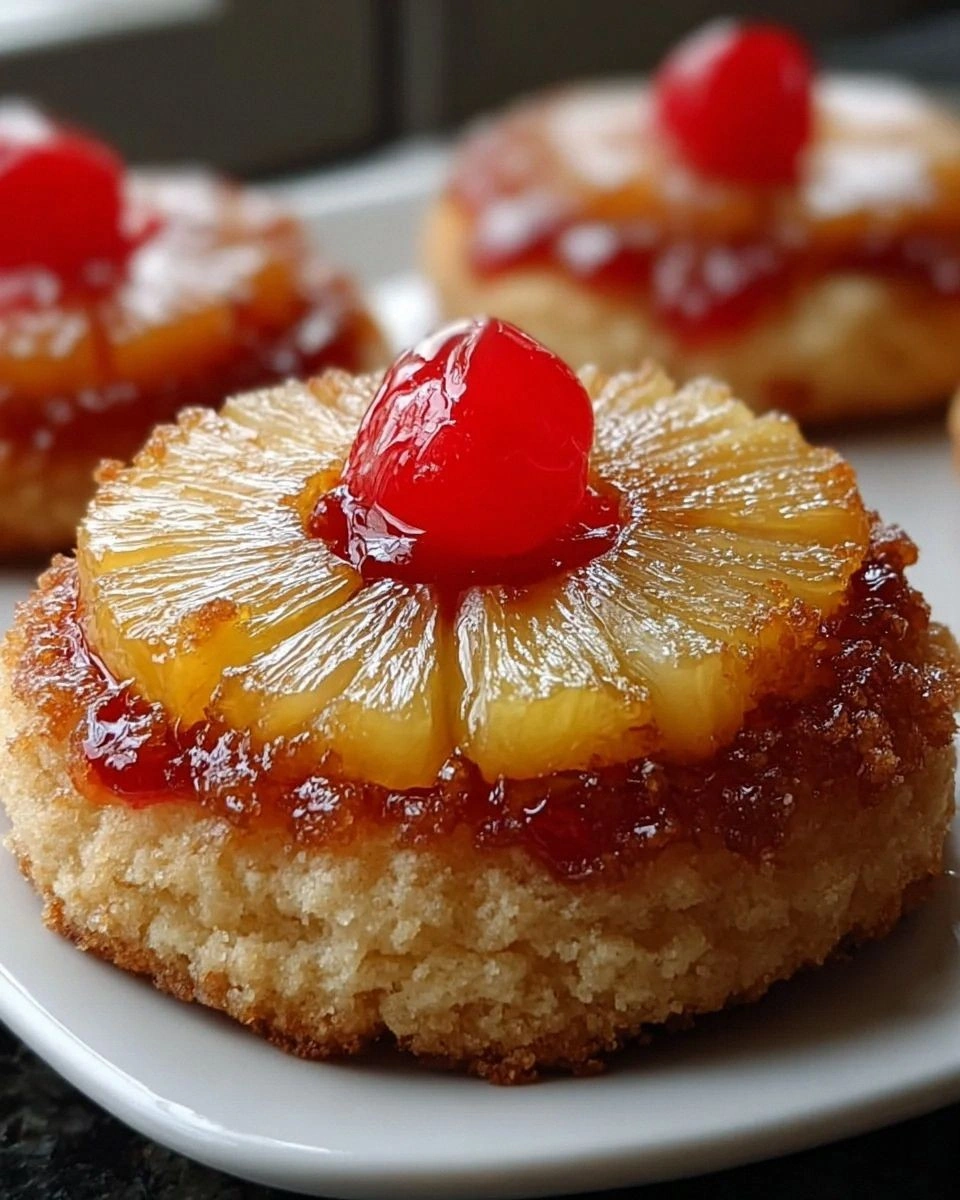
Fast forward a few minutes of frantic mixing, and the kitchen was alive with the sizzle of melted butter meeting brown sugar, a sound that reminded me of a tiny fireworks show in a skillet. The dough, once a shaggy mess, transformed into a silky ribbon that clung to the spoon like a secret lover. When the first batch of cookies emerged from the oven, their edges were crisp, the tops caramelized to a perfect amber, and the pineapple slices sat proudly in the middle, their juices bubbling just enough to create a glossy mirror. The moment I took a bite, the flavors collided – the tartness of the pineapple, the buttery sweetness of the cookie, and the pop of the cherry – all dancing together like a well‑rehearsed flash mob.
What makes this version truly stand out is the marriage of technique and ingredient quality. Most recipes either skimp on the buttery base or drown the cookie in a soggy topping, but I discovered that a splash of sour cream in the dough adds a subtle tang that cuts through the sweetness, while a pinch of cornstarch guarantees a melt‑in‑your‑mouth crumb. The secret weapon? A light brown sugar and melted butter glaze that caramelizes just enough to create that signature “upside‑down” shine without turning the cookies into a sticky mess. If you’ve ever struggled with getting the perfect balance, you’re not alone — and I’ve got the fix.
Picture yourself pulling these cookies out of the oven, the whole kitchen smelling like a tropical vacation, the golden glaze catching the light, and the first bite delivering a burst of sunshine that makes you forget it’s February. I dare you to taste this and not go back for seconds; the combination is so addictive it could easily become your go‑to treat for holidays, potlucks, or a midnight snack. Okay, ready for the game‑changer? Let me walk you through every single step — by the end, you’ll wonder how you ever made it any other way.
What Makes This Version Stand Out
- Flavor Explosion: The caramelized brown sugar glaze creates a deep, buttery sweetness that pairs perfectly with the bright acidity of pineapple, delivering a taste that feels both nostalgic and novel.
- Texture Harmony: A crisp edge gives way to a tender, almost cake‑like center, thanks to the cornstarch and sour cream, providing a bite that’s both satisfying and melt‑in‑your‑mouth.
- Simplicity Meets Sophistication: With just a handful of pantry staples and a few minutes of prep, you achieve a dessert that looks like it took hours of professional plating.
- Unique Presentation: The upside‑down arrangement turns an ordinary cookie into a visual centerpiece, making it perfect for brunch tables or dessert trays.
- Crowd‑Pleaser Factor: The bright pineapple and cherry toppings are instantly eye‑catching, and the sweet‑tangy flavor profile appeals to kids and adults alike.
- Ingredient Quality: Using unsalted butter and real vanilla extract elevates the flavor, while the light brown sugar adds a caramel depth that white sugar alone can’t achieve.
- Cooking Method: Baking the cookies on a pre‑heated sheet ensures even caramelization, and the brief cooling period lets the glaze set without hardening.
- Make‑Ahead Potential: These cookies store beautifully, and a quick re‑heat revives the glaze, making them an excellent make‑ahead dessert for busy weeks.
Inside the Ingredient List
The Flavor Base
Unsalted butter is the heart of any great cookie, delivering a rich, creamy foundation that carries the flavors forward. Using a high‑quality butter ensures a smooth, even dough that spreads just enough to create that coveted golden edge. If you ever skip the butter or replace it with margarine, expect a greasy texture and a muted flavor profile that will leave you disappointed. A good tip is to let the butter soften at room temperature for about 15 minutes; this makes creaming with sugar effortless and airy.
Granulated sugar not only sweetens but also contributes to the cookie’s structure by aerating the butter when creamed together. The fine crystals dissolve during baking, giving the cookie a delicate crumb. If you substitute with a coarse sugar, you’ll notice a grainy texture that’s far from the silky finish we’re after. For a deeper flavor, you can swap half of the granulated sugar with light brown sugar, but keep the total volume the same to maintain consistency.
The Texture Crew
Eggs act as the binding agent, providing structure and lift. The proteins in the eggs set during baking, ensuring the cookies hold together while staying tender. Over‑beating can lead to a rubbery texture, so mix just until the eggs are fully incorporated. If you’re avoiding eggs, a flaxseed “egg” (1 tbsp ground flaxseed + 3 tbsp water) can work, but expect a slightly denser bite.
Sour cream adds moisture and a subtle tang that balances the sweetness of the glaze. Its fat content contributes to a tender crumb, while the acidity reacts with the baking powder for a gentle rise. Skipping sour cream will make the cookie drier and less flavorful; you can replace it with Greek yogurt for a similar effect, though the texture will be a touch firmer.
All‑purpose flour is the backbone, providing structure. Using a low‑protein flour (like cake flour) will yield a softer cookie, while high‑protein bread flour can make it tougher. For the perfect balance, stick with a standard all‑purpose blend. If you’re gluten‑free, a 1:1 gluten‑free flour mix works, but you might need an extra tablespoon of xanthan gum to mimic the elasticity.
Baking powder is the leavening hero, giving the cookie a gentle puff that keeps the center from becoming dense. Too much will cause a bitter aftertaste, while too little results in a flat, dense cookie. A quick shake of the powder before adding ensures it’s evenly distributed.
Cornstarch is the secret weapon that makes the cookie tender and melt‑in‑your‑mouth. It interferes with gluten formation, preventing the cookie from becoming chewy. If you skip it, expect a firmer, more biscuit‑like texture.
The Unexpected Star
Canned pineapple slices bring the iconic tropical flavor that defines an upside‑down treat. Their natural juices caramelize during baking, creating a glossy, sweet‑tart topping. Be sure to drain them well; excess liquid can make the cookie soggy. If you prefer a fresher taste, use fresh pineapple rings, but be ready for a slightly less caramelized finish.
Maraschino cherries add a pop of color and a burst of sugary fruitiness that contrasts beautifully with the pineapple’s acidity. They also act as a visual anchor, making each cookie look like a miniature work of art. If you’re avoiding artificial colors, opt for dark sweet cherries and a quick dip in a sugar glaze.
The Final Flourish
Melted butter mixed with light brown sugar creates the luscious glaze that defines the upside‑down effect. The butter carries the sugar into the pan, where it caramelizes and clings to the pineapple and cherry, forming a glossy, buttery sheen. Using a light brown sugar ensures a milder molasses flavor, letting the pineapple shine. If you crave a deeper caramel, substitute half the light brown sugar with dark brown sugar, but watch the color intensify quickly.
A pinch of salt is the unsung hero that amplifies every other flavor, preventing the sweetness from becoming cloying. It also balances the acidity of the pineapple, making the overall taste harmonious. Never skip the salt; even a small amount makes a world of difference.
Everything's prepped? Good. Let's get into the real action…
The Method — Step by Step
Preheat your oven to 350°F (175°C) and line a large baking sheet with parchment paper. While the oven warms, melt ¼ cup of butter in a small saucepan over low heat, then stir in ½ cup of light brown sugar until it forms a smooth, bubbling glaze. This sizzle when it hits the pan? Absolute perfection. Set the glaze aside to cool slightly; it will thicken just enough to hold the pineapple slices in place.
In a large mixing bowl, cream together 1 cup of softened unsalted butter and 1 cup of granulated sugar until the mixture is light, fluffy, and pale in color. This process is the moment of truth – the air you incorporate now will become the airy lift in each cookie. If the mixture looks curdled, keep beating; a good cream will eventually smooth out.
Kitchen Hack: Add a splash of cold water (about a tablespoon) while creaming; it helps the butter emulsify better, preventing a grainy texture later.Add the two large eggs, one at a time, beating well after each addition. Follow with 2 teaspoons of vanilla extract, letting the fragrant aroma fill the kitchen. The batter should look glossy and slightly thick – if it looks runny, you’ve missed a beat in the creaming step.
In a separate bowl, whisk together 2½ cups of all‑purpose flour, 1 teaspoon of baking powder, 2 tablespoons of cornstarch, and ½ teaspoon of salt. This dry mix ensures even distribution of leavening agents and prevents pockets of flour. Once combined, gradually add the dry ingredients to the wet mixture, folding gently with a spatula until just incorporated.
Stir in ½ cup of sour cream, which will give the dough that luxurious tenderness. The dough will appear slightly shaggy at first, but keep folding until it’s smooth and cohesive. If you notice lumps, a quick hand‑mix will dissolve them without over‑working the dough.
Cover the dough with plastic wrap and chill it in the refrigerator for at least 30 minutes. This step is pure magic – the cold butter firms up, preventing the cookies from spreading too thin, while the flour hydrates for a tender crumb.
Watch Out: Skipping the chill will result in flat, overly crisp cookies that lose the soft center we’re aiming for.While the dough chills, prepare the topping: gently stir the cooled brown‑sugar glaze into the bottom of the parchment‑lined sheet, spreading an even layer. Place the drained pineapple slices in a single layer, spacing them about an inch apart, and nestle a maraschino cherry in the center of each pineapple slice. The glaze should coat the fruit just enough to hold it in place without drowning it.
Remove the dough from the fridge and scoop it onto a lightly floured surface. Using a 2‑inch cookie scoop or a large spoon, roll the dough into balls and gently press each ball down onto a pineapple slice, ensuring the fruit stays centered. The dough should spread just enough to surround the fruit, creating a little “nest” that will rise and caramelize around the topping.
Bake the cookies for 12‑15 minutes, or until the edges are a golden brown and the glaze is bubbling with a caramel sheen. Keep an eye on the color; you want that deep amber, not burnt. The scent at this stage is intoxicating – a blend of caramel, butter, and tropical fruit that makes the whole house feel like a bakery.
Allow the cookies to cool on the sheet for 5 minutes; this lets the glaze set, then transfer them to a wire rack to cool completely. As they cool, the glaze will firm into a glossy coating that holds the pineapple and cherry in place. That first bite? Pure bliss – the crisp edge, the soft interior, the sweet‑tart fruit, and the buttery glaze all in perfect harmony.
That's it — you did it. But hold on, I've got a few more tricks that'll take this to another level…
Insider Tricks for Flawless Results
The Temperature Rule Nobody Follows
Never bake cookies straight from the fridge on a cold baking sheet. A warm sheet helps the glaze set quickly, creating that glossy finish. If you’re in a rush, pre‑heat the sheet for 2 minutes before adding the glaze; this tiny step prevents the butter from seeping away, keeping the caramel rich and thick.
Why Your Nose Knows Best
When the glaze starts to bubble and you catch a whiff of caramelized sugar, that’s your cue to set a timer. Trust the aroma more than the clock; ovens can vary by up to 25°F. If the scent turns nutty or slightly burnt, pull the tray out a minute early and let the residual heat finish the job.
The 5‑Minute Rest That Changes Everything
After baking, let the cookies rest on the sheet for exactly five minutes before moving them. This short rest lets the caramel glaze thicken just enough to stay put, preventing any sliding or smearing. Skipping this pause results in a glaze that can run off, making the cookies look sloppy.
Swap the Sweet for the Savory
If you love a sweet‑savory contrast, try sprinkling a pinch of flaky sea salt on top of each cookie right after they come out of the oven. The salt crystals will melt slightly, creating pockets of salty crunch that elevate the caramel flavor to a whole new level.
Freeze for Future Fun
These cookies freeze beautifully. Store them in an airtight container, and when you’re ready for a treat, reheat at 300°F for 5 minutes with a splash of water on the tray. The water creates steam, reviving the soft interior while the glaze regains its shine.
Creative Twists and Variations
This recipe is a playground. Here are some of my favorite ways to switch things up:
Tropical Coconut Crunch
Add ¼ cup shredded coconut to the dough and sprinkle a few extra coconut flakes on top before baking. The coconut adds a chewy texture and reinforces the tropical vibe, perfect for beach‑themed parties.
Spiced Autumn Delight
Swap the vanilla extract for 1 teaspoon of pumpkin spice and replace the pineapple with thinly sliced apples. The warm spices and caramelized apple slices turn this into a cozy, fall‑ready treat.
Chocolate‑Covered Dream
Once the cookies have cooled, drizzle them with melted dark chocolate and sprinkle a pinch of sea salt. The bitter chocolate balances the sweet glaze, creating a sophisticated flavor contrast.
Nutty Banana Boost
Fold in ½ cup finely chopped toasted walnuts and replace half of the pineapple with thin banana slices. The nuts add crunch, while the banana’s natural sweetness melds with the caramel glaze.
Vegan Velvet
Use coconut oil in place of butter, replace eggs with flax “eggs,” and choose a plant‑based sour cream. The texture remains tender, and the flavor stays rich, proving you don’t need dairy to achieve decadence.
Storing and Bringing It Back to Life
Fridge Storage
Place the cooled cookies in an airtight container lined with parchment paper. Store them in the refrigerator for up to 5 days. The chilled environment keeps the glaze from getting sticky, and the cookies stay soft inside.
Freezer Friendly
Layer cookies between sheets of wax paper and seal them in a freezer‑safe bag. They’ll freeze solid for up to 3 months. When you’re ready, let them thaw at room temperature for 15 minutes, then reheat as described below.
Best Reheating Method
Preheat your oven to 300°F (150°C), place the cookies on a parchment‑lined tray, and add a teaspoon of water to the tray (not on the cookies). The steam revives the interior softness while the glaze re‑glosses. In just 5‑7 minutes, you’ll have a freshly baked feel without any loss of flavor.