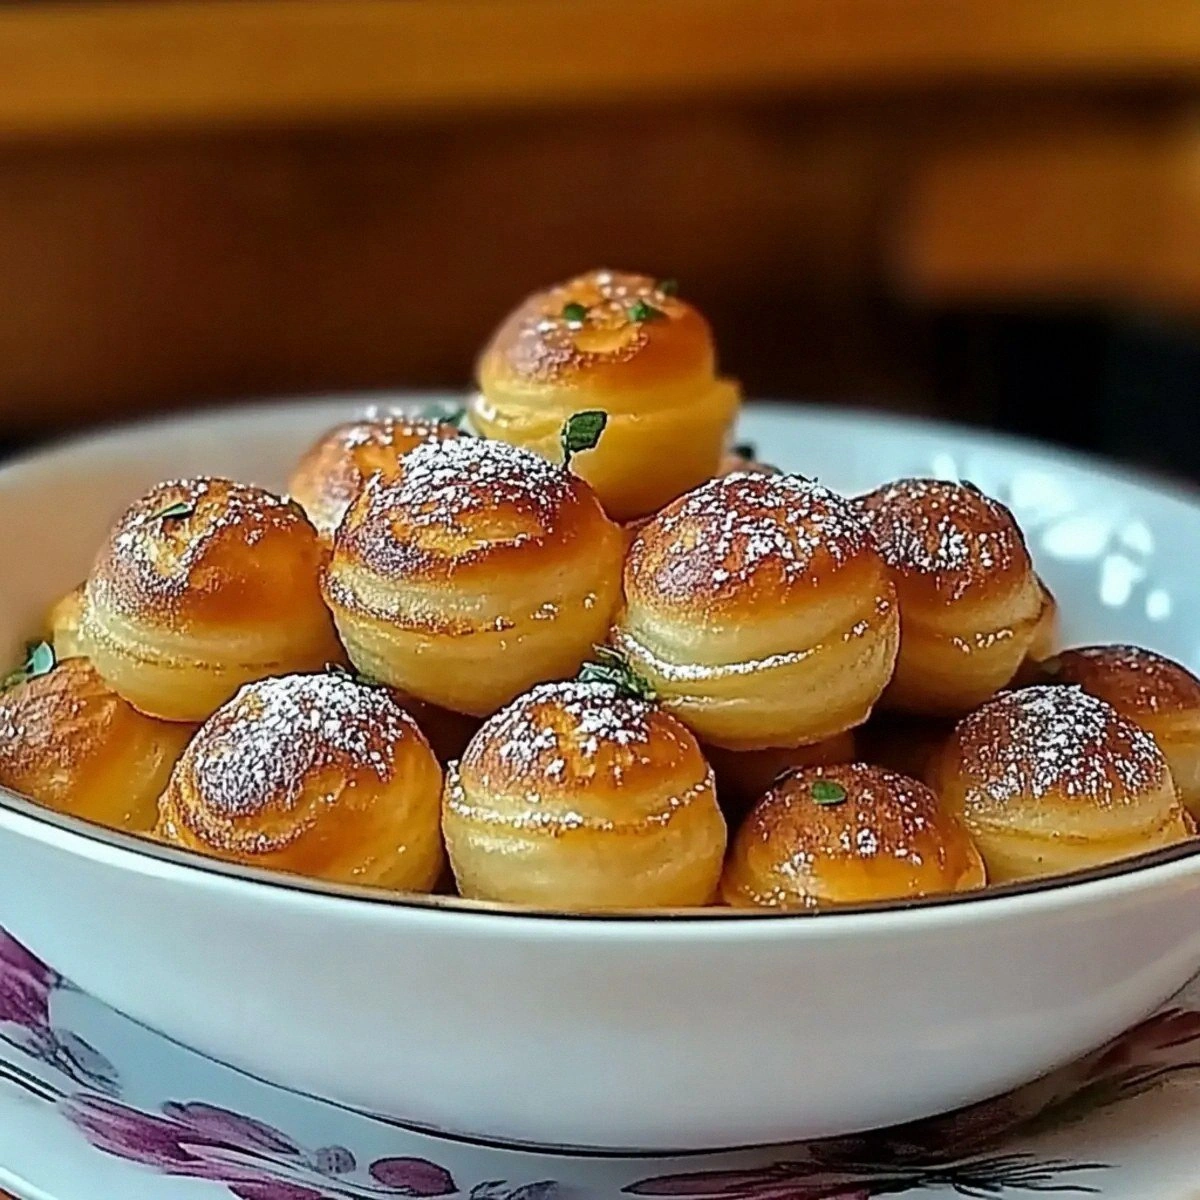
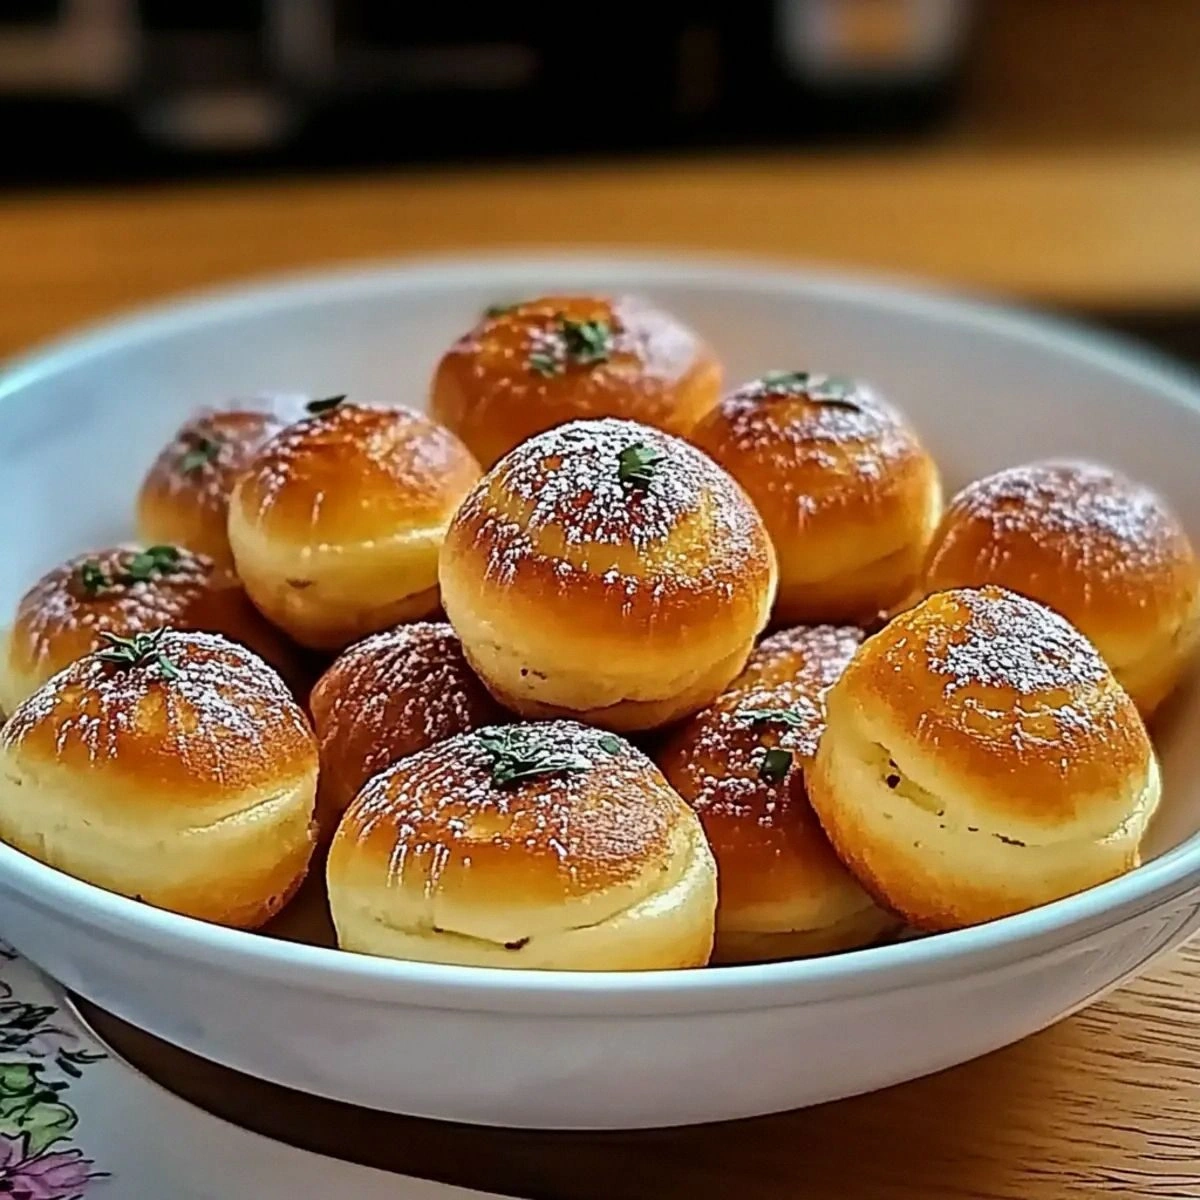
I was standing in my kitchen, half‑asleep, staring at a bowl of batter that looked like it belonged in a science lab rather than a breakfast table. The previous night I’d tried to make classic pancakes, but they turned out as flat as a piece of cardboard and as bland as unsalted crackers. I swear I heard my stomach growl louder than my alarm clock, and that’s when my roommate dared me: “Make something that actually pops, like popcorn, but you can eat it with your hands.” I laughed, I rolled up my sleeves, and I decided to reinvent the humble pancake into bite‑size, melt‑in‑your‑mouth poppers that would make even the most stubborn cereal‑hater beg for seconds.
Picture this: the first popper slides out of the skillet, its golden crust crackling like fresh firewood, while the interior stays fluffy, sweet, and speckled with molten chocolate chips that ooze out like tiny lava flows. The aroma of butter and vanilla swirls with the faint tang of buttermilk, hitting your nose with a promise that’s impossible to ignore. You hear the sizzle—a sound that feels like a tiny applause for every pop—and you feel the warm pan under your palm, the perfect balance of heat and comfort. The first bite? A buttery crunch that gives way to a soft, pillowy center that’s studded with berries that burst like fireworks of flavor.
What makes this version stand out is that it isn’t just a pancake; it’s a handheld celebration of texture and taste. Most recipes get this completely wrong, either over‑mixing the batter into a gummy mess or under‑seasoning it so it tastes like nothing at all. I’ve cracked the code by treating the batter like a delicate soufflé—mixing just enough to combine, then letting it rest so the gluten relaxes and the bubbles stay intact. The secret ingredient? A splash of nut butter that adds richness without weighing the poppers down, and a dash of vanilla that lifts everything into the stratosphere of flavor.
I dare you to taste this and not go back for seconds. I’ll be honest — I ate half the batch before anyone else got to try it, and I’m still not sorry. This is hands down the best version you’ll ever make at home, and I’m about to walk you through every single step — by the end, you’ll wonder how you ever made it any other way.
What Makes This Version Stand Out
- Texture: The outer crust is crisp enough to snap like a fresh apple, while the interior stays as soft as a cloud, creating a contrast that’s pure joy.
- Flavor Depth: The combination of vanilla, nut butter, and a pinch of salt amplifies the sweetness without ever feeling cloying.
- Simplicity: You only need a handful of pantry staples and a skillet—no fancy equipment, no blender, just love.
- Versatility: Swap chocolate chips for dried fruit, or add a dash of cinnamon for a warm, autumnal twist.
- Crowd Reaction: Serve these at brunch and watch the “What’s the secret?” chorus rise faster than the batter.
- Ingredient Quality: Using real butter and fresh berries makes a world of difference; artificial flavors just can’t compete.
- Cooking Method: The pan‑sear technique locks in moisture, unlike oven‑baked pancakes that can dry out.
- Make‑Ahead Potential: Freeze the poppers and reheat for a quick snack that still feels fresh‑baked.
Inside the Ingredient List
The Flavor Base
All‑purpose flour is the structural backbone; it forms the gluten network that holds the popper together. If you substitute cake flour, you’ll get a crumbly texture that falls apart the moment you try to pick it up. I always recommend sifting the flour to aerate it, which gives the batter a lighter feel and prevents those dreaded pockets of dense dough. Pro tip: Look for flour that’s labeled “unbleached” for a richer, buttery flavor.
The Sweeteners & Leaveners
Sugar not only sweetens but also aids browning, giving the poppers that beautiful caramelized crust. Baking powder and baking soda work together: the powder provides a steady rise, while the soda reacts with the buttermilk’s acidity for an extra puff. Skipping either will leave you with flat, pancake‑like disks. If you’re out of buttermilk, mix 3/4 cup milk with 1 tablespoon lemon juice and let it sit for five minutes—that’s a perfect stand‑in.
The Texture Crew
Buttermilk adds a subtle tang that cuts through the richness, keeping each bite balanced. The egg acts as a binder, ensuring the poppers hold their shape while also contributing to a tender crumb. Melted butter is the secret to that melt‑in‑your‑mouth mouthfeel; it coats the flour particles, slowing gluten formation for a softer interior. If you’re dairy‑free, substitute with coconut oil—just expect a faint coconut aroma that pairs nicely with berries.
The Unexpected Star
Nut butter may seem out of place, but a spoonful folded into the batter adds depth, a nutty undertone, and a hint of protein that makes these poppers more satisfying. Chocolate chips melt into pockets of gooey goodness, while fresh berries burst with acidity that brightens the overall profile. If you’re allergic to nuts, try sunflower seed butter; the texture is similar, and the flavor is surprisingly neutral.
Everything's prepped? Good. Let's get into the real action...
The Method — Step by Step
In a large mixing bowl, whisk together the flour, sugar, baking powder, baking soda, and that pinch of salt. You’ll hear the faint rustle of dry ingredients—listen for that sound; it means they’re fully combined. Once blended, set the bowl aside for a minute while you prep the wet side. This short pause lets the leaveners hydrate, which is crucial for that airy lift later.
In a separate bowl, whisk the buttermilk, egg, melted butter, vanilla extract, and nut butter until the mixture is smooth and glossy. The butter and nut butter should meld into a silky emulsion—think of it as a luxurious sauce that coats every ingredient. Power transition: Okay, ready for the game‑changer? This is where the flavor really starts to build.
Kitchen Hack: Warm the buttermilk slightly (no more than 35°C) before mixing; warm liquid integrates more evenly with the butter, preventing lumps.Create a well in the center of the dry ingredients and pour the wet mixture in. Using a rubber spatula, fold the batter together just until you see no dry streaks. Over‑mixing will develop gluten and give you a tough popper, so stop as soon as the batter looks slightly lumpy—those lumps are your friends.
Gently fold in the chocolate chips and berries, distributing them evenly without crushing the berries. The berries should stay whole, creating little pockets of juice that will burst during cooking. If you prefer a less sweet version, reduce the chocolate chips by half and add a sprinkle of cinnamon.
Heat a non‑stick skillet over medium‑low heat and add a thin layer of butter—just enough to coat the surface. When the butter foams and begins to turn light amber, you’ll know the pan is at the perfect temperature. That sizzle when it hits the pan? Absolute perfection. Using a medium‑low heat ensures the exterior crisps while the interior stays tender.
Watch Out: If the heat is too high, the poppers will burn before the inside cooks; always test with a single small dollop first.Spoon about two tablespoons of batter onto the skillet, spacing them at least an inch apart. As the batter hits the pan, you’ll hear a gentle hiss—this is the sound of moisture evaporating, creating that coveted crisp edge. Cook for 2‑3 minutes, then gently flip with a thin spatula. The edges should start pulling away from the pan, a clear visual cue that they’re ready to turn.
After flipping, cook another 2‑3 minutes on the other side. The poppers should be golden brown all around, and the chocolate chips should be melting into glossy pools. If you want extra caramelization, sprinkle a tiny pinch of sugar on top right after the flip; it will melt and create a subtle crunch.
Transfer the finished poppers onto a wire rack set over a baking sheet; this prevents steam from making the bottoms soggy. Keep them warm while you finish the batch—remember, the kitchen should smell like a bakery, not a kitchen sink.
Serve immediately with a drizzle of extra nut butter, a dusting of powdered sugar, or a side of maple syrup. Picture yourself pulling this out of the pan, the whole kitchen smelling incredible, and your guests reaching for another before you even finish the first. This next part? Pure magic. And now the fun part: enjoy the fruits of your labor while planning how to reinvent them tomorrow.
Insider Tricks for Flawless Results
The Temperature Rule Nobody Follows
Most home cooks set the stove to “medium” and hope for the best, but the real secret is a precise 325°F surface temperature, which you can gauge with an infrared thermometer or by dropping a tiny bead of batter—if it sizzles immediately and forms a bubble, you’re golden. Keeping the heat steady prevents the dreaded “burnt outside, raw inside” scenario. I once tried to rush this step and ended up with poppers that looked like charcoal; lesson learned: patience is a flavor enhancer.
Why Your Nose Knows Best
When the poppers are nearing completion, your kitchen will fill with a buttery, caramel‑sweet aroma that’s impossible to ignore. Trust that scent—if you can smell the faint hint of toasted sugar, the poppers are ready to flip. Over‑reliance on a timer can lead to dry results, especially if your stove runs hotter than average. I once set a timer for 2 minutes, but the poppers were already perfect at 1:45; listening with your nose saved the day.
The 5‑Minute Rest That Changes Everything
After cooking, let the poppers rest on a wire rack for exactly five minutes before serving. This short pause allows the steam to redistribute, ensuring the interior stays moist while the crust remains crisp. Skipping this step makes the poppers collapse under their own weight, turning them into soggy pancakes. I’ve seen friends serve them straight from the pan and wonder why they feel “weirdly dense.” The rest period is the silent hero of texture.
Butter Brush Boost
A quick brush of melted butter on each popper right after they’re removed from the pan adds an extra layer of shine and flavor. The butter seeps into the tiny cracks, making each bite richer without adding heaviness. If you’re watching calories, use a light hand or skip this step; the poppers are still delicious, just a shade less glossy.
Freezer‑Friendly Flip
When you freeze the poppers, stack them with parchment paper between each layer to prevent sticking. To reheat, pop them in a preheated 350°F oven for 8‑10 minutes; the heat revives the crisp exterior while the interior warms evenly. Adding a splash of water to the pan before reheating helps create steam that restores that fluffy interior, a trick I discovered after a disastrous reheating that left them dry.
Creative Twists and Variations
This recipe is a playground. Here are some of my favorite ways to switch things up:
Cinnamon‑Apple Delight
Swap the berries for finely diced apples tossed in cinnamon and a drizzle of maple syrup. The apples soften during cooking, creating a sweet‑spicy pocket that pairs beautifully with the nut butter.
Matcha‑White Chocolate Fusion
Replace chocolate chips with white chocolate chunks and add a teaspoon of matcha powder to the dry mix. The earthy green notes contrast the sweet white chocolate, delivering a sophisticated flavor profile.
Savory Breakfast Popper
Omit the sugar, add a pinch of smoked paprika, and fold in cooked, crumbled bacon and shredded cheddar. Serve with a dollop of sour cream for a brunch that blurs the line between sweet and savory.
Tropical Coconut‑Mango Burst
Swap berries for diced mango and add a tablespoon of shredded coconut to the batter. The tropical sweetness is perfect for a summer morning.
Peanut Butter Banana Blast
Add sliced bananas to the batter and increase the nut butter to three tablespoons. The banana’s natural sugars caramelize beautifully, making each bite a gooey, nutty dream.
Storing and Bringing It Back to Life
Fridge Storage
Place cooled poppers in an airtight container lined with parchment paper. They’ll stay fresh for up to three days. Reheat in a skillet over medium heat for two minutes per side, adding a splash of water to the pan to generate steam and revive the interior.
Freezer Friendly
Arrange poppers on a baking sheet, freeze until solid, then transfer to a zip‑top freezer bag. They keep for up to two months. When ready to eat, bake on a parchment‑lined tray at 350°F for 10‑12 minutes; the steam from the added water will bring back that fluffy texture.
Best Reheating Method
For the ultimate crunch, reheat in a preheated oven or toaster oven at 375°F for 5‑7 minutes. Add a tiny splash of water to the bottom of the pan or a foil‑covered dish to create gentle steam, preventing the poppers from drying out.