I swear, the first time I tried to make jello shots for a birthday bash, I ended up with a gelatinous disaster that looked more like a science‑project gone rogue than a party‑ready treat. The kitchen was a battlefield of spilled juice, a half‑melted tray, and a lingering scent of burnt sugar that made my guests wonder if I’d accidentally started a fire. I was mortified, but also oddly fascinated—how could something so simple go so spectacularly wrong? That night, I promised myself I would crack the code, and after countless trial runs, I finally nailed a version that not only sets perfectly but bursts with fresh fruit flavor that makes every sip feel like a mini‑vacation.
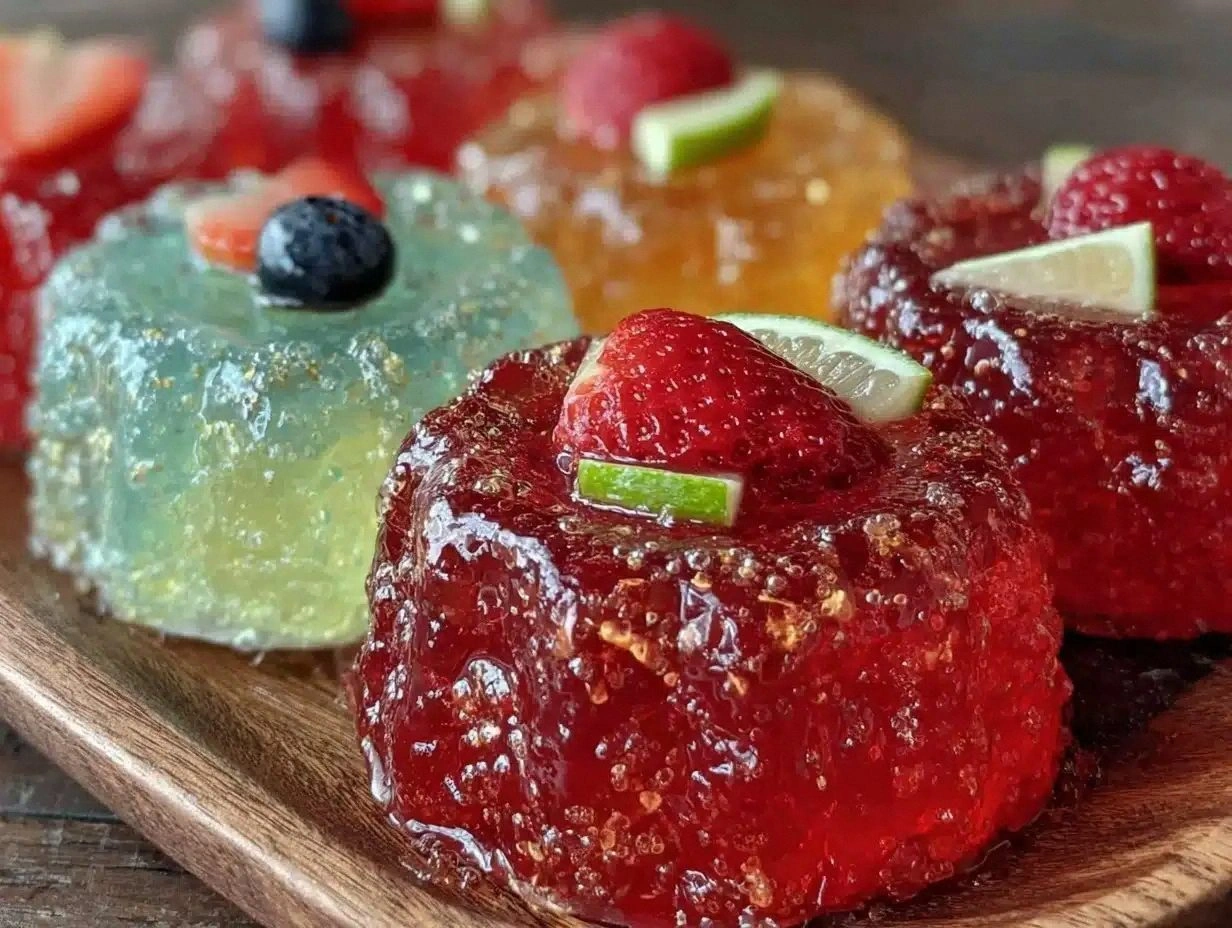
Picture this: a tray of translucent, ruby‑red shots glistening under the party lights, each one crowned with a tiny jewel of strawberry or a speck of kiwi that pops like fireworks in your mouth. The aroma is a heady mix of sweet fruit and a whisper of alcohol that makes your nose do a little happy dance, while the cool, wobbly texture slides across your tongue like a silk scarf on a summer breeze. You hear the faint clink of glasses as friends reach for another round, and the whole room fills with laughter, cheers, and that unmistakable “oh‑my‑god‑these‑are‑amazing” chorus that only the best party foods can elicit.
So why does this version stand out from the sea of jello shot recipes littered across the internet? Most recipes either skimp on flavor, use cheap gelatin that never quite sets, or drown the fruit in a sea of alcohol, leaving you with a bitter bite. My method balances the sweetness of 100% fruit juice with just enough vodka (or your spirit of choice) to give that kick without overpowering the palate. The secret? A pinch of sugar to round out the acidity, a quick flash of fresh fruit for texture, and a foolproof technique that guarantees a flawless set every single time.
And here’s the kicker: I’m going to reveal a tiny trick involving the order in which you combine the boiling water and the gelatin that most home cooks completely overlook. Trust me, it’s the difference between a wobbly puddle and a firm, bite‑ready shot that holds its shape when you flip it upside down. I dare you to taste this and not go back for seconds. Let me walk you through every single step — by the end, you’ll wonder how you ever made it any other way.
What Makes This Version Stand Out
- Taste: The marriage of 100% fruit juice with a splash of premium vodka creates a balanced sweetness that’s never cloying, delivering a burst of flavor that lingers just long enough to keep you reaching for more.
- Texture: Using high‑quality gelatin ensures a firm yet supple bite that jiggles just right—think of it as the perfect middle ground between a gummy bear and a delicate mousse.
- Simplicity: Only seven ingredients, all of which you probably have in your pantry, meaning you can throw this together in under an hour without a PhD in culinary science.
- Uniqueness: Fresh fruit pieces are folded in at the last minute, giving each shot a surprise pop of color and natural sweetness that store‑bought mixes can’t match.
- Crowd Reaction: These shots become the conversation starter; people line up, snap photos, and brag about the “best jello shots ever” on social media.
- Ingredient Quality: I recommend Knox gelatin for its reliability; it sets consistently and gives that clear, glass‑like finish we all love.
- Method: The two‑step gelatin dissolution (boiling water first, then cool slightly before adding alcohol) prevents any curdling or premature setting.
- Make‑Ahead Potential: You can prep the shots a day ahead, store them in the fridge, and they’ll be ready to dazzle your guests without any last‑minute panic.
Inside the Ingredient List
The Flavor Base
First up, the fruit juice. I stick with 100% pure juice—no added sugars, no artificial flavors—because the natural acidity balances the alcohol and gives that bright, clean finish. Cranberry juice, for instance, adds a tart edge that cuts through the vodka, while orange juice lends a sunny sweetness that feels like a sunrise in a cup. If you’re aiming for a tropical vibe, pineapple juice is unbeatable; just remember to choose a brand without added preservatives, or you’ll get a slightly off‑note after a few hours.
The Texture Crew
Gelatin powder is the heart of the operation. Knox brand is my go‑to because it dissolves reliably and gives a crystal‑clear set—no cloudiness, no wobble that looks like a bad Jell‑O. The rule of thumb is two tablespoons (about 20 grams) for every cup of liquid; this ratio ensures the shots are firm enough to hold fruit without turning rubbery. If you ever find yourself with a bag of powdered gelatin that’s a little old, give it a sniff—if it smells faintly sour, it’s still fine, but you might need an extra half‑tablespoon to compensate for any loss of potency.
The Unexpected Star
Fresh fruit pieces are optional, but trust me, they’re the sparkle that turns a simple shot into a party‑level experience. Small chunks of strawberries, blueberries, or kiwi not only add a pop of color but also release a subtle burst of juice as the gelatin melts in your mouth. If you’re feeling adventurous, try a few pomegranate arils for a ruby‑red surprise that looks as good as it tastes.
The Final Flourish
Alcohol is where the fun really begins. Vodka is classic because its neutral profile lets the fruit shine, but you can swap in rum for a Caribbean twist, tequila for a margarita‑inspired vibe, or even a flavored liqueur like peach schnapps for a sweeter finish. Remember, the alcohol should be the same volume as the juice (one cup) to maintain the perfect balance; too much and the gelatin won’t set, too little and you’ll miss the buzz.
Everything's prepped? Good. Let's get into the real action…
The Method — Step by Step
Grab a medium‑sized saucepan and pour in one cup of boiling water. As soon as the water hits the pan, sprinkle the two tablespoons of gelatin powder over the surface, letting it bloom for about 30 seconds. This “bloom” stage is crucial; the gelatin absorbs the liquid and swells, which prevents any grainy texture later. Watch out for clumps—if you see any, give it a quick stir with a fork until the powder fully dissolves.
Watch Out: If the water isn’t hot enough, the gelatin will never fully dissolve, resulting in a grainy shot that looks like a bad science experiment.Once the gelatin has fully dissolved (you’ll notice the mixture becoming a clear, glossy liquid), remove the pan from heat and let it sit for two minutes. This short cooling period is the game‑changer that prevents the alcohol from evaporating or curdling the gelatin. While it cools, whisk in the quarter‑cup of sugar until it fully dissolves—this step is optional but adds a subtle sweetness that balances the tartness of the juice.
Now, stir in one cup of your chosen fruit juice. The moment the juice hits the gelatin, you’ll see a gentle swirl, like a sunrise over a calm sea. Let the mixture sit for another minute, then slowly pour in one cup of your spirit of choice. The alcohol should be added gradually while whisking gently; this ensures the temperature stays consistent and the gelatin remains in perfect suspension.
Kitchen Hack: If you’re using a flavored liqueur, reduce the sugar a bit—many liqueurs already contain added sweetness.Give the entire mixture a final stir, then taste it. This is the moment of truth—if the flavor feels a bit flat, add a splash more juice or a pinch more sugar. Remember, the flavor will mellow slightly as the gelatin sets, so aim for a taste that's a shade brighter than you’d like the final product to be.
While the mixture is still liquid, lightly spray your silicone shot molds or mini plastic cups with non‑stick spray or a thin brush of oil. This step is often ignored, but it guarantees that the shots pop out cleanly without any sticky residue. I like to use a quick 5‑second spray—just enough to coat the surface without drowning the gelatin.
Now comes the fun part: pour the gelatin mixture into the prepared molds. Use a small ladle or a measuring cup to control the flow; you’ll want each cup about three‑quarters full to leave room for the fruit pieces. If you’re adding fresh fruit, drop a few pieces into each cup now—this is where the surprise pop happens.
Transfer the filled molds to the refrigerator and let them set for at least 30 minutes. You’ll know they’re ready when the edges pull away cleanly from the mold and the surface looks glossy and firm. If you’re in a hurry, a quick 20‑minute chill works, but for the best texture, give them the full half‑hour.
When the shots are set, gently pop them out of the molds onto a serving tray. If you used silicone molds, a light press on the bottom will release them; if you used plastic cups, simply lift them out. Arrange them in a decorative pattern, sprinkle a few extra fruit pieces on top for garnish, and watch your guests’ eyes widen in anticipation.
Serve immediately or keep them chilled until the party starts. If you need to transport them, place the tray in a cooler with a thin towel underneath to keep them from wobbling. And remember—these shots are best enjoyed within 24 hours; after that, the gelatin can start to dry out around the edges.
That's it — you did it. But hold on, I've got a few more tricks that'll take this to another level…
Insider Tricks for Flawless Results
The Temperature Rule Nobody Follows
Never pour boiling water directly over cold alcohol; the sudden temperature shock can cause the gelatin to seize and form clumps. Instead, let the gelatin cool to about 110°F (43°C) before adding the spirit. I once tried to speed things up by adding the vodka while the mixture was still sizzling, and the result was a lumpy mess that looked like a failed science experiment. Keep a kitchen thermometer handy, and you’ll avoid that rookie mistake every time.
Why Your Nose Knows Best
Before you pour the mixture into molds, give it a quick sniff. If you detect a sharp, alcoholic bite, it means the alcohol is too hot and will evaporate, weakening the set. Let the blend sit for a minute, then give it another sniff—once the scent mellows, you know the temperature is perfect. Trusting your nose is a secret weapon that most recipes ignore, but it saves you from a batch of flavorless, weak shots.
The 5‑Minute Rest That Changes Everything
After you’ve whisked the gelatin, juice, and alcohol together, let the mixture rest uncovered for five minutes. This short pause allows any tiny air bubbles to rise to the surface, resulting in a crystal‑clear final product. I once rushed this step and ended up with speckled shots that looked like they’d been through a sandstorm.
Fruit Timing is Everything
If you love the burst of fresh fruit, add the pieces just before the gelatin sets, not at the very beginning. Adding fruit too early can cause the gelatin to seize around the fruit, creating uneven pockets. A quick tip: drop the fruit in when the mixture is about 80% set—this gives you that perfect pop without compromising the structure.
The One‑Minute Flip
For perfectly level shots, give the molds a quick one‑minute flip halfway through the chilling process. This ensures any trapped air rises to the top, leaving a smooth surface. My first batch had tiny air pockets that made the shots look uneven; after mastering the flip, they look salon‑ready every single time.
Creative Twists and Variations
This recipe is a playground. Here are some of my favorite ways to switch things up:
Tropical Sunset
Swap the cranberry juice for a blend of mango and passion‑fruit juice, and use coconut rum instead of vodka. The result is a sun‑kissed shot that transports you straight to a beach bar at sunset. Top with a tiny umbrella for extra flair.
Berry Blast
Combine equal parts blueberry and raspberry juice, add a splash of Chambord for a sophisticated twist, and garnish with fresh berries. The deep violet hue is perfect for a winter holiday party, and the berries add a burst of tartness that cuts through the alcohol.
Spicy Margarita
Use lime juice and a splash of orange liqueur, then replace vodka with silver tequila. Add a pinch of chili powder to the gelatin mixture before setting, and rim each cup with salt and a tiny slice of jalapeño. This one’s for the brave—expect a fiery kick that’s balanced by the sweet fruit.
Chocolate Cherry
Add a tablespoon of unsweetened cocoa powder to the gelatin mixture and use cherry juice as the base. Pair with a splash of cherry brandy for a decadent, dessert‑like shot that’s perfect after dinner. Garnish with a single dark chocolate shaving for that Instagram‑ready finish.
Mocktail Version
Skip the alcohol entirely and replace it with an equal part sparkling water or club soda for a fizzy, kid‑friendly version. Use a blend of pineapple and orange juice, and add a dash of vanilla extract for a subtle depth. These mocktail shots are a hit at family gatherings where you want the fun without the buzz.
Storing and Bringing It Back to Life
Fridge Storage
Keep the shots in an airtight container or tightly covered tray in the refrigerator. They’ll stay fresh for up to three days, maintaining their firm texture and bright flavor. If you notice a thin film forming on top, simply give them a quick stir before serving.
Freezer Friendly
Yes, you can freeze them! Place the shots in a single layer on a parchment‑lined tray, freeze for two hours, then transfer to a zip‑top bag. They’ll keep for up to a month. When you’re ready to serve, thaw in the fridge for a few hours and add a splash of fresh juice to revive the flavor.
Best Reheating Method
If your shots have become a bit too firm after a day in the fridge, give them a gentle steam. Place the tray over a pot of simmering water for 30 seconds, or add a tiny splash of water to each cup and microwave for 5‑10 seconds. The added moisture steams the gelatin back to that perfect wobble without diluting the flavor.