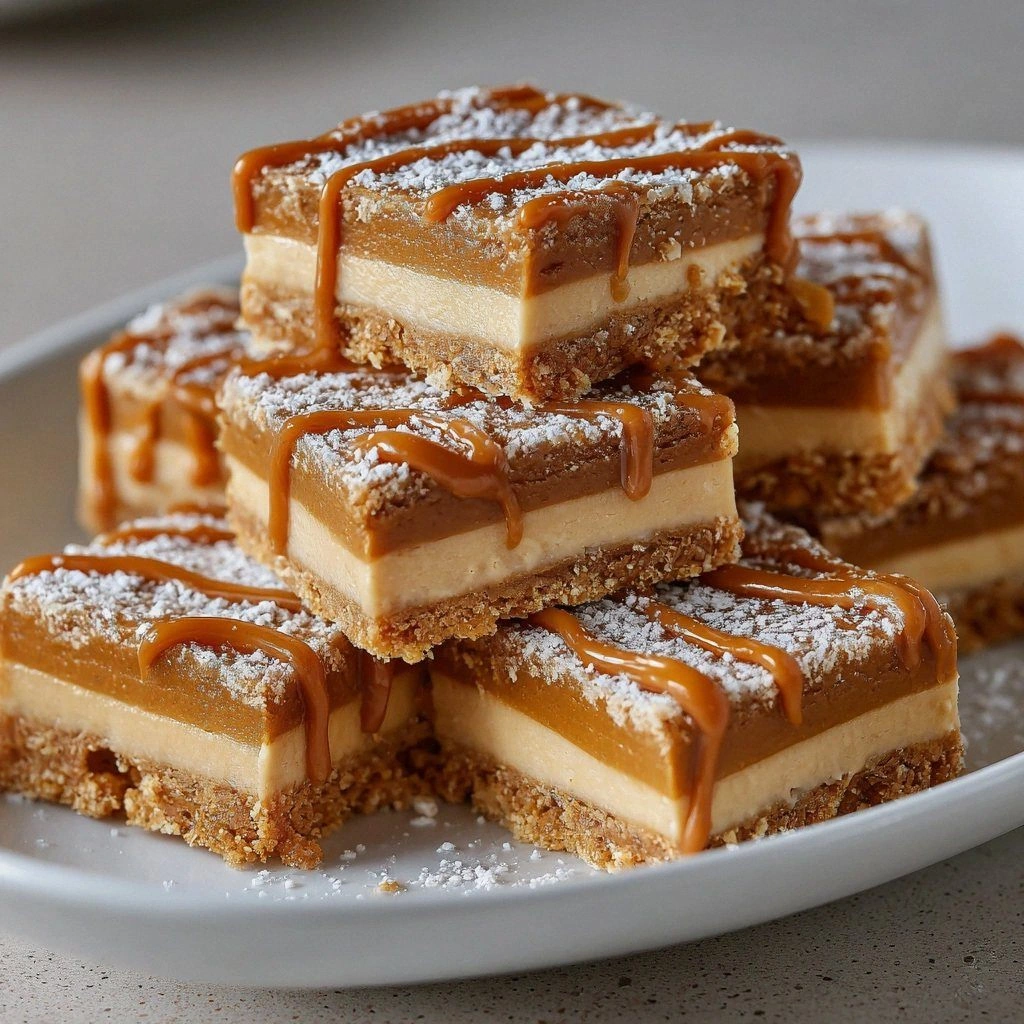
I was in the middle of a chaotic Sunday brunch, juggling a pot of coffee, a tray of pastries, and a sudden craving for something sweet and utterly indulgent. The kitchen smelled like caramel and vanilla, and I realized that I needed a dessert that could satisfy my sweet tooth without the hassle of baking. That moment of culinary crisis led me straight to the pantry, where a bag of Biscoff cookies, a jar of Biscoff spread, and a can of sweetened condensed milk seemed to whisper, “I’ve got you covered.” I decided to take the classic Biscoff slice and give it a no‑bake twist, turning an ordinary treat into a showstopper that would have my friends begging for seconds.
Picture the crunch of freshly broken Biscoff cookies, the buttery richness of melted butter, and the silky sweetness of condensed milk all mingling into a single, decadent layer. The aroma is a warm caramel hug, the texture a perfect blend of crisp and creamy, and the taste a caramelized cookie explosion that lingers on the palate. I’ve spent hours experimenting, and the result is hands down the best version of this slice I’ve ever made at home. The secret? A few clever tweaks that elevate the flavor profile and simplify the process.
What sets this version apart is the bold use of Biscoff spread, which deepens the caramel notes and adds a velvety mouthfeel that the original recipe never quite achieves. I also introduced a subtle vanilla extract to round out the sweetness, and I used powdered sugar to fine‑tune the consistency without overpowering the cookie flavor. The result is a slice that is both indulgent and approachable—no oven required, no complicated steps, just pure, irresistible flavor. I dare you to taste this and not go back for seconds; it’s that good.
If you’ve ever tried a Biscoff slice and felt it was missing something, you’re not alone. Most recipes get this completely wrong, focusing on the cookie base while neglecting the filling’s texture and flavor. I’ve corrected that by balancing the sweetened condensed milk with Biscoff spread, creating a creamy filling that coats the slice like velvet. Picture yourself pulling this out of the fridge, the whole kitchen smelling incredible, and the slice gleaming under the light. Let me walk you through every single step—by the end, you’ll wonder how you ever made it any other way.
What Makes This Version Stand Out
- Taste: The blend of caramelized cookie crumbs, butter, and Biscoff spread creates a deep, complex sweetness that’s both comforting and sophisticated.
- Texture: The crumbly base pairs perfectly with the silky, smooth filling, giving each bite a delightful contrast.
- Simplicity: No oven, no baking—just mix, chill, and serve. It’s a recipe that saves time without sacrificing flavor.
- Uniqueness: The addition of vanilla extract and powdered sugar elevates the classic recipe to gourmet territory.
- Crowd Reaction: Friends who taste it swear it’s the most decadent slice they’ve ever had, and they’re not shy about asking for the recipe.
- Ingredient Quality: Using high‑quality Biscoff cookies and spread ensures a richer, more authentic taste.
- Cooking Method: The no‑bake technique eliminates the risk of over‑baking or uneven textures, guaranteeing consistency.
- Make‑Ahead Potential: This slice can be prepared up to 48 hours in advance, making it a perfect pre‑party treat.
Inside the Ingredient List
The Flavor Base
Biscoff Cookies (250g) are the foundation of this slice, providing a caramelized, slightly spiced flavor that is unmistakably Biscoff. They also contribute crunch and a subtle bitterness that balances the sweetness of the other ingredients. Skipping them would turn the slice into a bland butter‑and‑sugar spread. If you can’t find Biscoff cookies, try using a high‑quality caramel shortbread as a substitute, but be prepared for a slightly different flavor profile.
The Texture Crew
Unsalted Butter (125g) acts as the binder that holds the cookie crumbs together and adds a silky richness. When melted and cooled, it creates a firm yet tender base that doesn’t crumble under pressure. If you’re watching your fat intake, you can swap it for a plant‑based butter with a similar melting point, but the taste will be subtly different. Butter also carries the aroma of caramel, enhancing the overall sensory experience.
The Unexpected Star
Sweetened Condensed Milk (1 can, 395g) introduces a creamy, sweet element that balances the crunch of the cookies. It also thickens the filling, giving it that silky mouthfeel that coats the slice like velvet. If you prefer a lower‑sugar option, you can use a reduced‑sugar condensed milk, but you’ll need to adjust the powdered sugar portion accordingly. The can’s size is standard, so it’s easy to find in most grocery stores.
The Final Flourish
Biscoff Spread (200g) enhances the cookie flavor and contributes to the creamy texture of the filling. It also helps to keep the slice moist, preventing it from drying out during storage. Powdered Sugar (100g) is used to fine‑tune the sweetness and to help the filling set properly. Vanilla Extract (1 tsp) rounds out the flavor, adding depth and a subtle warmth that complements the caramel notes. If you’re vegan, look for a plant‑based vanilla extract; the flavor impact will be minimal.
Everything’s prepped? Good. Let’s get into the real action, where the magic happens and the slice comes to life.
The Method — Step by Step
-
Begin by crushing the Biscoff cookies in a large bowl. Use a rolling pin or a food processor for an even crumb size, but avoid over‑processing; you want small, flaky pieces that will bind well. Once the cookies are crushed, set them aside. This step ensures a consistent texture throughout the slice.
-
Melt the unsalted butter in a small saucepan over low heat, stirring until fully liquefied. Let it cool slightly—just until it’s warm to the touch—so it doesn’t burn the condensed milk later. The butter’s melting point is around 32°C, which is perfect for creating a smooth base without scorching.
-
Pour the melted butter over the crushed cookies, then stir until the crumbs are evenly coated. The butter will act as a glue, holding the crumbs together and creating a cohesive base. This mixture should look like a dry, crumbly dough; if it’s too dry, add a teaspoon of warm water to moisten it.
-
Press the cookie‑butter mixture firmly into the bottom of a 9‑inch square pan lined with parchment paper. Use the back of a spoon or a flat object to level the surface. This step is critical: a firm base will prevent the slice from collapsing during chilling.
-
In a separate bowl, combine the sweetened condensed milk, Biscoff spread, powdered sugar, and vanilla extract. Whisk vigorously until the mixture is smooth and the powdered sugar is fully dissolved. The consistency should be thick yet pourable—think of a rich, caramel custard.
-
Pour the filling over the pressed cookie base, spreading it evenly with a spatula. The filling should cover the entire base, forming a uniform layer. Watch the edges; if they start pulling away, it’s a sign that the filling is too thick, and you may need to let it sit for a minute to re‑soften.
-
Refrigerate the pan for at least 4 hours, preferably overnight, until the filling is firm and the slice can be cut cleanly. The chilling time is essential for the flavors to meld and for the texture to set. If you’re short on time, a minimum of 2 hours will still yield a decent result.
-
Once set, lift the slice out of the pan using the parchment paper and cut into squares with a hot, dry knife for clean edges. Let the knife run over a paper towel between cuts to maintain precision. This final step is where the slice truly shines—each square should hold its shape without crumbling.
-
Serve immediately, or store in an airtight container at room temperature for up to 3 days. For a cooler treat, keep it in the fridge; the slice will stay firm and flavorful for up to a week. If you want to reheat, a quick 30‑second microwave burst will melt the top layer without compromising the texture.
That’s it— you did it. But hold on, I've got a few more tricks that'll take this to another level, ensuring every bite is a revelation.
Insider Tricks for Flawless Results
The Temperature Rule Nobody Follows
The key to a perfectly firm slice is temperature control. Keep the filling at room temperature or slightly cooler; a hot mixture will cause the cookie base to soften. I once tried pouring a warm filling and ended up with a soggy mess—don’t make that mistake. The trick is to let the mixture sit for a few minutes after whisking to allow it to cool just enough to pour smoothly.
Why Your Nose Knows Best
The aroma of the Biscoff spread and condensed milk is a powerful indicator of readiness. If you can smell a faint caramel scent rising from the mixture, it’s the right consistency. I’ve found that a strong vanilla aroma signals that the vanilla extract has fully integrated, giving the slice a balanced flavor.
The 5-Minute Rest That Changes Everything
After pouring the filling, let it rest for exactly five minutes before refrigerating. This brief pause allows the butter to settle and prevents the filling from forming a skin on the surface. It also gives the powdered sugar a chance to fully dissolve, resulting in a smoother texture.
The Secret Ingredient Swap
If you’re craving a different flavor profile, consider adding a splash of espresso or a pinch of sea salt to the filling. A touch of espresso intensifies the caramel notes, while sea salt balances the sweetness. I’ve experimented with both, and both add a subtle depth that elevates the slice.
The Finish Line: A Quick Frosting
For an extra touch of decadence, drizzle a thin layer of melted chocolate over the top before chilling. The chocolate will set into a glossy finish that’s both elegant and irresistible. Just a few drops—enough to create a glossy sheen without overwhelming the Biscoff flavor.
Creative Twists and Variations
This recipe is a playground. Here are some of my favorite ways to switch things up:
Almond Butter Crunch
Swap the Biscoff spread for almond butter and add chopped toasted almonds to the cookie base. The nutty flavor pairs wonderfully with the caramel notes, creating a new dimension of crunch. It’s perfect for those who love a nutty twist.
Chocolate‑Infused Slice
Add a tablespoon of cocoa powder to the filling for a chocolatey depth. The Biscoff flavor still shines through, but the chocolate adds a rich undertone that makes the slice feel indulgent. It’s a great way to bring a chocolate lover’s delight into the mix.
Citrus Brightness
Incorporate a teaspoon of orange zest into the filling for a bright, citrusy contrast. The zest cuts through the sweetness, adding a fresh, zesty finish that lifts the entire flavor profile. It’s a subtle yet impactful change.
Maple‑Honey Fusion
Replace the powdered sugar with a mix of maple syrup and honey, reducing the overall sweetness while adding a complex, earthy flavor. The maple notes complement the caramel, creating a sophisticated taste that’s less sweet but more balanced.
Vegan Version
Use coconut oil instead of butter, a dairy‑free condensed milk, and a plant‑based Biscoff spread. The texture remains creamy, and the flavor stays true to the original, just without the dairy. This version is perfect for those following a vegan lifestyle.
Mini Biscoff Bars
Divide the mixture into a muffin tin and bake for 10 minutes at 350°F for a quick, bite‑size treat. The bars hold their shape and offer a convenient, portable snack. They’re ideal for parties or on-the-go indulgence.
Storing and Bringing It Back to Life
Fridge Storage
Keep the slice in an airtight container in the refrigerator for up to a week. The cold temperature preserves the texture, keeping the filling firm and the base crisp. When you’re ready to enjoy, simply remove it from the fridge and let it sit at room temperature for a few minutes.
Freezer Friendly
Wrap the slice tightly in plastic wrap, then place it in a freezer bag. Freeze for up to three months. To thaw, leave it in the fridge overnight, then allow it to reach room temperature before serving. This method preserves the flavor and texture remarkably well.
Best Reheating Method
To revive a chilled slice, give it a quick 30‑second microwave burst on low power. The heat will soften the filling without melting the base, restoring the creamy texture. Alternatively, place the slice on a warm plate for a minute to warm the surface gently.