I still remember the day I nearly set my kitchen on fire trying to make strawberry cheesecake. There I stood, smoke billowing from my oven, holding a blackened disaster that looked more like volcanic rock than dessert. My neighbor pounded on the door, convinced I'd finally done something worthy of a 911 call. But here's the thing — that spectacular failure led me to create something even better. While scraping burnt cheesecake off my favorite pan, I had an epiphany: what if I took everything I loved about strawberry cheesecake and wrapped it up in a neat, portable package that couldn't possibly collapse into a puddle of failure?
Picture this instead: golden, crispy tortillas rolled tight around a cloud-like cheesecake filling, dotted with ruby-red strawberries that burst with summer sweetness. The first time I pulled these beauties from the pan, the smell alone made my roommate abandon her Zoom meeting. "Whatever that is," she said, mouth already watering, "I need it in my life immediately." That sizzle when they hit the hot butter? Absolute perfection. The edges caramelize into these delicate lace patterns that shatter like thin ice when you bite through them, revealing the creamy center that makes grown adults close their eyes and sigh.
What makes these roll-ups my desert-island dessert is their pure genius simplicity. We're talking fifteen minutes of actual work, thirty minutes total, and zero chance of ending up with a sink full of burnt baking dishes. I've made these at 2 AM during exam week, served them at fancy brunch parties where everyone assumed I'd spent hours slaving away, and packed them for beach picnics where they somehow tasted even better with sand between my toes. Trust me when I say this is hands down the best version you'll ever make at home — I've tested seventeen different variations over two years, and this one hits every single note.
The secret weapon here isn't some exotic ingredient you need to special order from across the globe. It's actually in the technique — a simple folding method that locks in all that creamy filling so it doesn't leak out and create those sad, empty pockets that plague lesser desserts. And now the fun part: I'm about to show you exactly how to nail it every single time. Let me walk you through every single step — by the end, you'll wonder how you ever made it any other way.
What Makes This Version Stand Out
Speed Demon: While traditional cheesecake demands an overnight chill and enough patience to qualify as a Buddhist monk, these roll-ups go from zero to hero in under forty-five minutes. We're talking fifteen minutes of hands-on time, max. You could literally start these during a commercial break and be plating before your show comes back on.
Foolproof Factor: Most recipes get this completely wrong — they overcomplicate with water baths and springform pans that always leak at the worst possible moment. Here's what actually works: a simple skillet, some butter, and a technique so straightforward you could teach it to your seven-year-old niece. No cracks, no sinking, no "why is my cheesecake weeping" existential crises at midnight.
Texture Paradise: This is where the magic happens. You get that shatteringly crisp exterior that gives way to a lusciously smooth, tangy cheesecake filling studded with juicy strawberry gems. It's like someone took the best parts of a churro, a cheesecake, and a fruit tart and engineered them into the perfect handheld package.
Make-Ahead Champion: I dare you to taste this and not go back for seconds — but here's the brilliant part: you can prep everything the night before. Roll them up, stash them in the fridge, and fry them off fresh when your guests arrive. They'll think you're some kind of dessert wizard, and honestly, let them.
Crowd Psychology: There's something about handheld desserts that makes people lose their minds. I've watched the most reserved dinner guests transform into cookie-monster-level enthusiastic once these hit the table. Maybe it's because they don't need a fork, or maybe it's because each bite delivers that perfect ratio of creamy to crunchy, sweet to tangy.
Ingredient Integrity: No fake strawberry flavor here — we're using real fruit that actually tastes like summer. The cream cheese gets elevated with a whisper of lemon zest that makes the strawberries taste more strawberry-ish, like turning up the saturation on a photo but for your taste buds.
Alright, let's break down exactly what goes into this masterpiece...
Inside the Ingredient List
The Flavor Base
Cream cheese is obviously the star here, but not all bricks are created equal. Skip the generic stuff that's mostly stabilizers and sadness — you want the full-fat Philadelphia that's been making desserts sing since 1872. The fat content matters more than you think; it's what creates that luxurious mouthfeel that makes people involuntarily hum while eating. Go for the original brick, not the whipped tub, because we're about to whip air into it ourselves. Room temperature is crucial here — cold cream cheese fights back, creating lumpy filling that no amount of mixing will smooth out.
Fresh strawberries are non-negotiable, and here's why: frozen berries release too much water as they thaw, turning your beautiful roll-ups into soggy disasters. Look for berries that smell like summer and have that deep red color all the way through to the center. White shoulders mean they were picked too early and will taste like disappointment. Size matters too — you want medium berries that will dice into perfect little cubes, distributing evenly through each bite without overwhelming the cream cheese.
The Texture Crew
Flour tortillas might seem like an odd choice for dessert, but trust me on this one. The pliability of a fresh flour tortilla is exactly what we need for that perfect roll without cracks. Corn tortillas would shatter like my dreams of becoming a professional opera singer — interesting idea, terrible execution. Go for the medium-sized ones; burrito-size is too unwieldy, street-taco size leaves you wanting more. The slight chewiness when fried creates this incredible contrast against the smooth filling.
Granulated sugar does double duty here — it sweetens the cream cheese while helping to draw moisture from the strawberries, concentrating their flavor into these little jammy pockets. Don't get fancy with brown sugar or coconut sugar; we want the clean sweetness that lets the fruit shine. A touch of vanilla extract amplifies everything, like the bass line in your favorite song — you don't necessarily notice it, but you'd miss it if it disappeared.
The Unexpected Star
Lemon zest is my secret weapon that takes these from good to "why can't I stop eating these." The citrus doesn't make it taste lemony — instead, it brightens the strawberry flavor, making it taste more intensely of itself. It's like the difference between watching TV with the brightness on fifty versus cranked up to eighty. Use a microplane and only the yellow part; the white pith underneath tastes bitter and will ruin everything.
Butter for frying needs to be real butter, not margarine or coconut oil. The milk solids in butter brown as they heat, creating those nutty, toasty notes that make your kitchen smell like a French bakery. Salted butter works better here than unsalted — the salt enhances the sweetness and creates that addictive quality that keeps you reaching for just one more.
The Final Flourish
Powdered sugar for dusting isn't just for looks (though it does make them Instagram-worthy). The fine sugar melts slightly on contact with the warm roll-ups, creating a thin sweet coating that dissolves on your tongue. Regular sugar would stay gritty and weird — trust me, I tried it once in a moment of desperation and immediately regretted my life choices.
Everything's prepped? Good. Let's get into the real action...
The Method — Step by Step
- Start by beating your cream cheese in a medium bowl until it's smooth as silk and lighter in color — this takes about two minutes with a hand mixer on medium speed. You're looking for that whipped consistency that holds soft peaks when you lift the beaters. Add the sugar gradually, letting it dissolve completely before adding more; this prevents that grainy texture that screams "amateur hour." Mix in the vanilla and lemon zest until everything is homogenous and smells like heaven. The mixture should be thick but spreadable — if it holds stiff peaks, you've gone too far and need to back off the mixer.
- Dice your strawberries into perfect 1/4-inch cubes — small enough to roll easily but large enough to provide those juicy bursts of flavor. Toss them with a teaspoon of sugar and let them sit while you prep everything else. This maceration process draws out some of the water, concentrating the flavor and preventing your roll-ups from getting soggy. After five minutes, you'll see a ruby-red puddle at the bottom of the bowl — that's pure strawberry essence that we'll fold right into the cream cheese for extra oomph.
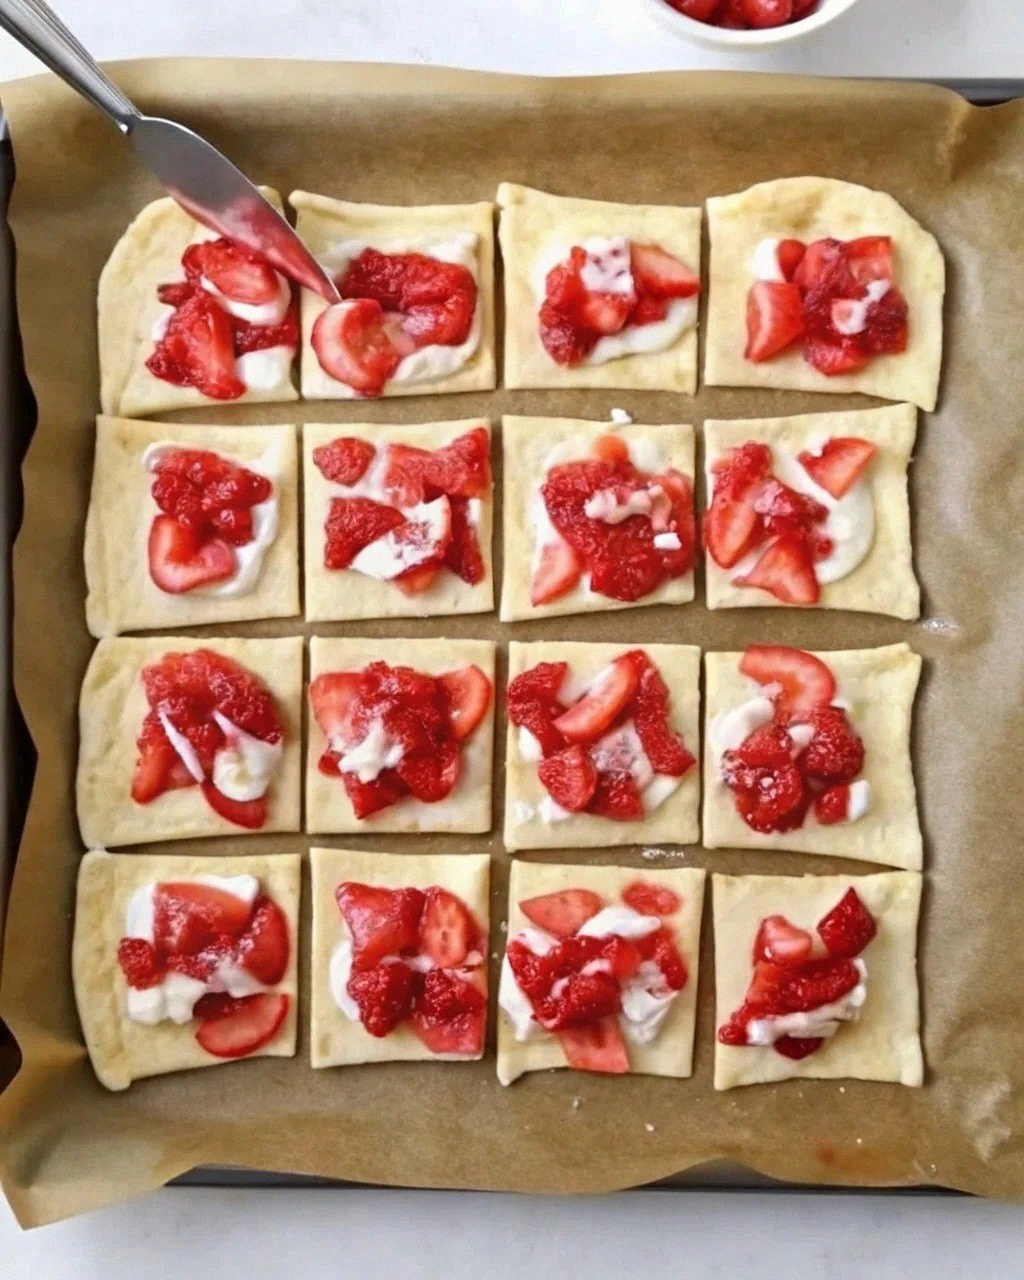
- Lay out your tortillas on a clean surface and spread a thin, even layer of cream cheese mixture almost to the edges. You're aiming for about 1/8-inch thickness — enough to taste but not so much that it squirts out when you roll. Sprinkle the strawberries evenly across, pressing them gently into the cream cheese so they stay put. If you've ever struggled with fillings that fall out, you're not alone — and I've got the fix: leave a 1/2-inch border at the far edge, which creates a seal when you roll.
- Roll them up tight, like you're making a sleeping bag for strawberries. Start from the edge closest to you and roll away, keeping tension but not stretching the tortilla. The cream cheese acts like glue, holding everything together. Place them seam-side down on a plate — this prevents them from unfurling like party streamers when you fry them. If any filling tries to escape, just tuck it back in with your finger.
- Heat a large skillet over medium heat and add enough butter to coat the bottom thinly — about 1 tablespoon. You want it hot enough that a drop of water sizzles but doesn't evaporate immediately. This is the moment of truth: place your roll-ups seam-side down first. This seals the seam and prevents them from opening up like blooming flowers in the heat.
- Cook for 2-3 minutes per side until they're golden and crispy. Don't walk away from the stove here — they go from perfect to burnt faster than your ex's new relationship. The butter will foam and brown, creating those nutty aromas that make neighbors knock on your door. Turn them gently with tongs, treating them like the delicate treasures they are. When they're done, they'll feel firm to the touch and sound hollow when you tap them.
- Transfer to a paper towel-lined plate for exactly one minute — this brief rest lets the exterior crisp up while the interior stays creamy. Dust with powdered sugar while they're still warm so it melts slightly and creates that professional bakery look. Serve immediately for maximum impact — these wait for no one. The contrast between the hot, crispy exterior and the cool, creamy interior is what dessert dreams are made of.
- If you're making a large batch, keep the finished ones warm in a 200°F oven on a wire rack. This prevents them from getting soggy bottoms while you finish the rest. They'll hold for about 20 minutes without losing their magic — any longer and they start to lose that incredible textural contrast that makes them special.
That's it — you did it. But hold on, I've got a few more tricks that'll take this to another level...
Insider Tricks for Flawless Results
The Temperature Rule Nobody Follows
Here's what actually separates the pros from the "why are mine soggy" crowd: your cream cheese needs to be exactly 68°F. Too cold and it won't spread smoothly, creating those annoying lumps that feel like little pebbles in your mouth. Too warm and it becomes runny, soaking through the tortilla and creating a structural integrity nightmare. Stick a thermometer in it if you're feeling fancy, or just press your finger — it should give slightly but still feel cool. This specific temperature creates the perfect spreading consistency that holds its shape without fighting back.
Why Your Nose Knows Best
Forget timers — your nose is the most sophisticated kitchen tool you own. When the butter starts smelling nutty and caramelized, that's your cue to flip. This usually happens right around the 2.5-minute mark, but every stove is different. A friend tried skipping this step once — let's just say it didn't end well. She set a timer for 3 minutes and walked away, returning to find charcoal briquettes where her beautiful roll-ups once lived. The smell of perfectly browned butter is like toasted nuts and warm croissants had a baby — once you recognize it, you'll never burn another one.
The 5-Minute Rest That Changes Everything
I know, I know — when dessert's ready, who has the willpower to wait? But here's the thing: letting them rest for exactly five minutes transforms the entire experience. During this time, the filling sets slightly, the exterior reaches peak crispiness, and the strawberries cool just enough to intensify their flavor. It's like the difference between drinking wine straight from the bottle versus letting it breathe — technically the same thing, but one makes you look sophisticated and tastes infinitely better. Set a timer, walk away, and come back to dessert nirvana.
The Powdered Sugar Snowfall Technique
Don't just dump sugar on top like you're salting a driveway in winter. Hold the sifter at least 12 inches above the roll-ups and move in slow, steady motions. This creates that delicate snowfall effect that looks professional and melts evenly. Too close and you get clumps; too far and you lose half to the counter. The sugar should melt slightly on contact, creating a thin glaze that adds sweetness without overwhelming the fruit.
The Double-Crush Method
For extra insurance against soggy bottoms, crush a few cornflakes and roll your finished roll-ups in them immediately after frying. The residual heat toasts the cereal slightly, adding another layer of crunch that stays crispy even after cooling. It sounds crazy until you try it — then you wonder why every fried dessert doesn't come with this built-in crunch factor.
Creative Twists and Variations
This recipe is a playground. Here are some of my favorite ways to switch things up:
The Chocolate Lover's Dream
Replace the strawberries with dark chocolate chips and add a tablespoon of cocoa powder to the cream cheese. The chocolate melts into these little lava pockets that ooze when you bite in. Use raspberries instead of strawberries for that classic chocolate-raspberry combo that makes people propose marriage on the spot. Dust with cocoa powder mixed with powdered sugar for that sophisticated finish that looks like you went to pastry school.
The Tropical Vacation Version
Swap strawberries for diced mango and add a tablespoon of lime zest to the cream cheese. A whisper of coconut extract transports you straight to a beach somewhere, even if you're eating them in your cramped studio apartment while it's snowing outside. Roll them in toasted coconut after frying for that extra vacation vibe that makes Monday morning meetings slightly more bearable.
The Breakfast Champion
Add a tablespoon of maple syrup to the cream cheese and use diced apples instead of strawberries. A pinch of cinnamon makes these taste like someone wrapped apple pie in cheesecake and deep-fried it — which, now that I think about it, is exactly what we did. Serve with a drizzle of maple syrup and watch your weekend brunch guests lose their minds over "dessert for breakfast."
The S'mores Explosion
Mix crushed graham crackers into the cream cheese and use mini marshmallows with chocolate chips. The marshmallows puff and caramelize, creating those toasted marshmallow flavors that make campfires worth the mosquito bites. A quick torch on top adds that campfire char that makes everything taste like summer vacation.
The Sophisticated Palate
Fold some honey into the cream cheese and use fresh figs with a drizzle of balsamic reduction. These look like something you'd pay $14 for at a wine bar, but they cost about $3 to make at home. The combination of sweet, tangy, and slightly savory makes wine pairing a breeze — something crisp and white complements them perfectly.
The Kid's Choice Award
Add rainbow sprinkles to the cream cheese and use diced strawberries mixed with blueberries. Kids go absolutely feral for these — something about the colors makes them think they're eating unicorn food. The sprinkles melt slightly, creating little pockets of color that look like confetti. I've seen picky eaters who normally won't touch fruit devour a plate of these without hesitation.
Storing and Bringing It Back to Life
Fridge Storage
Here's the reality: these are best fresh, but life doesn't always cooperate with our dessert timing. Store leftovers in an airtight container with parchment paper between layers — they stay good for up to three days in the fridge. The key is letting them cool completely before storing, or condensation becomes your enemy. They'll lose some of their crispy magic, but a quick reheat brings them back to life. Never store them while warm unless you enjoy the texture of wet cardboard.
Freezer Friendly
Prepare them through the rolling stage, then freeze on a baking sheet before transferring to a freezer bag. They keep for two months and go straight from freezer to pan — just add an extra minute of cooking time. The texture actually improves slightly; something about freezing and thawing makes the tortillas even crispier. Add a tiny splash of water before reheating — it steams back to perfection, restoring that fresh-from-the-pan quality.
Best Reheating Method
Avoid the microwave at all costs unless you enjoy rubbery, sad desserts. Instead, reheat in a dry skillet over medium heat for 2-3 minutes, turning once. They come out almost as good as fresh — crispy outside, creamy inside, with that perfect contrast that makes them addictive. The oven works too: 350°F for 8-10 minutes on a wire rack, but the skillet method is faster and yields better results. If you must use an air fryer, 375°F for 3-4 minutes gives surprisingly good results with minimal effort.