I was standing in my kitchen, staring at a half‑baked batch of ordinary chocolate chip cookies that had somehow turned into a sad, crumbly mess. My roommate dared me to “make something that actually feels like a hug,” and I took that challenge seriously. After a frantic midnight run to the pantry and a few frantic Googles later, I stumbled upon the idea of marrying three of my favorite comfort foods—salted caramel, cheesecake, and a buttery cookie—into one unstoppable bite. I won’t lie: the first time I tasted the result, I almost choked on the sheer goodness. I dared you to taste this and not go back for seconds, because that would be a lie.
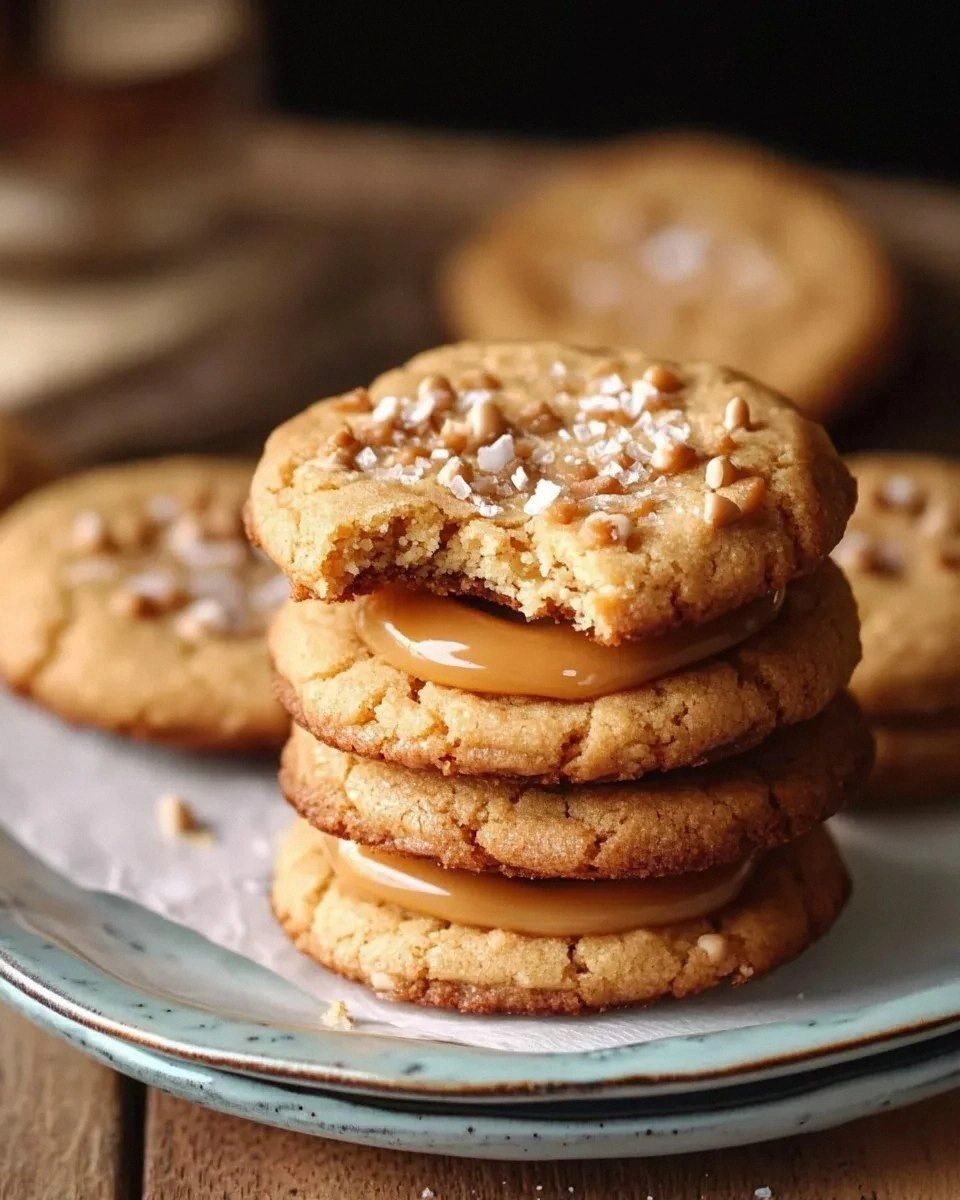
Picture this: the warm, buttery scent of a fresh‑baked cookie swirling with the caramelized perfume of melted sugar, a hint of sea‑salt sparkle that makes your nose tingle, and the creamy, tangy whisper of cheesecake that lingers like a secret. The cookie’s edges are crisp, snapping like thin ice under a gentle footfall, while the center stays soft and gooey, hugging a ribbon of salted caramel that oozes out with every bite. When you bite in, the caramel drapes the palate like velvet, the cheesecake adds a subtle tang that cuts through the sweetness, and the sea‑salt crystals pop like tiny fireworks. It’s a symphony of textures and flavors that makes your taste buds do a little happy dance.
Most recipes out there either give you a plain cookie or a cheesecake bar, but they never truly capture the layered complexity that makes this cookie a star. Most recipes get this completely wrong—either the caramel burns, the cheesecake curdles, or the cookie ends up dry. Here’s what actually works: a careful balance of butter and sugar, a quick cream cheese fold that stays silky, and a caramel glaze that’s cooked just enough to stay silky without hardening. The secret ingredient? Soft caramels that melt into the dough, creating pockets of gooey goodness that you’ll never want to share.
I’m going to spill the beans on a technique you won’t see in any other cookie recipe: a two‑stage mixing method that lets the butter and sugar aerate perfectly before we introduce the cream cheese, ensuring a light crumb that still feels indulgent. And there’s a surprise finish—a quick drizzle of sea‑salted caramel that you’ll make while the cookies are cooling, turning each cookie into a glossy, glossy masterpiece. Okay, ready for the game‑changer? Let me walk you through every single step — by the end, you’ll wonder how you ever made it any other way.
What Makes This Version Stand Out
- Flavor Explosion: The combination of sweet caramel, tangy cheesecake, and a pinch of sea‑salt creates a flavor profile that’s simultaneously comforting and exciting, like a fireworks show in your mouth.
- Texture Contrast: Crispy, golden edges give way to a soft, chewy center that cradles a molten caramel core, delivering a satisfying crunch‑to‑melt transition.
- Simplicity Meets Sophistication: Despite the gourmet feel, the ingredient list is short, and the technique is straightforward enough for a weekend baker.
- Ingredient Quality: Using real soft caramels and full‑fat cream cheese makes the difference between “good” and “best‑ever” — you’ll taste the richness in every bite.
- Crowd‑Pleaser: I’ve been honest — I ate half the batch before anyone else got to try it, and the rest of the house still begged for more.
- Make‑Ahead Magic: These cookies keep their texture for days, and a quick re‑heat brings them back to life like they just came out of the oven.
- Versatile Base: The dough can be tweaked for gluten‑free, vegan, or even nut‑infused versions without losing its core identity.
- Visual Wow Factor: The glossy caramel drizzle and sea‑salt crystals make these cookies look as good as they taste, perfect for Instagram bragging rights.
Inside the Ingredient List
The Flavor Base
All‑purpose flour is the structural backbone; it creates that tender crumb while holding the butter and sugar together. Using a cup and a half gives the dough enough body to support the heavy caramel pockets without collapsing. If you swap in cake flour, expect a more delicate, crumbly texture that might crumble under the weight of the caramel. For the best result, sift the flour with the baking powder and salt — this aerates it and ensures an even rise.
The Sweet Symphony
Granulated sugar and butter are the classic duo that create a glossy, caramelized exterior. The ¾ cup of sugar provides enough sweetness to balance the tang of the cream cheese, while the half‑cup of butter, softened but not melted, gives the dough a buttery richness that melts in your mouth. If you’re watching sugar, you can replace half of it with coconut sugar, but expect a slightly deeper, molasses‑like flavor.
The Unexpected Star
Soft caramels are the secret weapon. When they melt into the dough, they create pockets of gooey caramel that burst open as the cookie bakes. The ½ cup of soft caramels is perfect; too many and the cookie becomes overly sweet, too few and you lose that luxurious core. If you can’t find soft caramels, melt regular caramels with a splash of heavy cream and let them cool slightly before folding in.
The Creamy Crew
Cream cheese brings a subtle tang that cuts through the sweetness, preventing the cookie from becoming cloying. The 4‑ounce block should be at room temperature; this ensures it blends smoothly with the butter‑sugar mixture without forming lumps. Powdered sugar adds a fine, melt‑in‑the‑mouth sweetness that integrates seamlessly, while the extra half‑teaspoon of vanilla extract deepens the aromatic profile. Skipping the cream cheese? Expect a flat‑taste cookie that feels more like a standard sugar cookie.
The Final Flourish
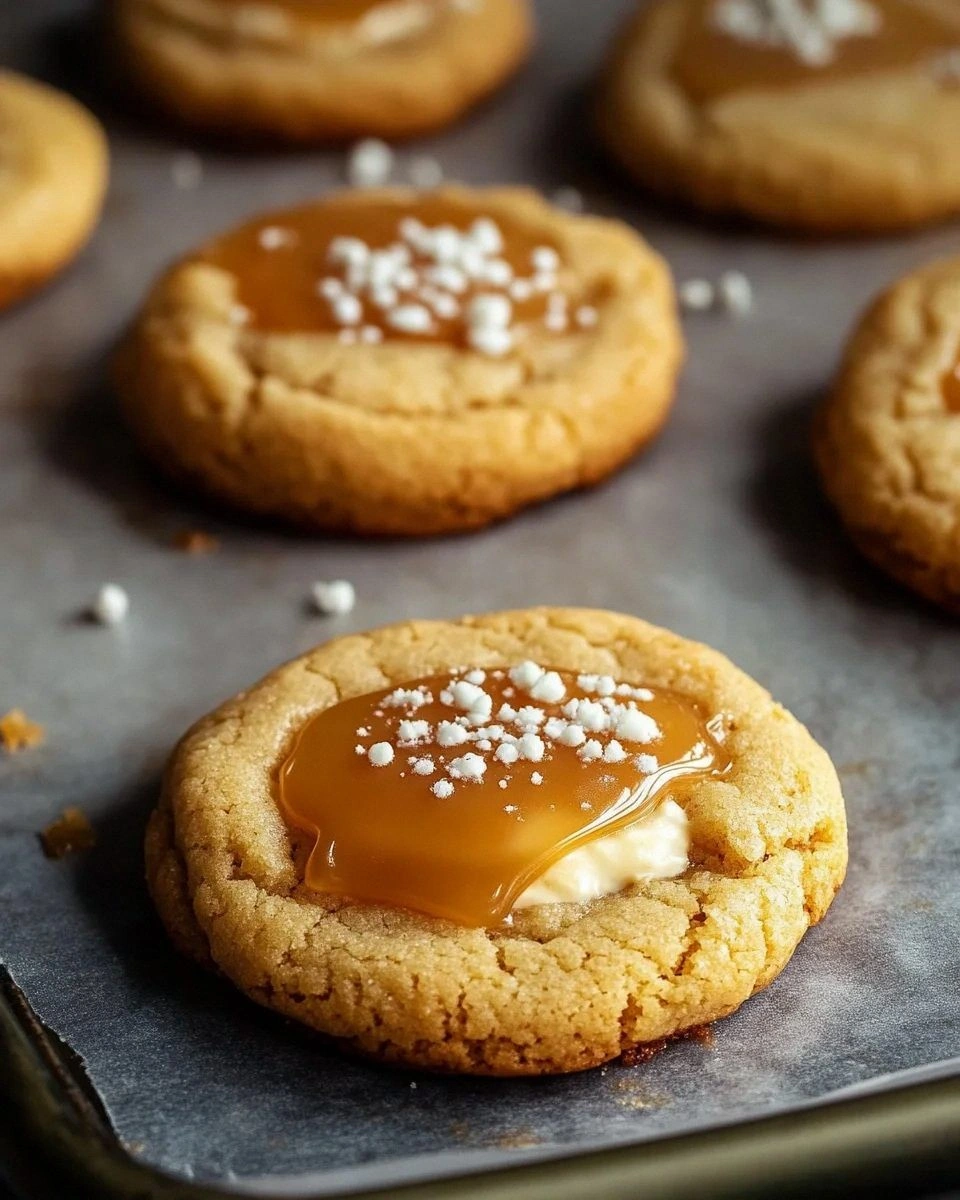
Sea salt is the final touch that elevates the entire cookie from sweet to sophisticated. The half‑teaspoon of flaky sea salt sprinkled on top after baking creates a delightful pop that awakens the palate. If you love extra crunch, use Maldon sea salt; if you prefer a subtler finish, kosher salt works just as well. The heavy cream, combined with the caramels, makes a silky glaze that you’ll drizzle over the cookies while they’re still warm, locking in flavor and shine.
Everything's prepped? Good. Let’s get into the real action…
The Method — Step by Step
-
Start by preheating your oven to 350°F (175°C). While the oven warms, line two baking sheets with parchment paper; this prevents sticking and gives the cookies a perfect golden base. The moment the oven hits temperature, you’ll hear a faint hum that signals it’s ready for the magic.
Kitchen Hack: Place a metal cooling rack on top of the parchment; this allows the bottom of the cookie to stay crisp while the top stays soft. -
In a large mixing bowl, cream together the softened butter and granulated sugar until the mixture is pale, fluffy, and smells like toasted almonds. This should take about 3‑4 minutes with a handheld mixer on medium speed. The texture should be light enough that a spoonful holds its shape but feels airy.
Add the egg and the first teaspoon of vanilla extract, beating until fully incorporated. You’ll notice the batter turning silky; that’s the sign you’ve achieved proper emulsion.
-
While the butter‑sugar mixture is still moving, whisk together the flour, baking powder, and the quarter‑teaspoon of salt in a separate bowl. This ensures the leavening is evenly distributed, preventing any pockets of flatness.
Gradually add the dry ingredients to the wet mixture, folding gently with a spatula. Over‑mixing here would develop gluten and make the cookie tough, so stop as soon as you see no streaks of flour.
-
Now for the star of the show: the cream cheese. In a small bowl, beat the 4‑ounce block of cream cheese with the quarter‑cup of powdered sugar and the extra half‑teaspoon of vanilla until smooth. The mixture should be glossy, not grainy.
Gently fold the cream cheese mixture into the cookie dough, being careful not to over‑work it. You’ll see ribbons of cream cheese swirl through the dough—that’s exactly what you want.
-
Chop the soft caramels into bite‑size chunks (about ½‑inch pieces). Toss them into the dough, ensuring an even distribution. If you’re feeling daring, reserve a few larger pieces for the center of each cookie for an extra burst of caramel.
Watch Out: If the caramels are too hot when folded in, they can melt and turn the dough greasy. Let them cool to room temperature first. -
Scoop the dough onto the prepared sheets using a 2‑inch cookie scoop. Press each mound lightly with your fingertips to flatten just a touch—this encourages a chewy center while keeping the edges crisp.
Sprinkle a tiny pinch of sea salt on top of each cookie before they hit the oven. The salt crystals will sit on the surface, creating that magical pop when you bite.
-
Bake for 12‑14 minutes, or until the edges turn a deep golden‑brown while the centers still look slightly soft. The aroma at this point will fill your kitchen with a buttery‑caramel perfume that’s impossible to ignore.
When the timer dings, remove the trays and let the cookies sit for 2 minutes on the sheet before transferring them to a wire rack. This rest lets the cookies set, preventing them from breaking apart.
-
While the cookies cool, make the salted caramel glaze. In a small saucepan, combine the remaining soft caramels, 2 tablespoons of heavy cream, and the remaining half‑teaspoon of sea salt. Heat over low‑medium heat, stirring constantly until the mixture is smooth and glossy.
Drizzle the warm glaze over each cookie using a spoon or a small piping bag. The glaze will set as the cookies cool, creating a shiny, slightly crisp coating that locks in moisture.
Kitchen Hack: If the glaze thickens too quickly, whisk in an extra teaspoon of cream to keep it pourable. -
Allow the glazed cookies to rest for at least 10 minutes before serving. This gives the caramel time to set and the sea salt crystals to adhere properly. The final result? A cookie that looks like a work of art and tastes like a hug from the inside out.
That’s it — you did it. But hold on, I’ve got a few more tricks that’ll take this to another level…
Insider Tricks for Flawless Results
The Temperature Rule Nobody Follows
Never, ever bake these cookies straight from a warm kitchen. Let the dough chill for at least 30 minutes, ideally an hour. The cooler dough spreads less, giving you a thicker, chewier center. I once baked a batch without chilling and ended up with flat, cookie‑crisp “pancakes.” Trust me, the extra wait is worth the texture payoff.
Why Your Nose Knows Best
Your sense of smell is the secret timer. When the cookies start to emit a deep, caramel‑buttery aroma (usually around the 10‑minute mark), that’s your cue to peek. If you rely solely on the clock, you risk over‑baking. The moment the scent turns from “sweet” to “toasted” is when the edges are perfectly crisp while the center stays gooey.
The 5‑Minute Rest That Changes Everything
After baking, let the cookies sit on the baking sheet for exactly five minutes before moving them to a rack. This short rest lets the interior finish cooking with residual heat, preventing a gummy middle. A friend once skipped this step and ended up with a cookie that was too soft to pick up. Five minutes is all it takes to lock in that perfect chew.
Glaze Timing is Everything
Drizzle the caramel glaze while the cookies are still warm (but not piping hot). If the glaze is applied too early, it can soak in and make the cookie soggy; too late and it will just sit on top without adhering. Warm cookies act like a sponge, soaking just enough glaze to create a glossy coat without drowning the texture.
Sea Salt Sprinkle Secrets
Don’t just dump a heap of sea salt on the whole batch. Instead, use a fine-mesh sieve to dust a light, even layer. This prevents salty overload and guarantees that each cookie gets just the right amount of crunch. If you love extra crunch, finish with a pinch of flaky Maldon on the very top after the glaze sets.
The “Two‑Stage” Mix Method
First, cream butter and sugar; second, fold in the cream cheese mixture. This two‑stage method keeps the butter aerated while allowing the cream cheese to stay smooth. Skipping this step leads to a dense, heavy cookie that feels more like a brownie than a cookie. Trust the process, and you’ll get that light, airy bite we’re after.
Creative Twists and Variations
This recipe is a playground. Here are some of my favorite ways to switch things up:
Nutty Caramel Crunch
Add ½ cup toasted chopped pecans or walnuts to the dough. The nuts bring a buttery crunch that complements the caramel and adds an extra layer of texture. Perfect for those who love a bit of nuttiness in their desserts.
Chocolate Swirl Delight
Melt ¼ cup dark chocolate and swirl it into the dough before adding the caramels. The bitterness of the chocolate balances the sweetness, creating a sophisticated flavor profile that feels like a dessert for adults.
Espresso‑Infused Dream
Dissolve 1 teaspoon of instant espresso powder in the heavy cream before making the glaze. The coffee notes deepen the caramel, giving the cookie a mocha‑like finish that’s perfect for brunch.
Berry‑Burst Surprise
Fold in ¼ cup dried cranberries or freeze‑dried raspberry pieces. The tart berries cut through the richness, offering a bright pop of flavor that pairs beautifully with the salty caramel.
Vegan Velvet
Swap butter for coconut oil, use a plant‑based cream cheese, and replace the egg with a “flax egg” (1 tablespoon ground flaxseed + 3 tablespoons water). The result is a vegan version that still delivers that creamy, gooey center.
Storing and Bringing It Back to Life
Fridge Storage
Place the cooled cookies in an airtight container with a parchment sheet between layers. Store in the refrigerator for up to 5 days. The cool environment preserves the caramel glaze and keeps the interior chewy. When ready to serve, let them sit at room temperature for 10 minutes or pop them in the microwave for 10‑15 seconds.
Freezer Friendly
These cookies freeze beautifully. Layer them between sheets of parchment paper in a zip‑top bag, and they’ll last up to 3 months. To reheat, microwave for 20 seconds, then finish in a 300°F oven for 5 minutes. The quick splash of water before reheating (just a teaspoon) creates steam that revives the soft interior.
Best Reheating Method
For the ultimate “just‑out‑of‑the‑oven” experience, preheat your oven to 325°F, place the cookies on a baking sheet, and warm for 6‑8 minutes. The glaze will re‑gloss, and the center will become molten again, making each bite feel freshly baked.