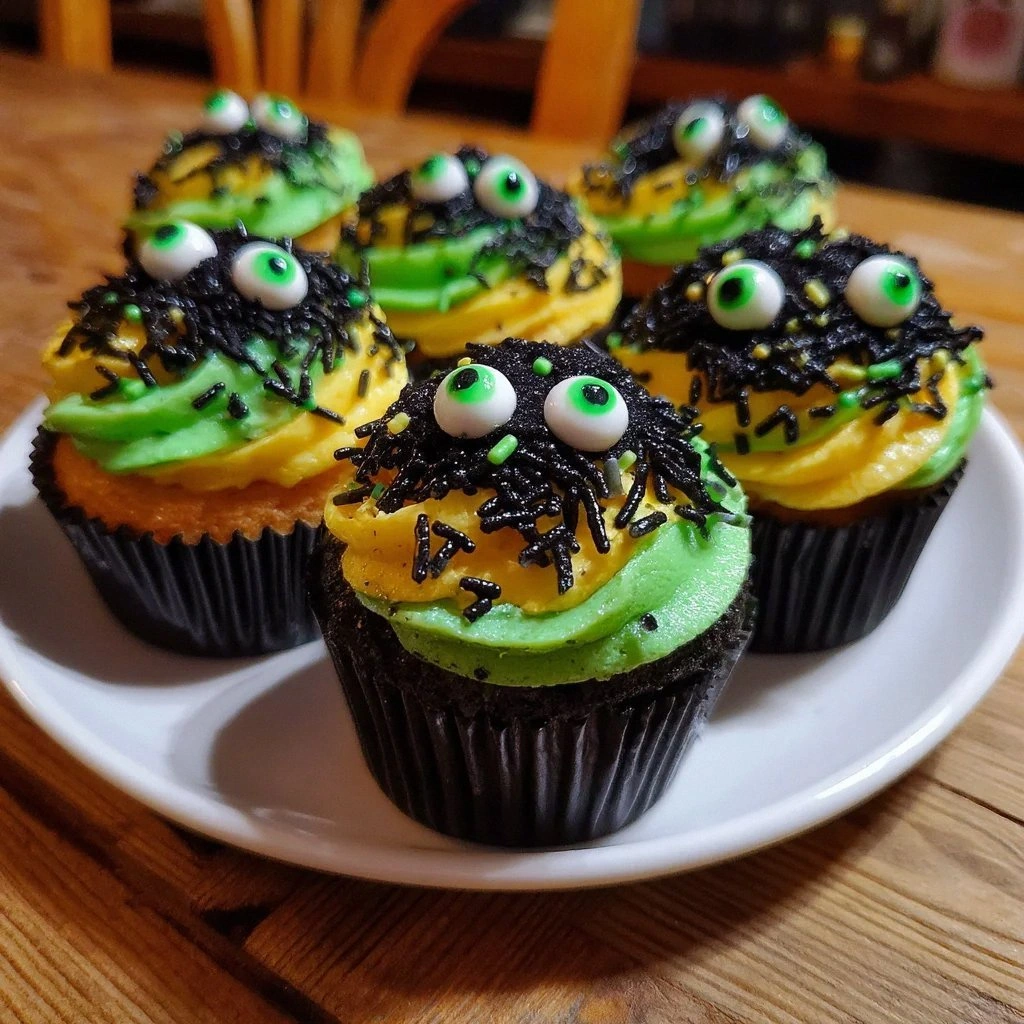
Last Saturday, I set out to make “something cute” for the neighborhood Halloween potluck and accidentally summoned a tray of chocolatey, neon-slime monsters that disappeared faster than free candy on October 31st. My kitchen looked like a science lab mid-explosion: black batter splattered across the counter, neon frosting oozing like radioactive lava, and candy eyes staring up at me from every conceivable crevice. Somewhere between the third taste-test and the fourth nervous giggle, I realized I had cracked the code for the ultimate spooky cupcake—one that tastes like a cloud of midnight chocolate and looks like it crawled out of a cartoon swamp. If you’ve ever wanted a dessert that makes kids squeal, adults hover protectively over the platter, and Instagram light up like a jack-o’-lantern, you’re in the right haunted kitchen.
Picture this: you pull the cupcakes from the oven and the whole house smells like cocoa and vanilla had a moonlit tryst. The tops spring back under your finger like a plush velvet cushion, but the real drama hides inside—a molten core of yellow custard that oozes out like friendly slime when you bite through. Then comes the frosting, whipped to satin peaks and tinted the exact shade of ectoplasm you begged your parents to buy you in second grade. Pipe it on in looping, drippy swoops, dot with candy eyes, and suddenly every little goblin at the party wants to know which bakery you robbed. I dare you to taste one and not go back for seconds; I personally inhaled three before the cream cheese even had time to come to room temperature. Confession time: I originally made these for the kids, yet the grown-ups formed an underground negotiation ring to smuggle extras into their coat pockets.
Most Halloween desserts are all show and no flavor—sugar bombs that look cute but taste like regret and neon food dye. These cupcakes flip the script. They’re moist, deeply chocolatey, and just sweet enough to keep you reaching for another, while the custard center delivers that theatrical “slime” moment without cloying sweetness. The secret weapon? A whisper of almond extract in the batter that fools your brain into thinking the chocolate is darker and richer than it actually is. Oh, and the black cocoa powder we’re using—think Oreo in powdered form—gives that midnight color naturally, so you need less artificial coloring. Stay with me here—this is worth it.
Let me walk you through every single step—by the end, you’ll wonder how you ever made it any other way.
What Makes This Version Stand Out
- Flavor Depth: Black cocoa plus a kiss of almond extract gives you the chocolate equivalent of a velvet cape—smooth, dark, mysteriously elegant.
- Textural Theater: Soft sponge, oozy custard, and fluffy frosting create a three-act play in your mouth; every bite is a plot twist.
- Color Without Chaos: We tint batter and frosting just enough to read “slime,” not “nuclear waste,” so your tongue stays Halloween-free while your eyeballs party.
- Kid-Proof, Adult-Approved: Simple one-bowl batter means tiny gremlins can help; sophisticated cocoa notes mean the grown-ups hover just as eagerly.
- Make-Ahead Magic: Bake the cupcakes, freeze them naked, then whip up frosting and custard on party day—no last-minute panic spiral.
- Instagram Gold: The neon slime drip plus candy eyes equals instant likes; no filter required, no fancy piping skills needed.
Alright, let's break down exactly what goes into this masterpiece...
Inside the Ingredient List
The Flavor Base
Baking spread or unsalted butter forms the fatty backbone of these cupcakes, giving them that bakery lushness and keeping crumbs tender for days. Caster sugar dissolves lightning-fast, so you won’t bite into gritty crystals—instead you get an even, velvety crumb that holds the black cocoa like a velvet theater curtain holds stage lights. Large eggs bind everything together while adding moisture; skip them and your cakes will taste like chocolate sawdust. Vanilla extract is the supporting actor who never gets applause but always makes the star look good—leave it out and the whole performance falls flat.
The Texture Crew
Self-raising flour already carries the perfect ratio of baking powder to flour, which means we avoid the “oops I added too much leavening and now my cupcakes look like top hats” disaster. Black food coloring is optional but dramatic; a few drops deepen the natural darkness of cocoa so your cakes look like midnight rather than milk-chocolate dusk. If you skip it, the flavor stays identical, but you’ll lose that witchy wow factor. Tinned custard is our secret slime agent—buy the good stuff with real vanilla specks, not the neon yellow pudding impersonator.
The Unexpected Star
Butter for frosting should be slightly cool but dentable; too soft and you’ll end up with soup, too cold and you’ll break your mixer. Icing sugar needs a quick sift unless you enjoy frosting that feels like beach sand between your teeth. Milk loosens the buttercream to piping consistency—add it a teaspoon at a time until the frosting ribbons off the spoon like molten green silk. Green and yellow food coloring work as a team: green gives the swamp, yellow gives the glow, together they shout “slime” without veering into radioactive.
The Final Flourish
Candy eyes are non-negotiable; they’re the googly finishing touch that turns simple cupcakes into cartoon monsters. Buy the flat-backed version so they stick upright instead of rolling off like tiny sugar snowballs. Green sprinkles add crunch and sparkle—look for the skinny jimmies rather than the fat pearls, because we want grassy texture, not rock-candy boulders.
Everything's prepped? Good. Let's get into the real action...
The Method — Step by Step
- Heat your oven to 350°F (175°C) and line a 12-hole muffin tin with black or orange paper cases—because presentation starts now, not at the frosting stage. In a stand mixer, beat the baking spread and caster sugar for a full three minutes; the mixture should turn pale, fluffy, and look like butterscotch clouds. Don’t rush this—sugar needs time to cut air pockets into fat so your cupcakes rise like champs instead of squatting like sad hockey pucks. Scrape the bowl once halfway so no stealth butter chunks lurk at the bottom.
- Crack in the eggs one at a time, letting each emulsify before the next joins the party. Splash in the vanilla and almond extracts; the scent will make you want to dab it behind your ears. If the batter curdles, sprinkle in a spoonful of flour and watch it smooth back into satin—this is baking’s equivalent of a diplomatic rescue. Okay, ready for the game-changer?
- Sift the self-raising flour and black cocoa together onto parchment; this aerates the cocoa so you don’t end up with bitter clumps. Fold the dry mix into the batter in three batches, alternating with a tablespoon of milk per batch. The batter should morph from speckled gray to midnight velvet—thick enough to mound on a spoon yet loose enough to slump off. Add black food coloring drop by drop until the color looks like a moonless sky; remember it lightens slightly during baking.
- Divide the batter among the cupcake liners, filling each two-thirds full—any more and they’ll volcano over the sides like tiny chocolate Mount Vesuvius. Bake for 18–20 minutes, rotating the pan at the halfway mark for even browning. They’re done when the centers spring back under a gentle finger press and a toothpick comes out with a few moist crumbs, not wet streaks. Cool in the tin for five minutes, then transfer to a rack; warm cupcakes are fragile, so handle them like sleepy kittens.
- While the cakes cool, poke a small hole in the center of each using the back of a piping tip or an apple corer, going two-thirds deep—this is the secret tunnel for our slime. Spoon tinned custard into a piping bag fitted with a narrow nozzle; if the custard feels like set pudding, zap it for ten seconds and stir until it flows like thick lava. Insert the nozzle into each cavity and squeeze until the custard kisses the top—stop before it overflows like a haunted ooze geyser. The cupcakes will feel heavier in your hand, promising that dramatic drip later.
- For the frosting, beat cool butter for five minutes—yes, five—until it resembles whipped cream cheese and leaves streaks like clouds across the bowl. Sift in icing sugar in two additions, beating each until fully absorbed before the next snowfall. Splash in milk a teaspoon at a time until the buttercream ribbons off the beaters like thick paint. Now the fun part: add one drop of green and one drop of yellow coloring, then beat for thirty seconds. The color should look like Nickelodeon slime—bright, zesty, unapologetically artificial yet weirdly natural against chocolate.
Watch Out: Over-mixing after adding color warms the frosting and can cause separation. Stop as soon as the hue looks even.
- Fit a piping bag with a large star tip and swirl the slime frosting in big, looping rosettes that drip just slightly over the edges—think lava flow, not perfect beehive. Press candy eyes gently into the frosting while it’s still tacky; they’ll stick like tiny googly sentinels. Scatter green sprinkles over the top for sparkle that catches party lights like disco glitter. Stand back and admire your army of edible monsters—they’re ready to terrorize taste buds and camera rolls alike.
- Chill the finished cupcakes for fifteen minutes so the frosting sets; this prevents tragic smearing when you stack them for transport. Serve at room temperature for maximum flavor bomb impact—the custard will ooze dramatically when bitten, earning gasps and Instagram boomerangs. Store leftovers (if such mythical things exist) in an airtight container in the fridge, but let them sit out for twenty minutes before serving so the frosting softens back to silk. Picture yourself pulling these out at the party, the whole kitchen smelling like Willy Wonka’s lab after dark.
That's it—you did it. But hold on, I've got a few more tricks that'll take this to another level...
Insider Tricks for Flawless Results
The Temperature Rule Nobody Follows
Room-temperature eggs and butter emulsify like a dream, creating tiny air bubbles that expand in the oven for sky-high domes. Cold eggs shock the butter into clumps, leaving you with greasy sinkholes. Leave dairy on the counter for thirty minutes before baking, or cheat: microwave butter on 20% power in five-second bursts until just dentable. Your cupcakes will rise evenly, not like the leaning Tower of Pisa.
Why Your Nose Knows Best
Trust your sense of smell more than the timer. When the custard-filled centers start to caramelize, a faint toasty aroma wafts out—this signals they’re moments from perfect. If you wait for a toothpick to come out completely clean, you’ve already overshot into dry territory. Pull them when the edges look matte and the centers still shimmer like unset gelatin.
The 5-Minute Rest That Changes Everything
After frosting, park the cupcakes in the fridge for five minutes—not longer, or the cake tightens. This quick chill sets the outer buttercream so you can pile on sprinkles without them sinking into sticky quicksand. A friend tried skipping this step once; let’s just say her eyeballs slid south like sad snowmen. Five minutes buys you Instagram-worthy stability without sacrificing that cloud-like bite.
Color Layering Magic
For an even creepier effect, tint half the custard with orange food coloring and pipe both colors into the same cavity in a zig-zag. When bitten, orange and yellow slime swirl together like toxic lava lamps. Kids lose their minds, and adults ask how you engineered it—just nod mysteriously and promise to share the recipe “later.”
Creative Twists and Variations
This recipe is a playground. Here are some of my favorite ways to switch things up:
Neon Swamp Monsters
Swap the chocolate batter for a classic vanilla base tinted electric green, then fill with purple custard. Top with black-colored frosting and glow-in-the-dark sprinkles (yes, they exist). The color contrast is so retina-searing you’ll need sunglasses, but the flavor stays mellow and crowd-pleasing.
Mummy Mayhem
Keep the chocolate base, but pipe white buttercream in horizontal stripes across the top, leaving gaps for candy eyes to peek through. Dust with powdered sugar “bandage wrappings” and serve with a side of raspberry “blood” coulis for dipping. It’s equal parts creepy and classy.
Pumpkin Patch Surprise
Add a teaspoon of pumpkin pie spice to the batter and fill with cream-cheese custard. Tint frosting burnt orange and top with mini fondant pumpkins. The warm spices cozy up to chocolate like flannel pajamas on a crisp October night.
Galaxy Goo
Replace black cocoa with dark cocoa and swirl in edible star glitter. Fill with blue-raspberry custard and frost with navy buttercream splattered with white food-color paint for star clusters. Kids swear they’re eating outer space; parents appreciate the sophisticated cocoa depth.
Double-Decker Slime
Bake mini cupcakes, core and fill, then stack two with a dab of frosting between them for a two-story monster. Double the slime, double the gasps. These tower treats are perfect for centerpiece displays—just add a lollipop stick down the center for stability.
Sugar-Free Spook
Substitute granulated erythritol for caster sugar and use sugar-free custard made with stevia. The texture is slightly less tender, but the flavor still delivers. Perfect for classroom parties with dietary restrictions—no one feels left out of the slime brigade.
Storing and Bringing It Back to Life
Fridge Storage
Place cupcakes in an airtight container lined with paper towel to absorb condensation; they’ll keep for three days without drying. Store them single-layered; stacking smears the eyes and turns your monsters into abstract art. Let sit at room temp for twenty minutes before serving—cold frosting tastes like hardened wax, and nobody wants that tragedy.
Freezer Friendly
Flash-freeze unfrosted cupcakes on a tray until solid, then zip into freezer bags for up to two months. Thaw overnight in the fridge, then refresh in a 300°F oven for five minutes to revive the just-baked aroma. Frost and decorate after thawing; custard freezes fine, but the visual ooze is less dramatic once defrosted.
Best Reheating Method
If you must reheat already-frosted cakes, microwave on 30% power for eight-second bursts—any longer and the custard erupts like a science-fair volcano. Alternatively, place in a 275°F oven for five minutes with a small mug of water on the rack; the steam revives crumb softness without melting the frosting into a puddle. Add fresh eyes and sprinkles post-warm-up for maximum wow.